Showing posts with label main course. Show all posts

Monday, March 16, 2015

Salmon Cakes


Lately, I've been trying to add a little more salmon into our diet.  We usually eat fish once a week and I've just been focusing on salmon for those meals. I've also been buying the more expensive, wild-caught salmon at our local grocery story and it makes such a difference in taste (and nutrition)! I highly recommend it. 

I'm happy to have found some excellent salmon recipes to add to our repertoire! These salmon cakes were wonderful - while I made them back in February, they seem to be especially fitting for spring.  They're pretty easy to make and come together quickly.  Altogether, they probably can be made in about 30 minutes from start to finish.  I also love that I can mix it up ahead of time while my toddler naps in the afternoon and then refrigerate it until I'm ready to cook them at dinner.  It makes dinnertime go even smoother! I served this with roasted potatoes and sauteed shredded Brussels sprouts, although something like asparagus would be very fitting for a spring menu.

Salmon Cakes
Taken from: Cook's Illustrated
Serves 4 as a main course
  • 3 tablespoons plus 3/4 cup panko bread crumbs
  • 2 tablespoons minced fresh parsley
  • 2 tablespoons mayo or plain Greek yogurt
  • 4 teaspoons lemon juice
  • 1 scallion, sliced thin (I omitted)
  • 1 small shallot, minced (I used about 1/4 cup minced onion instead)
  • 1 teaspoon Dijon mustard
  • 3/4 teaspoon salt
  • 1/4 teaspoon pepper
  • pinch cayenne pepper
  • 1 to 1 1/4 pound skinless salmon fillet, cut into 1-inch pieces
  • 1/4 - 1/2 cup canola oil (I haven't tried it yet but I think you could also use coconut oil here instead)
  1. Combine 3 tablespoons panko, parsley, mayonnaise/yogurt, lemon juice, scallion, shallot, mustard, salt, pepper, and cayenne in bowl. Working in 3 batches, pulse salmon in food processor until coarsely chopped into 1/4-inch pieces, about 2 pulses, transferring each batch to bowl with panko mixture (if you do not have a food processor, you could also try very finely chopping the salmon with a knife). Gently mix until uniformly combined.
  2. Place remaining 3/4 cup panko in pie plate. Using 1/3-cup measure, scoop level amount of salmon mixture and transfer to baking sheet; repeat to make 8 cakes. Carefully coat each cake in bread crumbs, gently patting into disk measuring 2 3/4 inches in diameter and 1 inch high. Return coated cakes to baking sheet.
  3. Heat 1/4 cup oil in 12-inch skillet over medium-high heat until shimmering. Place salmon cakes in skillet and cook without moving until golden brown, about 2-3 minutes. Carefully flip cakes (add up to 1/4 cup of more oil if necessary) and cook until second side is golden brown, 2-4 minutes. Transfer cakes to paper towel–lined plate to drain 1 minute. Serve.

Wednesday, April 9, 2014

Beef & Broccoli Stir-Fry


This dish was born out of necessity because I had half a package of top sirloin left and broccoli from our garden to use(!!).  This is my first time trying a vegetable garden (actually, it's pretty much my first time trying to grow anything), so it was nice to actually be able to enjoy anything from there.

Beef and broccoli seems like a classic combination so I was excited to try it at home.  We both really enjoyed this dinner, although it didn't hurt that we were able to sit out on our back patio and soak up the end of a beautiful day while we had dinner. I love spring here.

I served this with quinoa (I recommend that or rice to soak up some of the sauce!) and potstickers on the side.

Beef & Broccoli
Taken from: Mel's Kitchen Cafe
Serves 4-6

Sauce:
  • 1 tablespoon rice wine vinegar
  • 2 tablespoons low-sodium chicken broth
  • 5 tablespoons oyster sauce
  • 2 tablespoons light brown sugar
  • 1 teaspoon toasted sesame oil
  • 2 teaspoons cornstarch
Beef and Broccoli:
  • 3 tablespoons soy sauce
  • 1 1/2 pounds flank steak, cut into 2-inch-wide strips with the grain, then sliced across the grain into 1/8-inch-thick slices (I used 1 pound of top sirloin instead)
  • 6 medium cloves garlic, pressed through garlic press or minced (about 2 tablespoons)
  • 1-inch piece fresh ginger, minced (about 1 tablespoon)
  • 1 teaspoon peanut oil or vegetable oil, plus extra for cooking
  • 1 1/4 pounds broccoli, cut into bite-sized pieces
  • 1/3 cup water
  • 3 medium scallions, sliced 1/2-inch thick on diagonal, optional

  1. In a medium bowl, combine beef and soy sauce. Cover with plastic wrap and refrigerate at least 10 minutes or up to 1 hour. Meanwhile, whisk the sauce ingredients together in a liquid measure or small bowl. In another small bowl, combine garlic, ginger, and 1 teaspoon peanut oil. Set aside.
  2. Heat 1-2 teaspoons peanut oil in 12-inch nonstick skillet over medium-high heat until hot and rippling. Add half of beef to skillet and break up clumps; cook, without stirring, for 1 minute, then stir and cook until beef is browned around edges and cooked through, about 1-2 minutes. Don't overcook the meat - cook until just barely cooked through so the meat stays tender. Transfer beef to a medium bowl and cover with a lid and tin foil. Heat another 1-2 teaspoons peanut oil in the skillet and repeat with remaining beef.
  3. Add 1 tablespoon peanut oil to now-empty skillet; heat until rippling and hot. Add broccoli and cook 30 seconds; add water, cover pan, and lower heat to medium. Steam broccoli until tender-crisp, about 2 minutes. Push the broccoli to the sides of the skillet and add the garlic/ginger mixture. Cook, mashing the mixture with a spoon, until fragrant, about 15-30 seconds. Stir the mixture into the broccoli. 
  4. Add the beef back to skillet and toss to combine. Whisk the sauce to recombine and add to the skillet. Cook, stirring constantly, until sauce is thickened and evenly distributed, about 1-2 minutes. 
  5. Transfer to a serving platter, sprinkle with scallions (if using), and serve.

Monday, September 2, 2013

Chicken Fajitas


I first made this recipe for my husband's birthday.  While we technically have a grill (and I would love to try to make grilled chicken fajitas someday!), it doesn't have any grill grates so it's not exactly usable at this point.  So I needed to find a recipe that could be done on the stove or in the oven.  And, of course, Cook's Illustrated delivered.

While this does take some time to make, this recipe wasn't too hard and I love that much of it can be prepped ahead of time.  You cook the chicken on the stove, and the vegetables, surprisingly, get broiled in the oven (the onions are especially good).  And the end result is amazing!  Probably one of my favorite dishes that we've had all year.  We loved it so much that we served it to his parents when they came to visit a few weeks later.

I never could get the tortillas warmed by their recommended method so I always ended up putting them in the microwave for about 30 seconds right before serving.  But I've still included the instructions, in case you have more success than I did!

We served this with homemade tortillas, homemade salsa, homemade guac, homemade Greek yogurt, and black beans on the side.  And, of course, my husband's amazing margaritas!

Chicken Fajitas
Taken from: Cook's Illustrated
Serves 4-6
  • 1/3 cup lime juice (from 2 to 3 limes)
  • 4 tablespoons vegetable oil
  • 3 medium cloves garlic, minced or pressed through garlic press (about 1 tablespoon)
  • 1 tablespoon Worcestershire sauce
  • 1 1/2 teaspoons brown sugar
  • 1 jalapeño chile, seeds and ribs removed, chile minced
  • 1 1/2 tablespoons minced fresh cilantro leaves
  • Salt and ground black pepper
  • 3 boneless, skinless chicken breasts (about 1 1/2 pounds), trimmed of fat, tenderloins removed, breasts pounded to 1/2-inch thickness
  • 1 large red onion (about 14 ounces), peeled and cut into 1/2-inch-thick rounds (do not separate rings) -- we liked this so much I might have to double the onions next time
  • 1 large red bell pepper (about 10 ounces), quartered, stemmed, and seeded
  • 1 large green bell pepper (about 10 ounces), quartered, stemmed, and seeded
  • 8 - 12 plain flour tortillas (6-inch) - I recommend homemade!
  • Toppings: salsa (I recommend homemade), guacamole (I recommend homemade), sour cream/plain Greek yogurt
  1. In medium bowl, whisk together lime juice, 2 tablespoons oil, garlic, Worcestershire, brown sugar, jalapeño, cilantro, 1 teaspoon salt, and 3/4 teaspoon pepper. Reserve 1/4 cup marinade in small bowl; set aside. Add another teaspoon salt to remaining marinade. Place chicken in marinade; cover with plastic wrap and refrigerate 15 minutes (I often refrigerate mine for several hours if it's more convenient).
  2. Adjust one oven rack to upper-middle position (about 8 inches from heating element) and second rack to lower-middle position; heat broiler.
  3. Brush both sides of onion rounds and peppers with 2 tablespoons oil and season with salt and pepper. Arrange onion rounds and peppers (skin sides up) in single layer on rimmed baking sheet. Wrap tortillas securely in foil in two packets, each containing half of tortillas.
  4. Remove chicken from marinade and pat dry with paper towels; discard marinade. Heat remaining 2 teaspoons oil in 12-inch nonstick or cast-iron skillet over medium-high heat until just beginning to smoke. Swirl oil to coat skillet, then arrange chicken smooth side down in skillet in single layer; cook without moving chicken, until well browned, about 3 minutes. Using tongs, flip chicken; continue to cook until second sides are well browned, about 2 minutes. Reduce heat to medium and continue to cook, turning chicken once or twice, until chicken is no longer pink when cut into with paring knife or instant-read thermometer inserted in thickest part registers 160 degrees, 3 to 5 minutes longer. Transfer chicken to large plate and let rest 5 minutes.
  5. While chicken is cooking, place baking sheet with vegetables in oven on upper rack; place tortilla packets on lower rack. Broil vegetables until spottily charred and peppers are crisp-tender, 6 to 8 minutes. Using tongs, transfer peppers to cutting board. Flip onion rounds and continue to broil until charred and tender, 2 to 4 minutes longer. Turn off broiler and remove vegetables, leaving tortillas in oven until needed.
  6. Separate onions into rings and place in medium bowl; slice bell peppers lengthwise into 1/4-inch strips and place in bowl with onions. Add 2 tablespoons reserved unused marinade to vegetables and toss well to combine. Slice chicken into 1/4-inch strips and toss with remaining 2 tablespoons reserved marinade in separate bowl; arrange chicken and vegetables on large platter and serve with warmed tortillas and any additional toppings.

Wednesday, June 12, 2013

Crispy Buffalo Corn & Quinoa Patties


It certainly has been a while.  We've been a little busy...getting ready for a move, going on vacation, buying our first home...yikes! And I have a feeling it'll only stay busy until we're finally settled in.

But enough of that and onto food. I absolutely love meatless patties (these are some of our favorites!).  Don't get me wrong, when I want a hamburger, it will definitely be beef (preferably topped with bacon and cheddar).  But for a weeknight meal, meatless sliders fit the bill.  They don't take much time to make, can be made ahead of time, are pretty healthy and have tons of flavor combinations that you can try.  This one had a buffalo wing sauce flavor.  The buffalo wing sauce added a nice kick of heat, which went well with the sweet corn.

We served ours on hamburger buns with a salad on the side (actually, one of these patties on top of a salad would also be excellent)!

Crispy Buffalo Corn & Quinoa Patties
Taken from: How Sweet It Is
Makes about 8 patties
  • 2 cups cooked quinoa
  • 1 cup sweet corn (cooked or raw)
  • 4 scallions, sliced
  • 2 garlic cloves, minced
  • 2 tablespoons freshly chopped cilantro
  • 1/3 cup finely grated romano cheese (I omitted)
  • 1/4 cup panko bread crumbs
  • 2 tablespoons flour (I had to add about 1 additional tablespoon to help the patties hold together)
  • 2 large eggs
  • 2 tablespoons buffalo wing sauce + more for topping (you can use 1 tablespoon of melted butter plus 1 tablespoon of hot sauce to make buffalo wing sauce)
  • 1/4 teaspoon salt
  • 1/4 teaspoon pepper
  • 2-3 tablespoons olive oil
  • Toppings: cheddar cheese, lettuce, tomato, pickle, etc
  • 8 smaller buns or dinner rolls, toasted (I used these hamburger buns)
  1. In a large bowl, combine quinoa, corn, scallions, garlic and cilantro. Mix well to combine. Add in cheese, panko, flour, salt and pepper, tossing again to mix. Stir in eggs and buffalo wing sauce until the mixture is moistened, then using your hands, form patties by pressing the quinoa together (you can squeeze it together into your hands to form a patty, and then smooth out the sides). Set the patties on a plate.  At this point, you can refrigerate the patties until ready to cook.
  2. Heat a large skillet over medium to medium-high heat and add olive oil. Add patties and cook until crispy, about 3-4 minutes per side.

Tuesday, April 23, 2013

South Indian Lentil Cakes with Raita


This seems like an unlikely recipe to share.  Just by looking at the picture, you think, "Wow, that's...green." But even if the color catches you off guard, we really enjoyed these Indian lentil cakes!  Of course, it didn't hurt that it's served with a yogurt sauce called raita (I happen to be a huge fan of yogurt sauces like tzatziki).

I did alter the recipe to suit what we had on hand.  The mint at the store looked terrible so I just omitted it in both the raita and the lentil cakes.  Mint is such a distinct flavor that I'm sure it would have changed the taste of the cakes. I used up my cucumber in another dish so I had to omit that from the raita, too (although I'm sure it would have been delicious!).

Finally, this recipe reminded me of how much we LOVE roasted garlic. I hadn't made it in forever but since making these lentil cakes, I've roasted garlic twice in the past few weeks.  If you've never made roasted garlic, it takes away any sharpness or harshness from the garlic and creates a smooth, mellow flavor.  I highly recommend it!

The lentils and rice in this recipe do need to be soaked for several hours -- you can do this a day in advance if you'd like and just drain and refrigerate it.  I served this with naan and roasted cauliflower.

South Indian Lentil Cakes with Raita
Taken from: The Sweets Life
Serves 4-6

For the Raita-
  • -1 head of garlic
  • -1 tbsp extra-virgin olive oil
  • -kosher salt & freshly ground pepper
  • -1/4 tsp ground cumin
  • -1 cup plain yogurt
  • -1/4 cup finely chopped peeled seeded cucumber (I didn't have on hand so I omitted)
  • -2 tbsp fresh cilantro, chopped
  • -2 tbsp fresh mint, chopped (I didn't have on hand so I omitted)
  • -1/2 tsp (or more) fresh lemon juice
For the Lentil Cakes-
  • -1 cup lentils
  • -1/2 cup basmati rice (I used regular white rice)
  • -2 garlic cloves, minced
  • -2 tsp chopped peeled fresh ginger
  • -1 jalapeño, seeded and minced
  • -1 cup spinach
  • -1 cup peas, thawed
  • -1/2 cup fresh cilantro, chopped
  • -1/2 cup scallions, chopped (I used chopped onion instead)
  • -1/3 cup fresh mint, chopped (I didn't have on hand so I omitted)
  • -2 tsp kosher salt
  • -2 tsp freshly ground pepper
  • -2-3 tbsp extra-virgin olive oil
  1. Rinse the lentils and place in a medium bowl with the rice. Add water so that everything is covered by 3 inches and set aside at room temperature for 3-5 hours.
  2. Preheat oven to 450F. Cut the top half inch off of the head of garlic and place garlic on a piece of foil. Drizzle with olive oil and sprinkle with salt and pepper. Wrap in foil and roast for 40-45 minutes, until tender. Let cool.
  3. Place lentils and rice in the bowl of a food processor. Add remaining lentil cake ingredients (except for olive oil) and puree until a thick paste forms.
  4. Add about 1 tbsp olive oil to a large nonstick skillet over medium-high heat. Use a 1/4 cup measuring cup to place balls of the lentil mixture on the skillet. Flatten slightly with a spatula to form cakes. Cook for approximately 4-5 minutes per side, until cake is golden brown on each side. Repeat with remaining batter, adding additional oil as needed.
  5. Meanwhile, make the raita by combining the yogurt, cumin, cucumber, mint, cilantro, and lemon juice. Season with salt, pepper, and more lemon juice, if desired.
  6. Serve cooked lentil cakes with raita and roasted garlic cloves.

Saturday, March 9, 2013

Spice Rubbed Chicken


My husband and I were really impressed with this spice rubbed chicken recipe.  To be honest, I was just looking for something that looked simple (and also would go well with sweet potatoes and brussels sprouts...I've been known to plan the meals around the side dishes).  But it made for an incredibly flavorful meal.  And the leftovers for lunch the next day were also great!

This is really a simple recipe.  Combine some spices, rub on chicken and then cook the chicken.  I really liked the cooking method -- you sear both sides of the chicken in a pan and then finish cooking it in the oven.  I think it's also important to let the chicken rest for several minutes after cooking -- it won't be as hot but it helps the chicken absorb all the juices back.  And that was one of our favorite things about this meal was that the chicken was so moist.

I served this with sweet potatoes and a Brussels sprouts salad (don't be surprised if you see the recipe for the salad in the next week or two...).  It was a great dinner without a great deal of effort!

Spice-Rubbed Chicken
Taken from: Peanut Butter Runner
Serves 4
  • 2 teaspoons chili powder
  • 1/2 teaspoon ground cumin
  • 1/2 teaspoon ground coriander
  • 1/2 teaspoon freshly ground black pepper
  • 1/4 teaspoon ground cinnamon
  • 1 1/2 teaspoons salt
  • 1 tablespoon olive oil, plus extra for the pan
  • 3/4-1 pound boneless, skinless chicken breasts
  1. Preheat oven to 400 degrees. Rinse and pat dry chicken.
  2. Stir together spices, salt and 1 tablespoon of oil. Rub all over chicken. Heat another tablespoon of oil in an ovenproof heavy skillet (preferably not non-stick) over medium-high heat until hot but not smoking (I actually used bacon fat because that's what I had on hand). Add chicken and brown on both sides, about 6 minutes total (3 minutes per side).
  3. Transfer skillet to middle rack of oven and roast, until just cooked through, 8-15 minutes (Note, if you are using a nonstick skillet, you need to transfer the chicken to a different baking dish that is oven-safe.)  The cooking time will vary based on the size of your chicken breasts but the internal temperature will read 160 when the chicken is done.  Let the chicken rest for several minutes to help absorb all the juices.

Thursday, February 14, 2013

Mediterranean Orzo Chickpea Salad


I love that you can make this Mediterranean salad ahead of time. With a new baby, meals that I can prep in advance become especially important.   I combined everything but the spinach, feta and orzo in a large bowl in the afternoon and then let it sit in the fridge until dinnertime. (I'm also guessing this actually helps the flavors meld together, too.)  For dinner, all I had to do was cook some orzo and chop some spinach.  It couldn't have been an easier meal to put together!

My husband and I both really, really enjoyed this.  We ate it warm (because of the freshly cooked orzo) for dinner although I also enjoyed the leftovers cold from the fridge for lunch the next day.  I actually served this as a main course along with some roasted butternut squash but I think it would also make a great side dish and could even be easy to transport to someone's house as well.


Mediterranean Orzo Chickpea Salad
Taken from: Tasty Kitchen
Serves 4-5 as a main dish
  • 3 Tablespoons Red Wine Vinegar (I used 1 tablespoon red wine vinegar and 2 tablespoons lemon juice)
  • 1 teaspoon Dried Oregano
  • 1-2 cloves Garlic, Minced
  • ¼ cup Extra Virgin Olive Oil
  • ½ teaspoon Kosher Salt
  • ½ teaspoon Freshly Ground Black Pepper
  • 1 1/4 cup Orzo
  • 1/2 cups (1 15 Ounce Can) Chickpeas, Drained And Rinsed
  • 1-2 cups Baby Spinach Leaves, Chopped
  • ½ pints Cherry Tomatoes, Halved (I omitted the tomatoes because it's the dead of winter but would be great in the summer!)
  • ¼ cups Pitted Kalamata Olives, sliced
  • ¼ cups Crumbled Feta Cheese
  • ½ whole Red Onion, Diced (I omitted)
  • 1 red bell pepper, chopped
 
1. Whisk together the vinegar, oregano, and garlic in a small bowl. Gradually whisk in the olive oil and season with salt and pepper, to taste.
2. Bring a large pot of salted water to a boil. Add the orzo and cook for 8 to 10 minutes, according to package instructions for al dente.
3. Meanwhile, combine the chickpeas, spinach, tomatoes, olives, feta cheese, and red onion in a large bowl. Drain the orzo and add to the bowl. Add the dressing and toss to coat.

Friday, January 18, 2013

Fast Creamless Tomato Soup


Now that we have a sweet new baby in the house (!!!), let's just say that my cooking style has changed in these past 2 weeks.  Instead of my usual do-it-yourself type cooking, I'm now buying bread, granola, yogurt and tortillas.  (For now.  But I'll be back because everything's just so much tastier -- and cheaper -- made from scratch.)  But right now, I'm not looking for the best recipe per se but the fastest.   Luckily, fast can still be delicious.

I made this tomato soup one afternoon when we needed a quick lunch.  It only needs a few ingredients and didn't take long to make.   There's no cream in this tomato soup but a surprise ingredient is bread which I think gives it a good consistency.  Who would have guessed?  We like our soups on the chunkier side so I only partially blended our soup. 

Altogether, this made a fast and wonderful meal (especially with a grilled cheese sandwich). The leftovers were also great for lunch for the next couple days.

Creamless Creamy Tomato Soup
Taken from: Cook's Illustrated

  • 1/4 cup extra virgin olive oil (I probably only used about 2 Tbsp total)
  • 1 medium onion, diced (about 1 cup)
  • 3 garlic cloves, minced (about 1 tablespoon)
  • pinch red pepper flakes
  • 1 bay leaf
  • 2 (28-oz) cans whole tomatoes packed in juice
  • 1 tablespoon brown sugar
  • 3 large slices good-quality sandwich bread, crusts removed, torn into 1-inch pieces
  • 2 cups low-sodium chicken broth
  • 1/4 cup chopped fresh chives (I omitted)
  1. Heat 2 tablespoons of the oil in a large Dutch oven over medium-high heat. Add the onion, garlic, red pepper flakes and bay leaf. Cook, stirring frequently, until the onion is translucent, about 3-5 minutes. 
  2. Mix in the tomatoes and their juice. Using a potato masher, mash the tomatoes to break them down into smaller pieces (no bigger than 2 inches). Stir in the sugar and bread then bring the soup to a boil. Reduce the heat to medium and cook, stirring occasionally, until the bread is completely saturated and starts to break down, about 5 minutes. Remove the bay leaf.
  3. Turn off the heat under the pot, add the remaining 2 tablespoons of oil and puree the soup with an immersion blender (or, if you don't have one, in a traditional blender - you'll probably want to do it in 2 or 3 batches. Split the remaining 2 tablespoons of oil over the batches as you puree.) Blend to your preferred consistency (we like a chunkier soup) -- you can alsostrain the soup through a fine-mesh strainer if you want a perfectly smooth consistency. Stir the chicken broth into the soup and return the soup to a boil. Season to taste with salt and pepper. Garnish with the chives when serving.

Friday, January 4, 2013

Asian Chicken Lettuce Wraps


While we already have an Asian lettuce wrap recipe that we really like using ground beef, I couldn't resist trying a chicken version.  Chicken lettuce wraps seem like such a classic dish and really aren't hard to make at home.  Perhaps the most labor-intensive part was that I didn't want to get my food processor covered in raw chicken, so I chose to finely chop the chicken instead.  

Like most stir-fries, you want to have all your ingredients ready to go before you start the actual cooking process.  The cooking process goes quickly (it's about 10 minutes altogether), so there's not really time to be chopping veggies while things cook.
Although you could make this a side dish or appetizer, this was our main meal.  I served it with quinoa and roasted broccoli on the side (both were drizzled with a little sesame oil and soy sauce).  I probably couldn't choose a favorite between these chicken lettuce wraps and the beef ones - I highly recommend both!

Asian Chicken Lettuce Wraps
Taken from: Cook's Illustrated magazine, May/June 2012
Serves 4 as a main dish, 8 as a side dish 
  • 1 pound boneless, skinless chicken breast or thighs, cut into rough 1-inch pieces
  • 2 teaspoons Chinese rice cooking wine or dry sherry (I used rice wine vinegar)
  • 2 teaspoons soy sauce
  • 2 teaspoons toasted sesame oil
  • 2 teaspoons cornstarch
Sauce:
  • 3 tablespoons oyster sauce
  • 1 tablespoon Chinese rice cooking wine or dry sherry (again, I used rice wine vinegar)
  • 2 teaspoons soy sauce
  • 2 teaspoons toasted sesame oil
  • 1/2 teaspoon sugar
  • 1/2 teaspoon red pepper flakes, or more, for taste
Stir-Fry:
  • 2 tablespoons vegetable oil
  • 2 celery ribs, diced
  • 1 red bell pepper, thinly sliced
  • 6 ounces shiitake mushrooms, stemmed and sliced thin (I used regular button mushrooms)
  • 1/2 cup water chestnuts, diced (I omitted because I didn't have it on hand)
  • 2 scallions, white parts minced, green parts sliced thin
  • 2 garlic cloves, minced
  • 1 head bibb, romaine or butter lettuce (8 ounces), washed and dried, leaves separated and left whole
  • hoisin sauce, for serving (optional, I omitted)
  • sriracha sauce, for serving (optional -- I just like sriracha)
  • sesame seeds, for serving (optional)
  1. First, prep the chicken. Place chicken pieces on a large plate or two in a single layer. Freeze meat until firm and staring to harden around the edges, about 20 minutes or so. Meanwhile, whisk the rice wine, soy sauce, oil and cornstarch together  in a medium sized bowl. Set aside. Once the chicken has been chilled, transfer about half of it into a  food processor. Pulse until coarsely chopped into 1/4-inch sized pieces, about 7 or 8. Transfer the meat to the bowl with the rice wine-cornstarch mixture and repeat with the remaining chicken chunks. (If you do not have a food processor or if you're like me and do not want to get raw chicken all over your food processor, you can cut the chicken into small, 1/2 inch pieces by hand instead.) Toss the chicken to coat with the rice wine mixture and place in the refrigerator to chill for about 15 minutes.
  2. To make the sauce that will be later used to coat the stir-fried chicken and vegetables, whisk all the ingredients, including the oyster sauce, rice wine, soy sauce, sesame oil, sugar and red pepper flakes. Set aside.
  3. For the stir-fry, it is important that you already have all of the vegetables already prepped and chopped and the chicken chilled. Heat 1 tablespoon oil in a 12-inch nonstick skillet over high heat until very hot, or smoking. Add the chicken and cook, stirring constantly, until opaque and cooked through, 4 to 5 minutes. Remove chicken from pan and set aside in a bowl. Next, cook the vegetables. In the now-empty skillet, heat the remaining 1 tablespoon oil until very hot and smoking. Add the chopped celery and mushrooms and cook, stirring constantly, until the mushrooms have reduced to about half their size and the celery is tender but still crisp, about 3 or 4 minutes. Add the water chestnuts, minced white part of the scallions and garlic and cook, stirring constantly, for about 1 minute. Return chicken to skillet. Whisk set aside sauce to recombine and add to the skillet, tossing the chicken and vegetables in the sauce.
  4. Spoon chicken stir-fry into lettuce leaves and sprinkle with scallion greens. Serve with hoisin sauce if you’d like. 

Tuesday, November 6, 2012

Butternut Squash Risotto


I went over to my sister's house yesterday which was so fun.  We got to chat, she let me raid her closet for clothes and we made dinner together.  We didn't necessarily have a plan in mind for dinner (should we eat out or stay in?) but decided it would be more fun to make dinner together.  She had a butternut squash and using that as our basis, we flipped through her magazine cutouts until we found this butternut squash barley risotto. 

Selfishly, this recipe sounded perfect to me -- not only do I love making risotto (stroll through the recipe index and you'll see this is the third risotto recipe) but squash just so happens to be my fall/winter obsession every year. (Squash was one of the few foods my dad doesn't like so we never had it growing up - I'm making up for lost time!)  And finally, my sister had all the ingredients on hand. 

This was an amazing risotto.  The squash ends up giving the risotto an (even more) incredibly creamy texture.  The barley had a wonderful chew to it which was a nice contrast.  It probably took us close to an hour from start to finish but I didn't feel there was a ton of prep or hands-on work (more time for us to chat!).  It also makes a one-pot meal so cleanup was very, very easy. 

Highly recommended!
Butternut Squash Barley Risotto
Adapted from: Real Simple
Serves 3-4 for main course, 6-8 for side dish
  • 2 tablespoons  olive oil
  • small butternut squash (about 11/2 pounds)—peeled, seeded, and cut into 1-inch pieces (about 3 cups)
  • onion, finely chopped
  • 2 cloves garlic, minced
  • kosher salt and black pepper
  • 1  cup  pearl barley
  • 1/2  cup  dry white wine (I used 1/2 cup water and 1 tbsp lemon juice instead)
  • 3  cups  low-sodium vegetable or chicken  broth
  • 5 ounces baby spinach
  • 1/4 - 1/2 cup grated Parmesan (1-2 ounces), plus more for serving
  • 1  tablespoon unsalted butter

  1. Heat the oil in a Dutch oven or large saucepan over medium-high heat. Add the onion, garlic, ¾ teaspoon salt, and ¼ teaspoon pepper and cook, stirring often, until the onion begins to soften, about 3-4 minutes. Add butternut squash and cook for 2-3 minutes more. 
  2. Add the barley to the vegetables and cook, stirring, for 1 minute. Add the wine/water and cook, stirring, until evaporated, about 1 minute.
  3. Reduce heat to medium.  Add 1 cup broth and cooking until absorbed, stirring occasionally. Add the rest of the broth, 1 cup at a time, stirring until each portion is absorbed before adding the next.  Altogether, this should take about 30-40 minutes.
  4. Stir in the spinach, Parmesan, and butter. Serve with additional Parmesan if desired.

Tuesday, September 25, 2012

Artichoke-Stuffed Chicken Breasts


Wow. This was a seriously good dinner.  I certainly expected both of us to like it - we like artichokes and we like chicken - but what I wasn't expecting was that throughout the entire dinner, we both kept commenting on just how tasty this was.  Leave it to Cook's Illustrated but I think what made a huge difference was the addition of the chopped chicken breast into the filling. This kept the chicken from drying out so we ended up with perfectly cooked chicken and a very flavorful filling. I did adapt this recipe quite a bit  - the original recipe didn't have artichokes but an artichoke-mushroom filling sounded amazing to me (okay, and we happened to have artichokes in the freezer that I wanted to use) so the recipe below is my version.

The sauce was also amazing.  I left out the white wine (being pregnant and all) but even without the wine, it was still so good spooned over the chicken.  Don't leave it out!

I think you could prep everything in a couple of hours or even the day before (prep the chicken, make the filling, roll up the chicken) and refrigerate it when ready to cook.  I'll definitely keep this in mind next time we want a fancier dinner or are planning a dinner party.  I served this with a couscous pilaf and a green salad, which worked very well.

Artichoke-Stuffed Chicken Breasts
Adapted from: Annie's Eats (I'd recommend going to this link if you want the non-artichoke version)
Serves 6
  • 4 boneless, skinless chicken breasts (8 oz. each)
  • 3 tbsp. vegetable or canola oil
  • 1/2 cup sliced mushrooms (I used button but feel free to use another kind)
  • 1/2 small onion, chopped (about 1/2 cup)
  • 2-3 cloves garlic, minced or pressed
  • 1/4 tsp. dried thyme (or 1/2 tsp. fresh chopped thyme)
  • 1-2 tbsp. freshly squeezed lemon juice, divided
  • ½ cup dry white wine (I used water instead)
  • 1 tbsp. chopped fresh parsley, divided
  • ¾ tsp. salt
  • ½ tsp. pepper
  • 1 cup low-sodium chicken broth
  • 1 tsp. Dijon mustard (I did not have on hand so I omitted)
  • 1-2 tbsp. unsalted butter
  • Equipment: food processor, twine, skillet with cover
  1. If your chicken breasts have the tenderloin attached, remove the tenderloins and set aside.  Using a sharp knife, butterfly each chicken breast horizontally, almost all the way through but not quite, leaving the two halves attached like the pages of a book.  Open up the butterflied breasts and lay them out flat.  Place each piece of chicken, laid out flat, in a large zipper-lock bag one at a time.  Pound the chicken pieces to ¼-inch thickness (I omitted this step).  Trim about 1½ inch from the long side of the cutlets, to remove about 1½ to 2 ounces per piece of chicken.  (Use the reserved tenderloins in place of or in addition to the trimmings to equal about ½ cup total reserved chicken pieces.)  Process the trimmings in a food processor until smooth, about 20 seconds.  Transfer the puree to a medium bowl.  Do not wash out the bowl of the food processor.
  2. To make the stuffing, heat 1 tablespoon of the oil in a 12-inch skillet over medium-high heat.  Add the mushrooms and cook, stirring occasionally, for about 4-5 minutes.  Add onion and continue to cook for about 4-5 more minutes, until onion is softened.  Add chopped artichokes and cook about 2 minutes.  Mix in the garlic and thyme and cook just until fragrant, about 30 seconds.  Add 1½ teaspoons of the lemon juice and cook until the moisture has evaporated, about 30 seconds.   Transfer the mixture to the bowl of the food processor.  Return the pan to the heat; add the wine/water and scrape the pan to loosen browned bits.  Transfer the wine mixture to a small bowl and set aside.  Turn off the heat on the pan.
  3. Pulse the mushroom mixture in the food processor until roughly chopped, about five 1-second pulses.  Transfer the mushroom mixture to the bowl with the pureed chicken.  Mix in half of the parsley, and the salt and pepper and pulse once to combine.
  4. With the chicken breasts laid out flat, spread a quarter of the filling mixture over each of the breasts, leaving a clear edge around the perimeter.  Roll up each breast as tightly as possible without squeezing out the filling and place seam-side down.  Tie evenly with 3 pieces of twine around each chicken breast.
  5. Season the chicken pieces with salt and pepper.  Heat the remaining tablespoon of oil in skillet over medium-high heat until just smoking.  Add the chicken bundles and brown on all sides, about 2 minutes per side.  Add the broth and reserved wine/water mixture to the pan and bring to a boil.  Reduce the heat to low, cover, and cook until a thermometer inserted into the thickest part of the chicken reads 160˚ F, about 12-18 minutes.  Transfer to a plate or cutting board and tent loosely with foil.
  6. While the chicken is resting, whisk the mustard into the cooking liquid.  Bring the heat to a high simmer, scraping the pan bottom to loosen browned bits.  Simmer until reduced to ½ cup, about 7-10 minutes.  Off the heat, whisk in 1 Tbsp. butter, remaining parsley and lemon juice.  Season with salt and pepper, adding more butter and/or lemon juice to taste.  Remove the pieces of twine, slice the chicken pieces on a slight diagonal, and serve with sauce spooned over the top.

Saturday, August 25, 2012

Coffee-Rubbed Pork Tenderloin


This recipe had me at the word "coffee."  My husband and I love coffee and I've used it in desserts before (adding a little espresso powder to brownies or double chocolate cookies is a wonderful thing!) but I've never made a savory dish with it.  And it just so happens that pork tenderloin is probably my favorite type of meat so I was sold.
 
A huge bonus to this dish is that it's very quick-cooking (although if you're pan-searing it, open the windows! Our little apartment can get smoky pretty quickly) and no chopping required which means you can have it prepped, cooked and on the table in less than 30 minutes.  And this was exactly what I needed on a weeknight.
 
One thing I love about pork tenderloin is just how juicy and flavorful it can be.  This rub doesn't add a ton of flavor but adds a great smokiness to the pork.  I really enjoyed this - it was such a simple and tasty meal (I served this with the chickpea & barley side dish as well as a green salad).
 
The original recipe gave directions for grilling the pork but since we don't have a grill, I used my stove-to-oven method which works for me every time.  I provided directions below for grilling as well as stove-to-oven.
 
Coffee-Rubbed Pork Tenderloin
Taken from: Cook Like a Champion
Serves 4-8
  • 1 tablespoon very finely ground coffee beans (preferably French roast)
  • 2 teaspoons packed light brown sugar
  • 1 teaspoon chili powder
  • 2 teaspoons kosher salt
  • 2 tablespoons extra-virgin olive oil
  • 2 1-pound pork tenderloins, trimmed (I only used 1 pound pork but still used most of the rub)
 IF USING STOVE-TO-OVEN:
  1. Preheat the oven to 400˚ F.  Combine the coffee, brown sugar, chili powder and salt in a small bowl. Divide the mixture evenly between the two pork tenderloins and rub to coat completely.
  2. Heat the olive oil in an ovenproof 12-inch skillet over medium-high heat.  Place the tenderloins in the skillet and brown on all sides, turning occasionally, about 4 minutes total.  Remove from the heat, leaving the pork in the skillet.
  3. Place the skillet in the preheated oven and roast about 10 minutes, until an instant-read thermometer inserted in the center of each tenderloin registers 130-140˚ F.  Transfer to a serving plate, loosely tent with foil and let stand approximately 10 minutes before slicing and serving.
IF USING GRILL:
  1. Combine the coffee, brown sugar, chili powder and salt in a small bowl. Add the olive oil and mix until combined. Divide the mixture evenly between the two pork tenderloins and rub to coat completely.
  2. Prepare a charcoal grill for indirect cooking (medium-high heat if using gas). Place the tenderloins on the hot side of the grill, cover and cook, flipping once, until grill marks form on each side (about 4 minutes per side). Move to the cooler side of the grill and continue cooking an additional 7-9 minutes, or until the pork has reached an internal temperature between 140º and 145º. Transfer to a cutting board and tent with foil. Allow to rest for 10 minutes before slicing and serving.

Friday, April 20, 2012

Crispy Baked Chicken Tenders


It was remarkable to me how crispy these chicken tenders were!  I know, I know, it's in the name so you should expect it to be but typically when I make things like this, the breading kind of falls off during the cooking process.  It's usually tasty but I wouldn't often use the word crispy.  But the panko bread crumbs stuck remarkably well to the chicken tenders and really gave a nice crunch. Toasting the crumbs (in butter) might have helped the crumbs stay crispy in addition to deepening the flavor.

These are easy to put together and I always have the ingredients on hand but it does take a little bit of time to dip the chicken strips into the flour, then egg, then breadcrumbs.  Not a whole lot of time (10 minutes? I've never timed myself) but I tend to underestimate how long these tasks will take. 

We served this with a homemade honey-mustard sauce (about 2 Tbsp honey and 1 Tbsp of mustard combined) and BBQ sauce.  We don't keep ketchup in the house but you couldn't go wrong with that, either.  This would be great with a wheatberry salad as well as a salad or sauteed green beans!

Crispy Baked Chicken Tenders
Taken from: Blissfully Delicious
Serves 4-6
  • 2 cups panko breadcrumbs
  • 2 tablespoons butter or canola oil (I used butter)
  • 1/2 cup all-purpose flour (I used white whole wheat)
  • 1 teaspoon garlic powder
  • 1/8 teaspoon cayenne pepper
  • 1 egg + 1 egg white (I omitted the egg white and it was the perfect amount)
  • 1 tablespoon water
  • 1 tablespoon Dijon mustard
  • 1/4 teaspoon dried thyme
  • 1 1/2 lb chicken tenderloins (or boneless, skinless breasts), cut into 3/4-inch strips
  • Optional sauce: serve with honey-mustard sauce (the basic ratio for honey-mustard is 2:1 although adjust to taste)
  1. Preheat oven to 475 F. Set a wire rack inside a rimmed baking sheet and spray the rack with cooking spray (I like the baking sheet with aluminum foil for easier clean up).
  2. Combine the breadcrumbs and oil/butter in a 12-inch skillet, and cook over medium to medium-high heat, stirring almost constantly, until golden brown.
  3. Transfer the breadcrumbs to a wide, shallow dish and set aside to cool. Mix the flour, garlic powder, and cayenne pepper together in a second wide and shallow dish. Add the egg, water, Dijon mustard and thyme to a third dish and whisk vigorously.
  4. Season the chicken with salt and pepper. Dredge each piece of chicken in the flour mixture (shaking to remove excess) then dip in the egg whites coating both sides completely. Finally, place in the toasted breadcrumbs, turning to coat both sides. Transfer to the wire rack and repeat with all chicken.
  5. Spray the chicken lightly with cooking spray then bake for 10-12 minutes, or until the chicken is cooked through.

Wednesday, April 11, 2012

Lemon Chicken


Sometimes, the simplest meals can be some of the best.  The other week, I made roasted salmon and potatoes with steamed broccoli.  Delicious, easy but nothing fancy.  And the next day, my husband bragged about how impressed his co-workers were with the leftovers he had for lunch.  I think I had forgotten how simple can still be impressive.

When I came across this lemon chicken, I immediately bookmarked it because the recipe looked easy with minimal prep work and cooking time.  And sure enough, it took under 30 minutes from start to finish (I used chicken breast tenderloin which made it even easier).  However, when we actually sat down to dinner, I was surprised at how flavorful this dish was.  It doesn't look like much but the lemon-butter combination is so classic and delicious.  We happily ate the leftovers the next day.

I served this with garlic toast and steamed green beans - the green beans were especially good topped with the extra lemon sauce!

Lemon Chicken
Taken from: Tracey's Culinary Adventures
Serves 4
  • 2 boneless, skinless chicken breasts, about 8 oz each (I used about a pound of chicken breast tenderloins so I didn't have to do all the slicing and pounding of the chicken below)
  • 1/2 teaspoon salt
  • 1/4 teaspoon pepper
  • 1/4 cup all-purpose or white whole wheat flour
  • 2 tablespoons butter, divided
  • 1 tablespoon olive oil
  • 1/4 cup chicken broth
  • 1/4 cup lemon juice (juice from 1-2 lemons)
  • 8 lemon slices
  • 2 tablespoons chopped fresh parsley
  1. Place the chicken on a cutting board. Working with one breast at a time, place your hand on top and use a sharp knife to cut the breast in half horizontally, to make two thinner chicken cutlets (don't worry if they're not perfectly even). Place each cutlet between two sheets of plastic wrap and use a meat mallet or skillet to pound to 1/4-inch thickness.
  2. Add flour to a shallow bowl. Season the chicken on both sides with the salt and pepper. Lightly dredge each cutlet in flour, shaking off the excess.
  3. Set a large nonstick skillet over medium-high heat. Add 1 tablespoon of the butter and the olive oil to the pan. Once the butter is melted and the pan is hot, add the chicken. Cook for 2-3 minutes per side, or until the chicken is golden brown and cooked through. Transfer the chicken to a plate and tent with foil to keep warm.
  4.  Reduce the heat to medium, and add the chicken broth and lemon juice to the pan. Cook for 1-2 minutes, or until the sauce has thickened slightly, scraping the bottom of the skillet to loosen any brown bits. Add the lemon slices to the sauce and let sit undisturbed for about 30 seconds. Remove the pan from the heat and add the parsley and remaining tablespoon of butter. Stir until the butter is melted and the sauce is smooth. Pour the sauce over the chicken and serve (you can garnish with the lemon slices if desired).

Friday, April 6, 2012

Crispy Oven Baked Fish


This fish may look pretty unassuming but it is some of the best oven baked fish I've ever had.  It was incredibly flavorful - the homemade breadcrumbs and the touch of paprika made a big difference.  Also, while the fish had a crispy crust, the fish still stayed moist, thanks to the yogurt layer.

While store-bought breadcrumbs probably could be substituted in a pinch, I would highly recommend making your own.  I think it really helps to make this dish spectactular.  You could make the breadcrumbs up to the day before and just store them in an air-tight container at room temperature to cut down on the cooking time before dinner. 
I served this with couscous and an arugula salad but I think it also would have been great with these gorgonzola smashed potatoes and asparagus (I'm still waiting on my farmers market to have some!)

Crispy Oven Baked Fish
Taken from: Elly Says Opa
Serves 4-6
  • 4 slices whole wheat bread, torn into 1″ pieces (I used part of a leftover baguette)
  • 1 Tbsp. olive oil or melted butter
  • salt and pepper
  • 3 tablespoons + 2 tablespoons flour (I used white whole wheat)
  • 2 eggs
  • 3 Tbsp. plain yogurt
  • 1/2 tsp. paprika
  • 1/4 tsp. cayenne pepper
  • 2 Tbsp. fresh minced parsley
  • 1 small shallot, minced
  • 4 6-ounce cod or haddock fillets, 1.5″ thick (I probably had 6 4-oz cod fillets which worked fine)
  • lemon wedges, for serving
  1. (Could make the breadcrumbs the day before and store in air-tight container at room temp.) For breadcrumbs: Adjust the rack to the middle position and preheat the oven to 350 degrees.
  2. Place the bread in a food processor and pulse until coarse crumbs form, about 10 or 12 pulses (mine took longer).
  3. Put the breadcrumbs on a baking sheet and toss with the oil/butter and salt and pepper to taste, then spread into an even layer. Place in the oven and bake for 8-12 minutes, stirring occasionally, until golden brown and dry. Set aside to cool for 10-15 minutes.
  4. Increase the oven temperature to 425 and place a wire rack on top of a baking sheet; spray or brush rack with oil.
  5. Meanwhile, place 3 Tbsp. of the flour in a shallow bowl or plate. In a second shallow bowl, mix together the eggs, yogurt, paprika, cayenne, and about 1/4 tsp. pepper. Whisk in the remaining 2 Tbsp. flour until a smooth, thick batter is formed.
  6. In a third shallow dish, mix together the parsley and shallot with the cooled breadcrumbs.
  7. Pat each piece of cod dry with a paper towel, and then season with salt and pepper. One by one, take each piece of fish and dredge into the flour, then into the batter, and finally into the breadcrumbs, patting lightly to make sure breading adheres. Place on the wire rack.
  8. Bake the fish for 17-25 minutes, or until coating is golden and flakes easily when gently poked with a fork. (I broiled mine for a minute or two at the end to make sure the coating is golden.)
  9. Serve the fish with lemon wedges.

Monday, March 26, 2012

Chicken Tikka Masala, Revisited


I couldn't help it.  This chicken tikka masala recipe was in dire need of reposting.  It was our favorite recipe of 2010, after all. I finally made it again for dinner the other night and it was so, so good.  Licking the bowl good.  Dreaming about the leftovers good.

However, this isn't a 30-minute meal.  I rubbed the spice mixture on the chicken and started cooking the rice in the rice cooker and then went to the gym for an hour.  When I got back, it took me an hour from start to finish to get this meal on the table.  But, if I didn't already have the leftovers in the freezer, I'd want to do it all over again next week -- it was totally worth it.

I only made a few changes this time - I used a bit less chicken (1.3 pounds instead of the recommended 2) and couldn't tell a difference.  I also only used half of the cream it called for sauce and substituted 2% Greek yogurt instead.  I thought it turned out perfectly and will be using that substitution from now on. 

I recommend serving this with either rice, quinoa or something that can help soak up all the delicious sauce. I use this recipe for brown rice with mustard seeds, carrots, celery and peas which doubled as our side dish and vegetables!

PS - I froze half of this (including the brown rice dish) and we just had the reheated leftovers for dinner last night.  My husband thought it was even better this time!


Chicken Tikka Masala
Reposted from 2010, Taken from: Cook's Illustrated, Sep & Oct 2007 issue
Serves 4-6
Chicken Ingredients:
  • 1/2 tsp. ground cumin
  • 1/2 tsp. ground coriander
  • 1/4 tsp. cayenne
  • 1 tsp. kosher salt
  • 1 1/5 - 2 lbs. boneless, skinless chicken breast, trimmed of fat (I used about 1.3 pounds)
  • 1 c. full-fat or  low-fat plain yogurt (I used 2% Greek yogurt)
  • 2 Tb. canola oil
  • 2 cloves of garlic, minced or pressed with garlic press
  • 1 Tb. fresh ginger, grated
Sauce Ingredients:
  • 3 Tb. canola oil or coconut oil
  • 1 medium onion, diced (approx. 1 1/4 cups)
  • 2 cloves of garlic, minced or pressed with garlic press
  • 2 tsp. fresh ginger, grated
  • 1/2 - 1 jalapeno chile, ribs and seeds removed, flesh minced (caution: the hottest part of the chile is the ribs and seeds so be very careful when handling because it gets on your fingers; use 1/2 jalapeno if you want a mild taste)
  • 1 Tb. tomato paste
  • 1 Tb. garam masala (or substitute 2 tsp. ground coriander, 1/4 tsp. ground cardamom, 1/4 tsp. ground cinnamon, 1/2 tsp. ground black pepper)
  • 1 28-oz. can crushed tomatoes OR approx. 4 large tomatoes, crushed in food processor (I used 1 28-oz can of diced tomatoes instead)
  • 2 tsp. sugar
  • 1/2 tsp. kosher salt
  • 2/3 c. heavy cream or half-and-half (I used 1/3 cup of whipping cream and 1/3 cup of 2% Greek yogurt)
  • 1/4 c. fresh cilantro, chopped
  1. Combine cumin, coriander, cayenne and 1 tsp. salt in small bowl. Sprinkle on both sides of chicken, pressing gently so spices adhere.
  2. Place chicken on plate, cover with plastic wrap and refrigerate 30-60 minutes.
  3. In large bowl, whisk together yogurt, 2 Tb. oil, 2 minced garlic cloves and 1 Tb. ginger.
  4. Then, heat 3 Tb. oil in Dutch oven (or saucepan) over medium heat. Once heated, add onion and cook, stirring frequently, until lightly golden (8-10 minutes).
  5. Add 2 minced garlic cloves, ginger, chile, tomato paste and garam masala. Cook, stirring frequently, until fragrant (about 3 min).
  6. Add crushed tomatoes, sugar and 1/2 tsp. salt; bring to boil. Reduce heat to medium-low, cover and simmer about 15 minutes, stirring occasionally. (See next steps to cook chicken while sauce simmers.)
  7. Stir in half-and-half and/or yogurt and return to simmer. Remove pan from heat or turn to low to keep warm.
  1. CHICKEN: While sauce simmers, adjust oven rack to upper-middle position (about 5 inches from heat) and heat broiler. Cover baking sheet with aluminum foil; spray wire rack with cooking spray and then set wire rack in baking sheet
  2. Using tongs, dip chicken into yogurt mixture and make sure chicken has thick layer of it. (Throw away any extra yogurt.)
  3. Broil chicken for 10 minutes and then flip. Cook until thickest part is 160 degrees (chicken will be lightly charred in places). Time will depend on thickness of the chicken but will range from 15-25 total minutes.
  4. Let chicken rest 5 minutes, then cut into 1-inch chunks and stir into warm sauce. Stir in cilantro (or serve cilantro on side).

Thursday, March 22, 2012

Tomato Florentine Soup


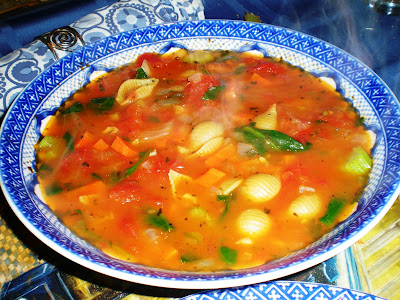
This was really a clean-the-fridge kind of soup.  I was going to call it pasta e fagioli but apparently, true Italian pasta e fagioli doesn't have much in the way of vegetables.  Or bacon.  And since I'd rather have vegetables and bacon (thankyouverymuch), we're going to call this Tomato Florentine soup.  But whatever you want to call it, it worked. I used whatever we had on hand and loved the results.  I especially liked cooking the pasta in the soup because not only did it make this a one-pot soup, but it also gave the soup an extra thickness thanks to the starch being released while the pasta cooks. 

Topping the soup with bacon, not surprisingly, took it to the next level.  However, we ate it for dinner the next day (and that does not happen often in this house), and still thoroughly enjoyed it bacon-less.  I served this with savory scones and a simple salad.

Tomato Florentine Soup
Adapted from: AllRecipes and MyRecipes
Serves 4-6
  • 2 tablespoons olive oil (if you cook bacon as a topping, you could use the bacon fat instead)
  • 1 small onion, chopped
  • 3 cloves garlic, minced
  • 1-2 carrots, chopped
  • 1-2 celery stalks, chopped
  • 2 bay leaves
  • 1 tablespoon dried parsley (I used about 2-3 tablespoons of fresh parsley)
  • 1 1/2 teaspoons dried basil
  • 1 1/2 teaspoons dried oregano
  • 1/2 teaspoon salt
  • 1/4 teaspoon pepper
  • 1 (28 ounce) can diced tomatoes
  • 4 1/2 -6 cups water or chicken stock (I used about 3 cups of water and 2 cups of chicken broth)
  • 1 (15 ounce) can or 1 1/2 cups cooked cannellini beans (I used canario beans instead)
  • 1 - 1/2 cups pasta (I like a little less pasta because there's so many other things in this soup but you could increase the amount to 1 1/2 cups; I used small shells)
  • 6 oz spinach, chopped
  • Toppings: grated Parmesan cheese, cooked bacon

  1. In a large pot over medium heat, cook onion and carrots in olive oil until onion is translucent (approximately 4 minutes). Stir in garlic, parsley, basil and oregano and cook until tender. Stir in bay leaves, tomatoes, 4/12 cups of water/chicken stock, and beans.  Season with salt and pepper. Bring to a boil on high then reduce to a simmer.  Simmer about 20 minutes.  Stir in a little more water/chicken stock if the soup seems too thick.
  2. Add pasta and cook for 8 to 10 minutes or until al dente; during the last 2 minutes of pasta cooking time, add spinach.  Season to taste.
  3. Serve with grated parmesan cheese and bacon, if desired.

Friday, March 16, 2012

Crockpot BBQ Beer Chicken


This was a seriously easy meal to put together.  All it needs is a little advanced planning and you have a wonderful meal.  We were heading out for a day trip to visit some friends last weekend but would be back just in time for dinner.  Since I knew I didn't want to spend a lot (ok, any) time making dinner, before we left for our trip that morning. I put some frozen chicken breasts in a slow cooker, added the spices, a lot of beer and barbeque sauce, and then let it cook on low for 8 hours (and then it sat at warm for another 3 hours until we got back).  I was a little worried that the chicken would dry out but it was perfectly cooked and shredded easily with two forks.  So easy and so delicious.

When we came home,we served this chicken on toasted hamburger buns (with melted cheddar cheese and extra barbeque sauce) and had a salad on the side.  All together, 10 minutes, tops.  The next day, we had the leftovers for lunch with some sweet potato fries (although you could do these sweet potato bites instead!), carrots and fruit.


Slow Cooker BBQ Beer Chicken
Taken from: How Sweet It Is
Serves 8-10 (I halved this recipe and we got several meals out of it)
  • 3 pounds boneless, skinless chicken breasts (about 6 large; I used frozen chicken breasts which worked perfectly)
  • 1 tablespoon onion powder
  • 1 tablespoon smoked paprika
  • 1 teaspoon garlic powder
  • 1/2 teaspoon salt
  • 1/2 teaspoon pepper
  • 8-12 ounces of beer  -- I used about 10 ounces of an amber (it's also suggested you could use ginger ale or chicken stock if you didn't want to use beer but I haven't tried it)*
  • 24 ounces of barbecue sauce (I use our favorite Trade Joe's Kansas City barbeque sauce)*
  • Optional: hamburger buns, cheddar cheese, extra barbeque sauce
Season chicken with onion powder, garlic powder, paprika, salt and pepper. Add to crockpot, then add beer and 18 ounces of barbecue sauce. Cook on low for 8 hours, tossing once or twice if desired. After 8 hours, shred and add remaining barbecue sauce (if desired...or you can just serve extra BBQ sauce on the side). Toss chicken to coat and let sit for 10-15 minutes before serving to absorb everything. (We had ours on toasted hamburger buns with cheddar cheese that was melted under the broiler.)

*Note: If you use a thicker barbeque sauce (like Sweet Baby Ray's or Trader Joe's or homemade) or if you know you'll be away from your slow cooker for a long time (ours cooked on low for 8 hours and then was on warm for 3 hours), you may want to add a little more beer in order for the sauce not to burn and thicken on the edges of the pot.

Thursday, March 8, 2012

Stuffed Poblano Peppers


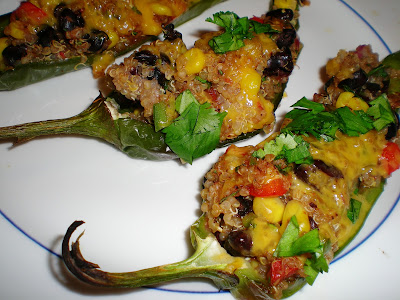
 I had high expectations for this dish.  Mexican is definitely a favorite in our house and I'm a fan of our stuffed bell peppers. So it seemed like a logical idea to make Mexican stuffed peppers.  And I think I ended up liking these even more than our Italian stuffed pepper recipe! The flavors melded so well together.  The melted cheddar cheese really helped to make the dish; I think the sharpness and creaminess just helped to put this over the top.

I also like that these ingredients and the amounts can be adjusted to your liking.  I'm using quinoa a LOT in our house recently and it goes perfectly in this dish.  However, you could use brown rice or some other grain you might have.  I used fire-roasted diced tomatoes but diced tomatoes with chiles or salsa would also work well.  I also didn't really measure many of the ingredients so feel free to play with the suggested amounts below!

We served this with a simple side salad.  I'm already looking forward to the leftovers!


Stuffed Poblano Peppers
Taken from: A Couple Cooks via A Hint of Honey 
Makes 12-16 stuffed pepper halves
  • 6-8 poblano peppers, halved lengthwise, seeds and ribs removed (I used anaheim peppers instead)
  • 1 cup uncooked quinoa (you could use brown rice instead)
  • 1 1/2 cups of cooked black beans (1 15-oz. can black beans, drained and rinsed)
  • 1 15-oz. can diced tomatoes with green chiles or fire-roasted diced tomatoes
  • 1 cup fresh or frozen corn kernels (optional)
  • 3 green onions, sliced (I used 1/4 cup of diced red onion instead)
  • 1 jalapeno, minced (optional)
  • 1 tsp. cumin
  • 1 tsp. chili powder
  • dash cayenne pepper
  • salt and freshly ground black pepper, to taste
  • 1/3 cup fresh cilantro, chopped + extra for garnish
  • Cheddar or any Mexican blend of cheese, shredded for topping
  • Extra add-ins: I threw in some diced green and red peppers as well
  1. Cook quinoa (or rice) according to package directions.  For quinoa, I rinse it, add 1 cup to a rice cooker and then add 2 cups of water. 
  2. While the quinoa cooks, prepare the peppers: slice them in half and remove the seeds and ribs (be careful when handling the seeds and ribs -- wear gloves if necessary).
  3. Broil Method: Place the peppers in a baking dish skin side up. Broil about 5-7 minutes, then flip the peppers and broil 4-7 minutes more. (There are also an oven cooking method and a grilling method below.)
  4. In a large bowl, toss to combine cooked rice, beans, tomatoes, corn (optional), onion, jalapeno (optional), cumin, chili powder, cayenne and cilantro. Season to taste with salt and freshly ground black pepper. 
  5. Heat the filling a few minutes in the microwave (or on the stove) until warm, depending on the heat of the rice.  Stuff peppers with the filling.
  6. Place the pepper halves skin side down in a baking dish, and spoon the filing into each half. Top with shredded cheese and broil until the cheese is melted, for about 1 1/2 to 2 minutes.  (Can keep warm in a 350 degree oven for a few minutes until serving.)
  7. If desired, garnish with chopped cilantro and serve with sour cream or nonfat yogurt.
Alternative Oven Method: Preheat oven to 400 F.  Prepare the peppers (slice in half and remove seeds and ribs).  Follow Step 4 by mixing all other ingredients together.  Fill peppers and bake until peppers are tender and browned, about 25-30 minutes.  During last 5 minutes of cooking, top with cheese and finish cooking.
Grilling method: Preheat grill to medium-high heat. Grill peppers until tender and charred on the bottom. Top with cheese several minutes before they are done grilling to allow the cheese to melt. Garnish with fresh cilantro and serve.