Showing posts with label snack. Show all posts

Monday, April 13, 2015

Healthy No Bake Granola Bars


I like to make a weekly snack that my husband can have at work (and I can enjoy while my toddler naps).  My criteria for a snack recipe is something pretty easy to make, pretty healthy, and of course, delicious.  These granola bars are my new favorite! While you do have to dirty a food processor to make them, there is no baking involved and it comes together very easily.  My 2 year old loved helping me make these (and sampling the dates, too).

These actually taste like a real granola bar to me.  They also do not really crumble and stay together very well, unlike some other granola bar recipes I've tried.  Finally, while they're sweet, they're not too sweet and most of the sweetness comes from dates.  I love the ingredient list - dates, honey, almond butter, almonds, oats, and chocolate chips.  What's not to like?

These will definitely go into our regular snack rotation.  Highly recommend!

Healthy No-Bake Granola Bars
Taken from: Minimalist Baker
Makes 8-10 bars
  • 1 cup packed dates, pitted (deglet nour or medjool) - I like to soak these in water for about 10 minutes, then drain them before using
  • 1/4 cup honey (or maple syrup or agave)
  • 1/4 cup creamy salted natural peanut butter or almond butter
  • 1 cup unsalted chopped almonds
  • 1 1/2 cups rolled oats
  • Optional: 1/3 cup dark chocolate chips
  1. Add chopped almonds to your food processor and pulse for 1-2 seconds, just to get a finer chop (you do not want to process them).  Scrape almonds into a bowl.
  2. Process dates in a food processor until small bits remain (about 1 minute). It should form a "dough" like consistency (mine rolled into a ball).
  3. Add processed dates and the oats into the bowl with the almonds. Set aside.
  4. Warm honey and peanut butter in a small saucepan over low heat. Stir and pour over oat mixture and then mix, breaking up the dates to disperse throughout (the mixture will be stiff).
  5. Once thoroughly mixed, transfer to an 8x8 dish or other small pan, sprayed with cooking spray or lined with plastic wrap or parchment paper so they lift out easily.
  6. Press down until uniformly flattened. Sprinkle the chocolate chips evenly over the top of the bars and press down hard. Cover with a lid or parchment or plastic wrap, and let set in fridge for at least 15-20 minutes to harden.
  7. Remove bars from pan and chop into 8-10 even bars. Store in an airtight container in the fridge - they will keep for 1-2 weeks.

Monday, September 8, 2014

(Healthier) Chocolate Zucchini Muffins


I know summer feels over (well, for most people -- with hot temperatures here and our toddler too little for school, it doesn't feel that different to me!), but here's a way to continue to use zucchinis from summer produce.

While chocolate zucchini muffins certainly seem indulgent, they're better for you than you might suspect - the sugar is cut to 5 tablespoons (from the usual 8 that's in most recipes), there's a few tablespoons of coconut oil, and it's made completely of whole wheat pastry flour.  There are chocolate chips but I think there's approximately 10 chips per muffin which gives it enough that you really taste the chocolate chips but don't go overboard.  However, they're incredibly tasty - my husband couldn't believe when he heard the ingredient list.  He thought they tasted too good!

I've made these twice and they've been a big hit both times!

Chocolate Zucchini Muffins
Taken from: Ambitious Kitchen
Makes 12 muffins

  • 1 ¼ cup whole wheat pastry flour (or white whole wheat flour)
  • 1/3 cup unsweetened cocoa powder
  • 1 teaspoon baking soda
  • ¼ teaspoon salt
  • 2 tablespoons coconut oil
  • 1/3 cup honey
  • 1 teaspoon vanilla
  • 2 eggs
  • 1 cup shredded zucchini (about 1 medium)
  • ¼ cup unsweetened applesauce
  • ½ cup milk (I used almond milk) 
  • ½ cup chocolate chips (I used dark chocolate chips)

  1. Preheat oven to 350 degrees F. Line 12 cup muffin tin with cupcake liners and generously spray inside of liners with nonstick cooking spray.
  2. Squeeze shredded zucchini of excess water with a paper towel.
  3. In a medium bowl, whisk together flour, cocoa powder, baking soda, and salt; set aside.
  4. In the bowl of an electric mixer, add coconut oil, honey, vanilla, eggs; mix on medium-low until smooth and well combined. Add in zucchini, applesauce, and almond milk; mix again. Slowly add in dry ingredients and mix until just combined. Gently fold in chocolate chips.
  5. Evenly divide batter into prepared liners. Bake 20-25 minutes or until toothpick inserted into middle comes out clean. After 5 minutes, remove muffins and transfer to wire rack to finish cooling. Enjoy!

Monday, August 4, 2014

Honey & Sea Salt Roasted Almonds


Addicting.  The first time I made these honey and salt almonds, I quartered the batch (only making one cup) since I figured we didn't need 4 cups of almonds for the two of us.  But then I ate almost the whole thing in 24 hours.  The next time I made them, I made 2 cups' worth, figuring that would be enough for a small appetizer before dinner with some friends and then we would have leftovers as snacks. I (graciously) sent my husband with the little that was left for a snack at work today so they will also be gone in 24 hours.  I should probably learn my lesson and make the whole 4 cup batch next time.

There isn't that much honey or salt but it makes such a nice, subtlety salty-sweet snack.  I served them on their own as an appetizer, we ate them as snacks, and we even had enough to top them on a salad, too.  I imagine they would be great over berries and/or yogurt in the morning, too!

Honey & Sea Salt Roasted Almonds
Taken from: Cafe Sucre Farine
  • 4 cups sliced almonds
  • 1 tablespoon coconut oil
  • 4 tablespoons honey
  • ½ teaspoon flaky sea salt or kosher salt (plus more to taste)
  1. Preheat oven to 350˚F. Line a sheet pan with foil or parchment paper for easy clean up. Add almonds to prepared pan.
  2. Combine coconut oil and honey in a small microwave-safe bowl. Place in microwave and cook on high power for 30 seconds. Drizzle mixture over almonds and stir gently to coat.
  3. Place in oven and roast for 20-25 minutes or until golden brown, stirring gently to redistribute every 5 minutes.
  4. Remove from oven, sprinkle with salt to taste (if use flaky sea salt, rub it between your fingers as you add it, breaking up the large flakes as you sprinkle it).  Stir gently (I like to have the almonds in a mound so you can break it off in small clusters after it cools). Allow to cool completely on pan. 
  5. Store in an airtight container for 2-3 days or in the freezer for 4-5 weeks.


Monday, December 9, 2013

Cranberry Nut Bread


This is about the time of year that I start hoarding cranberries.  They only seem to be in grocery stores for November and December and then they vanish until the next year.  This makes me slightly panicky so I start buying and freezing them to use throughout the year.

This cranberry nut bread is one of my favorite ways to use them.  It's my great aunt's recipe, which makes me love it all the more.  I make this every year in November or December (it often graces our table at Thanksgiving) and we enjoy it for breakfast, snacks or dessert. I think it goes especially well with a cup of coffee or tea!

I've made a few changes to the recipe.  I've substituted some white whole wheat flour and also added in flaxseed meal.  I've reduced the sugar and added a sprinkle of raw sugar on top of the bread.  Regardless of the slight changes, it's a recipe I love and definitely one that I want my family to continue to make.

Cranberry Nut Bread
Taken from: My Great Aunt Eleanor
Makes 1 loaf

  • 1 tsp. salt
  • 1 1/2 tsp. baking powder
  • 1/2 tsp. baking soda
  • 3/4 c. sugar
  • 2 c. flour (I use 1 cup all-purpose and 1 cup white whole wheat)
  • 2 Tbsp. flaxseed meal (optional)
  • juice and zest of 1 orange
  • 2 Tbsp. butter
  • 1 egg, beaten
  • 1/2 cup boiling water
  • 1 cup chopped nuts (I use walnuts)
  • 1 cup chopped cranberries
  • 1 Tbsp. raw sugar, for sprinkling (optional)


  1. Preheat oven to 325. Grease a bread pan with cooking spray. 
  2. Sift together salt, baking power, baking soda, sugar and flour.  Stir in flaxseed meal.
  3. In a separate bowl, combine orange juice and zest, butter and 1/2 cup boiling water.
  4. Combine wet and dry ingredients (sometimes I need to add a bit more boiling water to mix all together).
  5. Add chopped nuts and cranberries to the mixture.  Pour into greased bread pan and top with raw sugar, if desired.
  6. Bake for 45-60 minutes until a toothpick comes out clean.

Monday, April 29, 2013

Chocolate Almond Date Bites


I made these on a whim several months ago.  I had some dates that had been hanging out in my pantry for a while and I wanted to finally use them up.  This chocolate almond date bite recipe looked appealing so I figured I'd give it a try.  And we really liked them! They made for a perfect midafternoon snack.  They're sweet but since they are only sweetened by the dates, they're not a dessert-disguised-as-a-snack-sweet. The almonds also give some staying power, which I definitely appreciate around 3 pm.  Oh, and now it happens to be a great way to use my homemade almond meal.  And if you have a food processor, they're incredibly simple to make -- just throw 4 ingredients in the processor, turn it on for a few minutes and then form the bites.  Done from start to finish in under 10 minutes.

I liked this recipe so much that I went out and bought more dates so I could make it again.  Only this time, I have a feeling those dates won't sit in the pantry for very long.
Chocolate Almond Date Bites
Taken from: Yes I Want Cake
I think this made around 12 or so bites
  • 1/2 cup almonds (if you happen to have 1/2 cup almond meal from making homemade almond milk, I highly suggest using that!)
  • 1 cup dates, pitted
  • 2 tablespoons coconut, unsweetened (you could also use sweetened)
  • 1 tablespoon cocoa powder, unsweetened
  • 1/4 cup chopped almonds, for rolling (optional; you could also roll them in sprinkles or cinnamon sugar or leave them plain)
  1. Combine all ingredients (except for chopped almonds) into a food processor and process until a ball of dough forms (this will take about 5 minutes).
  2. Form balls using a tablespoon, then roll in almonds, if using. 

Monday, December 17, 2012

No-Bake Peanut Butter Oatmeal Bites


These are some of my new favorite snacks.  They're so easy to make -- it probably takes about 10 minutes total from start to finish -- and I love all the ingredients on the list.  Flaxseed and chia seeds are so good for you and in this case, a little chocolate goes a long way.  Overall, they make for a pretty healthy snack but still taste wonderfully indulgent.

This is probably the third time I've made these and have been meaning to take a picture each time but they just go so quickly! I really should remember to double the recipe next time.

No-Bake Peanut Butter Oatmeal Bites
Taken from: How Sweet It is
Makes 12-15 bites
  • 1 cup old-fashioned rolled oats
  • 1/4 cup ground flaxseed
  • 1/4 cup sliced almonds, chopped
  • 2 tablespoons chia seeds (if these are too hard to find, omit them)
  • 1/8 teaspoon cinnamon
  • a pinch of salt
  • 1/4 cup + 2 tablespoons creamy peanut butter, melted and slightly cooled
  • 3-5 tablespoons honey (I like it less sweet so I only used 3 tablespoons)
  • 1/4 teaspoon vanilla extract
  • 2-3 tablespoons chocolate chips (I prefer dark chocolate but use any kind you'd like)
  • 1/4 cup ground peanuts or ground almonds, to roll the balls in
  1. Combine oats, chopped almonds, flaxseed, chia seeds, salt and cinnamon in a large bowl and stir.
  2. Melt peanut butter and allow it to cool slightly (I melted mine in the microwave for about 30 seconds, then stirred), then stir in honey and vanilla extract until it's combined. Once peanut butter has cooled a bit, pour it over the oat mixture and mix well with a spoon then bring together with your hands. Once mixture is sticking together, fold in chocolate chips.
  3. Roll dough into golf-ball sized (or slightly smaller) balls, then roll in ground peanuts or ground almonds. These can be eaten at room temp but these are best refrigerated..

Thursday, November 15, 2012

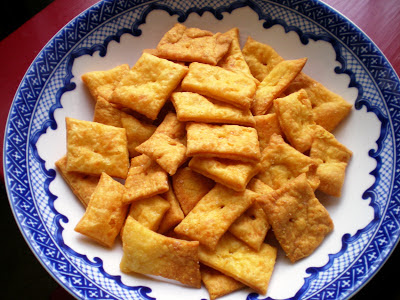
Homemade Cheese-Its


It's probably no surprise that I often show my affection for people by making them food.  So after my husband had a long month of training, I wanted to make him something to celebrate him finishing the rotation.  He's more of a salty snack kind of person and when he was little, he used to like cheez-its.  So when I found a recipe for homemade cheese-its, I knew I wanted to try it.  Because nothing says I love you like...crackers?

These ended up being a pretty easy recipe to make.  It doesn't hurt that there are only 5 ingredients (two of which are salt and water) and the food processor does most of the work for you.  You just pulse all the ingredients together in a food processor for a few seconds (I probably did 5-7 one-second pulses) and then add in a little water to form a dough.  You let the dough rest and then the hardest part (which wasn't bad) was rolling out the dough into a nice, thin layer.  I thought that the thinner crackers tasted better because they crisped up nicely so next time, I'd probably try a little harder to get most of the crackers on the thinner side.

Even though I didn't have the full amount of cheddar cheese, they still tasted very similiar to the store bought cheese-its but just much more real.(Well, according to my husband, anyway. I can't say I've had too many cheez-its in my life...which I'm okay with.)


Homemade Cheese-Its
Taken from: Rachel Cooks
  • 1 cup all-purpose flour
  • 4 tablespoons unsalted butter, cut into small pieces
  • 7 ounces sharp or extra-sharp cheddar cheese, grated (I actually only used about 5-6 ounces of cheese since that was all I had and they still turned out wonderfully.  Also, since the food processor was going to get dirty anyway, I used it to shred the block of cheddar cheese.)
  • 3/4 teaspoon salt
  • 1/2 teaspoon ground mustard (optional, I omitted)
  • 2-3 tablespoons cold water
  • sea salt or kosher salt for sprinkling, if desired
  1. In a food processor, pulse everything except water together until it looks like course crumbs.
  2. While pulsing, add in water, 1 tablespoon at a time (you may not need all 3 tablespoons or you may even need a tablespoon or so more; mine took 3 tablespoons of water to come together into a dough).
  3. Remove from food processor, wrap in plastic wrap and put in refrigerator for at least 20 minutes.
  4. Meanwhile, preheat oven to 350 degrees.  Line a baking sheet with a Silpat or parchment paper.
  5. Roll out dough (quite thin–I think the crackers that were thinner were a better).  Cut into squares using a knife or a pizza cutter. Use a toothpick, the end of a skewer or the end of scissors to poke a hole in the middle of each cracker.
  6. Place crackers on lined baking sheet. Lighly sprinkle with salt, if desired.You can place them fairly close together, as they do not really expand. Bake for 13-20 minutes or until crispy (I started checking mine every few minutes after the first 10 minutes of baking and probably baked close to the full 20 minutes).

Thursday, October 11, 2012

Pumpkin Bread


So I held off making anything pumpkin until October this year but this pumpkin bread was a wonderful way to welcome back my favorite season.  This bread was moist and so flavorful.  It's actually made with some whole wheat flour and olive oil (surprise!) although it's always hard to categorize quick breads as health food.  Even so, I didn't mind having a slice or two for breakfast the next day and then as a snack pretty much everyday after that.

I added a cinnamon streusel topping because you really can't go wrong with streusel.  Feel free to leave it off but I liked it both for the flavor and for the texture change. 

This bread keeps really well and still tastes wonderful, even though we're on day 4.  We liked it both at room tempeature as well as heated in the microwave.

Now that fall is in full swing and I happen to have a huge can of pumpkin to finish up, any good recipe ideas? Pumpkin scones and pumpkin waffles are at the top of my list!

Pumpkin Bread with Streusel Topping
Bread taken from: Blissfully Delicious
Makes 1 loaf
  • Cooking spray
  • 3-1/4 oz. (3/4 cup) whole wheat flour
  • 3 oz. (2/3 cup) unbleached all-purpose flour
  • 1 tsp. ground cinnamon
  • 1 tsp. baking soda
  • 1/2 tsp. baking powder
  • 1/2 tsp. ground nutmeg
  • 1/4 tsp. table salt
  • 2 large eggs
  • 1 cup canned pumpkin purée
  • 1/2 cup packed light brown sugar
  • 1/3 cup olive oil
  • 1/3 cup honey
Streusel Topping (optional):
  • 1 1/2 Tbsp. all-purpose flour
  • 3 Tbsp. old-fashioned oats
  • 3 Tbsp. packed light brown sugar
  • 1/4 teaspoon ground cinnamon
  • pinch salt
  • 2 tablespoons cold unsalted butter, cut into small cubes
  1. Position a rack in the center of the oven and heat the oven to 350°F. Spray a 9×5-inch loaf pan with cooking spray.
  2. In a medium bowl, whisk both flours, cinnamon, baking soda, baking powder, nutmeg, and salt. In a large bowl, whisk the eggs, pumpkin, sugar, oil, and honey until well combined. Add the dry ingredients to the wet and stir with a large spoon just until evenly incorporated.
  3. To make the streusel: Stir the flour, oats, brown sugar, cinnamon and salt together in a medium bowl. Add the butter, and use a pastry cutter to work it into dry ingredients until the mixture resembles coarse crumbs. Set aside while you make the batter.
  4. Spoon the batter into the prepared pan and smooth the top. Tap the pan on the counter a few times to settle the batter. Top with streusel, if using.
  5. Bake until the top is browned and a wooden skewer inserted in the center comes out clean, 40 to 45 minutes. (If the bread begins to brown too much before it’s fully baked, lay a piece of aluminum foil on top.) Cool in the pan for 15 minutes and then transfer the bread to a rack to cool completely before slicing.

Friday, September 7, 2012

Cinnamon Almond Biscuits


We actually called these "crookies" at home because they taste like a cross between a cracker and a cookie.  But I think the name biscuit works, too. Feel free to call them what you want! They're lightly sweetened and have a slight crunch on the outside.  And I find them surprisingly addicting.  I made these on Sunday and tasted one...which turned into two...which turned into three...and then I had to stop myself before "our snack for the week" became "my snack for Sunday." 

Not only do I like the taste and texture but I also love the good ingredients in here -- wheat flour, almonds, oats, flax seed and minimal sugar.  Not bad for a snack! Or a Sunday afternoon.

I'll definitely be making these again but might need to double the recipe.

Cinnamon Almond BiscuitsTaken from: Everyday Reading
Makes 25-30 biscuits

  • 1 cup wheat flour (I use white wheat flour)
  • 1/2 cup oats
  • 1/2 cup almonds
  • 1 Tbsp ground or whole flaxseed 
  • 2 tsp cinnamon
  • 1/2 tsp salt
  • 1 tsp baking powder
  • 2-3 Tbsp brown or turbinado sugar (I used 3 Tbsp turbadino plus extra for sprinkling on top) 
  • 5 Tbsp cold butter, diced
  • 1/3 cup milk
  1. Preheat oven to 400 degrees F. 
  2. In a food processor or blender, blend the almonds until they form a coarse flour. Add oats (and flaxseed if you're using whole flaxseed) and blend a bit more until they are pretty broken up. Pour into a mixing bowl or bowl of a stand mixer.
  3. Add the remaining ingredients except for the butter and milk and combine. Add the butter chunks and mix until well incorporated. With the mixer running, pour in the milk. Let the mixer run until the dough starts clumping up (kind of like if you were making the crumble topping for an apple crisp).
  4. Dump the dough onto a clean surface, pat it into a rectangle, and roll out to a 1/4 inch thickness. 
  5. Cut the dough with cookie cutters (or just use a pizza cutter to cut it into squares. Lay them on a greased or parchment-covered cookie sheet. They don't expand really at all, so you can put them quite close together (I can do about two dozen on a single sheet).
  6. Pat remaining dough back together, re-roll and repeat.  If desired, sprinkle tops of biscuits with more turbinado. 
  7. Bake for 12 minutes. Let cool for a few minutes on baking sheet before eating. 

Wednesday, August 29, 2012

Raspberry (or Blueberry) Coffee Cake


Saturday mornings are some of my favorite times.  I love going to the farmers market and then making a nice breakfast for us to enjoy.  This berry coffee cake was a last-minute idea but I had all the ingredients on hand (albeit a few substitutions).  And even better, I made the cake, stuck it in the oven and went off to the farmers market while my husband stayed home and read.  I got home about 5 minutes before the coffee cake was done -- I love that there was hardly any waiting time until I could eat this!

I think this would have been amazing with raspberries but 1) they're expensive when not on sale and 2) I already had frozen blueberries on hand.  So we went with blueberries which was still delicious.  Next time, I think I would mix the blueberries into the batter so they were spread more evenly throughout the cake (I don't think I would recommend this with raspberries because they are much more delicate). 

I also didn't have a 10-inch springform pan so after a quick search on the internet, a bundt pan holds approximately the same amount.  This worked fine for us although it probably caused the crumble topping to sink into the cake (and so it wasn't crumbly in the end).  It was fine because it still infused a delicious buttery lemon taste in each slice. 

This does make a large cake so it fed us breakfast/snack/dessert for days.  But trust me, we weren't complaining!  I especially liked this coffee cake warm (a quick trip to the microwave did the trick). 

Raspberry (or Blueberry) Coffee Cake
Taken from:  Annie's Eats
Serves about 12

For the crumb topping:
  • ½ cup all-purpose flour
  • 1/3 cup sugar
  • Zest of ½ lemon
  • 4 tbsp. (2 oz.) unsalted butter, melted and cooled slightly
For the cake:
  • 1 ¾ cups all-purpose flour
  • 1 scant cup sugar
  • 2 tsp. baking powder
  • ¼ tsp. baking soda
  • ¼ tsp. salt
  • 3 eggs
  • 1 cup sour cream (I used 1/2 cup 2% plain yogurt and 1/2 cup light sour cream)
  • 1 tsp. vanilla extract
  • 1 tablespoon lemon juice
  • 2 cups fresh raspberries or blueberries
  1. Preheat the oven to 350˚ F.  Lightly grease and flour and 10-inch springform pan (if you don't have a 10-inch springform, I used a bundt pan instead).  To make the crumb topping, combine the flour, granulated sugar and lemon zest in a small bowl and whisk to blend. Add the melted butter and stir with a fork until the mixture is crumbly. Set aside.
  2. To make the cake, combine the flour, sugar, baking powder, baking soda and salt in a large bowl.  In another bowl, whisk together the eggs, sour cream and vanilla until well blended. Make a well in the center of the flour mixture and add the liquid ingredients.  Fold together gently until evenly mixed and no streaks remain, being careful not to over mix.  Spread the batter into the prepared pan in an even layer.  Dot the top of the batter with the raspberries. Sprinkle the crumb topping evenly over the berries.
  3. Bake until the topping is golden brown and a toothpick inserted into the center of the cake comes out clean, 38-42 minutes.  Transfer the pan to a wire rack and let cool for 20 minutes.  Remove the sides of the springform pan.  Serve warm or at room temperature, cut into wedges.

Friday, July 13, 2012

Mocha Granola


So I originally intended to make this recipe just for my husband.  He loves granola and coffee and I thought mocha granola would be a fun way for him to start the day.  What I wasn't expecting was that I would like it so much! I've already had a bowl for breakfast yesterday morning and might be munching on some more right now.

This granola is GREAT with milk (or yogurt, I bet) for breakfast but it's also a delicious snack all by itself.  I cut down on the sweetness so I was a little worried that it wouldn't be sweet enough or that the coffee flavor wouldn't be enough.  While I'm sure we could always make the coffee flavor stronger (we really like our coffee), I really enjoyed the sweetness -- it's not overly sweet but is perfect with the bits of chocolate in the granola.  The chocolate isn't overwhelming and isn't in every bite but is a real treat when you do get some.

With any granola recipe, it's easy to make changes to the recipe.  I used coconut oil instead of canola, added in extra shredded coconut (because I thought a coffee-chocolate-coconut combination would be delicious!), omitted the nutmeg and salt, used walnuts instead of hazelnuts, added wheat germ and chia seeds...the list goes on!  I also didn't measure out some of the ingredients but just eyeballed the proportions. Feel free to make changes based on your taste preferences or what you have on hand.


Mocha Granola
Taken from: Annie's Eats
Makes 10 cups (I cut this recipe down to 2/3)

Sunday, May 13, 2012

Green Smoothies

I didn't use quite as much spinach in this smoothie so it didn't come
out very green


I might be one of the last people to jump on the green smoothie bandwagon but I've finally jumped.  The actual spinach part of the smoothie didn't deter me -- it was more of the idea of drinking meals didn't really appeal to me.  I prefer to chew my meals, thankyouverymuch. However, these smoothies are great after a workout, for breakfast (with a side of toast or something to chew on) or any time on a hot day. They're sweet and delicious but are still really good for you.

These are also very versatile -- I hate banana so that never ends up in our smoothies.  We've made these with tons of different kinds of fruit or just single fruit smoothies (mango was a great choice). Also, if a green colored smoothie doesn't appeal to you (or picky eaters in your family), cut the spinach in half.  You won't taste or see the spinach but you'll still get the nutrients from it!  

These seem especially appropriate with summer fast approaching!

Green Smoothies
 Serves 2-3
  • 1 cup frozen fruit (I most often use frozen mixed berries and/or frozen mango)
  • 1/2 cup chopped fresh fruit (feel free to try all kinds - pineapple, strawberries, blueberries and/or oranges would work really well here depending on the season.  Also, you could just add in more frozen fruit if you don't have any fresh on hand)
  • 1/2 cup yogurt (we use 2% plain Greek yogurt)
  • 1/2 cup liquid (we most often use orange juice or milk or even a little water to help thin the smoothies)
  • 2 cups baby spinach leaves, rinsed (decrease this to 1 cup if you don't want your smoothies to look green)
  • Ice (I don't use ice at first if I am using frozen fruit)
Optional add-ins:
  • 1-2 tbsp. honey
  • 2-4 tbsp. ground flaxseed
  • 1-2 tbsp. chia seeds
  1. Combine all ingredients in a blender or food processor and puree until completely smooth.  
  2. Taste and adjust according to your liking (i.e. add additional honey for sweetness, additional liquid and/or ice for consistency. I typically need to add more liquid.).  Serve immediately.

Friday, April 27, 2012

Super Charge Me Cookies


While I never really considered myself much of a baker, I've been using the weekends more and more for baking.  There's just so much I would prefer to make myself and I love knowing exactly what goes into our food.  Also, I like to bake things that I can throw in our lunches to enjoy all week long. 

These "super charge" cookies have been on my list for a while but for one reason or another got pushed to the back burner.  I finally made them this weekend but warned my husband that these are healthier cookies before he tested one.  After he tested one, then had one after dinner and then packed two in his lunch the next morning, it certainly seemed like the healthy part didn't deter him! 

There is still quite a bit of sugar in these cookies but they do get a health boost from some nut butter, oats, spelt flour, a hefty dose of flax meal and less oil.  I'd imagine they would be good with nuts so I'll probably try adding walnuts next time.

We really liked these and as you can tell, they're going quickly in our house!  I have a feeling I'll be making them again this weekend.

Super Charge Cookies
Taken from: Dreena's Vegan Recipes
Makes about 12 (I got 14)
  • 1 cup rolled oats or quick oats
  • 2/3 cup spelt flour
  • 1/4 tsp (rounded) sea salt
  • 1/4 – 1/2 tsp cinnamon
  • 1/8 cup unsweetened shredded coconut
  • 1/4 –1/3 cup raisins or chopped dried fruit (I used dried cranberries)
  • 3–4 tbsp carob or chocolate chips (optional; or use more dried fruit, nuts, or seeds)
  • 1/4 cup nuts (optional; I will try walnuts next time)
  • 1 tsp baking powder
  • 1/3 cup flax meal (could use ground flax seed)
  • 1/2 cup pure maple syrup (I was low on real maple syrup so I used 1/4 cup dark brown sugar and 1/4 cup Grade B maple syrup)
  • 3 tbsp almond butter (may use cashew, peanut, hemp seed butter)
  • 1 1/2 tsp pure vanilla extract
  • 2 tbsp oil or melted butter
  1. Preheat oven to 350°F (180°C). In a bowl, combine oats, flour, salt, cinnamon, coconut, raisins, and carob or chocolate chips, sift in baking powder, and stir until well combined.
  2. In a separate bowl, combine flax meal, syrup, almond butter, and vanilla and stir until well combined. Stir in oil.
  3. Add wet mixture to dry, and stir until just well combined (do not overmix).
  4. Line a baking sheet with parchment paper or a silpat mat. Spoon batter onto baking sheet evenly space apart, and lightly flatten.
  5. Bake for 10-13 minutes (no longer, or they will dry out). I started check at 10 minutes. Remove from oven and let cool on baking sheet for 1 minute, then transfer to a cooling rack.  

Wednesday, April 18, 2012

Lemon Poppy Seed Bread


We are big lemon poppy seed fans.  However, we don't have it that often because honestly, I often forget that we are big lemon poppy seed fans.  But when I stumbled on this recipe, it reminded me that it had been way too long (1 year? 2 years?) since the last time I made anything like this.

The bread ended up being moist with great flavor! Next time, I might double the glaze because I liked it so much; this glaze soaks into the bread and I really loved the extra burst of lemon that it added.  However, my husband liked this bread just the way it was.  And a word of warning: although I sprayed my pan, I forgot to flour it and that nice crack pictured above in the bread was the result.  So, just don't forget to butter (or spray) and flour your pans! 

My husband called this lemon poppy seed cake and I was quick to correct him that it's actually a quick bread.  But let's be honest, it might as well be called cake.  Just cake that seems slightly more acceptable as breakfast or a snack.
  
Lemon Poppy Seed Bread
Taken from: Kelsey's Apple A Day
Makes 1 loaf
  • zest and juice of 1-2 large lemons, divided (I only needed 1 juicy lemon)
  • 1 1/2 c. all-purpose flour (I used 1/2 cup whole wheat pastry flour and 1 cup all-purpose)
  • 1 tsp. baking powder
  • 1/4 tsp. salt
  • 6 Tbsp. unsalted butter, softened
  • 1 c. granulated sugar
  • 2 large eggs
  • 1/2 c. milk (I used skim)
  • 2 Tbsp. chia or poppy seeds (I used 1 Tbsp of poppy and 1 Tbsp of chia seeds)
  • 1/4 c. confectioners' sugar
  1. Preheat oven to 325 degrees F.  Spray or butter and flour one 9x5x3-inch loaf pan or 2-3 mini loaf pans (not glass), knocking out any excess flour.
  2. Finely grate enough zest from lemons to measure 2 tsp. and squeeze enough juice to measure about 1/4 cup. 
  3. Into a bowl sift together flour, baking powder, and salt.
  4. In a large bowl with an electric mixer beat together butter, granulated sugar, and lemon zest until light and fluffy.  Beat in eggs 1 at a time, beating well after each addition. 
  5. With mixer on low speed add flour mixture and milk alternately in batches, beginning and ending with flour mixture and beating just until batter is combined well.  Beat in seeds and 1 TBSP lemon juice and pour batter into prepared loaf pans, smoothing tops. Bake loaves in middle of oven until a tester comes out clean, about 45-60 minutes for a full-sized loaf (mine was close to 45 minutes) or 40-45 minutes for mini loaves.  Check for doneness with a skewer or toothpick.
  6. While loaves are baking, in a small bowl stir together 3 Tbsp of remaining lemon juice and confectioners' sugar to form a glaze (next time, I might double the amount of glaze because I love the extra lemon-y flavor!).
  7. Cool loaves in pans on a rack 15 minutes. Run a thin knife around edges of pans and invert bread onto rack. Turn right side up and pierce top all over with a thin skewer. Repeatedly brush lemon glaze over tops of loaves until all of glaze is absorbed.
  8. Cool loaves completely. Bread keeps, wrapped in wax paper, in an airtight container at room temperature 4 days or, wrapped in foil and frozen, 1 month.

Monday, April 9, 2012

Berry Jam


I remember feeling quite triumphant when I made this jam recipe several years ago. I was new(er) to cooking at the time and thought it was incredible I could make my own jam in just 10 minutes.  Well, I had forgotten about this recipe until I recently made a batch of homemade English muffins and wanted some jam for them.  I felt just about as triumphant four years later as I used up a bag of frozen berries from our freezer and again, had jam in about 10 minutes.  Exactly what I had wanted for an English muffin!

I love this recipe because it doesn't use as much added sugar as other recipes I've seen, and you could certainly cut down on the sugar if you wanted to.  I think it really helps to highlight the fruit in the jam.  While this recipe calls for frozen berries and can be made all year long, I'm especially excited to try this spring and summer with fresh berries. Cherry is a personal favorite of mine but I really want to try strawberry as well. Also, feel free to substitute lemon zest instead of lime (which I think could be particularly good with strawberries or blueberries).

Berry Jam
Taken from: Everyday Food
Makes 3/4 cup (I halved this)
  • 1 bag (12 ounces) frozen cherries or berries (I used Trader Joe's very cherry blend which has other fruits, too; I think this would be excellent with pretty much any kind of berries)
  • 1 1/2 teaspoons grated lime zest
  • 4 tablespoons sugar (I used turbinado)
  • 1/4 cup + 1 tablespoon water
  • 1 teaspoon cornstarch
  1. In a medium saucepan, combine cherries, zest, sugar, and 1/4 cup water. Cook over medium-high until mixture is thickened and large bubbles form, 6 to 8 minutes.
  2. In a small bowl, stir together cornstarch and 1 tablespoon cold water; stir into cherry mixture. Boil, stirring, for 1 minute; cool.

Tuesday, January 31, 2012

Breakfast (or Snack) Cookies


I often make something about once a week that I can throw in our lunches to serve as a mid-morning or early afternoon snack.  These snack cookies fit the bill.   They have a bit of staying power and good-for-you ingredients while still being sweet and cookie-ish (adding chocolate chips to half the batch sure didn't hurt!).  They ended up being soft and chewy.  Also, this made about 20 large cookies so they lasted us over a week!

While I might not consider them a dessert (kinda like when your parents told you that "fruit" was dessert back when you were younger), they made for a great snack!

Other snack options I've really enjoyed: these granola bars and this applesauce cake.


Breakfast/Snack Cookies
Taken from: Yes, I Want Cake
Makes approx 20 largish cookies
  • 1/2 c butter, room temperature (I used 1/4 cup butter and 1/4 cup unsweetened applesauce)
  • 1/2 c pumpkin puree
  • 1/2 c sugar
  • 1/4 c maple syrup
  • 1 egg
  • 1 t vanilla
  • 1 c oats
  • 1 c whole wheat flour (I used 1/2 cup all-purpose flour and 1/2 cup whole wheat pastry flour)
  • 1 t baking soda
  • 1 t kosher salt
  • 1/2 c grape nuts cereal
  • 1/4 c wheat germ
  • 2 T ground flax
  • 2 T chia seeds (I omitted)
  • 1/2 c unsweetened dried coconut flakes (I used about 1/4 cup unsweetened and 1/4 cup sweetened)
  • 1 c nuts, chopped (I used pecans and almonds)
  • Optional: chocolate chips (I threw about 1/4 cup or so into half the batter)
  1. Preheat the oven to 350 degrees. Line a cookie sheet with parchment paper – these bad boys are sticky.
  2. Combine the butter, pumpkin, sugar, and maple syrup in the bowl of a mixer fitted with a paddle attachment (or just use your muscles and stir it all with a big spoon). Then add the egg and vanilla
  3. Add the dry ingredients (oats, flour, baking soda, salt) and mix just until incorporated.
  4. Then add the rest of the ingredients and mix again.
  5. Use a large scoop (I used ice cream scoop) and place balls of dough about 2 inches apart on the cookie sheet. Use your hand (or a  glass) to press down until flattened.
  6. Bake for 10-12 minutes or until edges are brown.

Friday, December 2, 2011

Applesauce Cake


It was a bit of a surprise to find an applesauce cake that doesn't have...fresh apples.  It has applesauce, it has dried apples and it has apple cider but no whole apples.  However, you can't tell at all - it is super moist, very apple-y, and delicious. And a little hard to share with others.  Within 24 hours, a certain husband of mine had three pieces of this cake so I knew I had to pack up some for myself before it all disappeared.  It was excellent as a snack or would even be great as breakfast or dessert.

There are a few extra steps to making this that aren't normally in a quick bread kind of recipe -- the dried apples and apple cider are simmered on the stove for 15 minutes and then they are processed in the food processor with the applesauce.  I actually did these steps in the morning and then refrigerated the applesauce mixture until that evening when I finished making the recipe.  It really didn't feel like much work by splitting the tasks although it still wouldn't be too hard to do everything from start to finish. And trust me, it is so worth it. The picture just doesn't do justice to how high the cake rose or how moist it stayed.  I'm definitely planning on making this again in the next few weeks!

Applesauce Snack Cake
Taken from: Cook's Illustrated
Makes about 9-12 squares (depending on how large you like them!)
  • ¾ cup (2 ounces), dried apples, cut into ½-inch pieces
  • 1 cup apple cider
  • 1½ cups (7½ ounces) unbleached all-purpose flour (I used 3/4 cup all-purpose and 3/4 cup whole wheat pastry flour)
  • 1 teaspoon baking soda
  • ⅔ cup (4¾ ounces) sugar
  • ½ teaspoon ground cinnamon
  • ¼ teaspoon fresh ground nutmeg
  • ⅛ teaspoon ground cloves
  • 1 cup unsweetened applesauce, room temperature
  • 1 large egg, room temperature, lightly beaten
  • ½ teaspoon table salt
  • 8 tablespoons (1 stick) unsalted butter, melted and cooled slightly (I did 5 tablespoons of melted butter and 3 tablespoons of Greek yogurt instead)
  • 1 teaspoon vanilla extract
  1. Adjust oven rack to middle position; hear oven to 325 degrees. Cut 16-inch length parchment paper or aluminum foil and fold lengthwise to 7-inch width. Spray 8-inch square baking dish with nonstick spray and fit parchment into dish, pushing it into corners and up sides; allow excess to overhang edges of dish.
  2. Bring dried apples and cider to simmer in small saucepan over medium heat; cook until liquid evaporates and mixture appears dry, about 15 minutes. Cool to room temperature.
  3. Meanwhile, whisk flour and baking soda in medium bowl to combine; set aside. In second medium bowl, whisk sugar, cinnamon, nutmeg, and cloves. Measure 2 tablespoons sugar-spice mixture into small bowl and set aside for topping.
  4. In food processor, process cooled dried-apple mixture and applesauce until smooth, 20 to 30 seconds, scraping sides of bowl as needed; set aside. 
  5. Whisk egg and salt in large bowl to combine. Add sugar-spice mixture and whisk continuously until well combined and light colored, about 20 seconds. Add butter in three additions, whisking after each. Add applesauce mixture and vanilla and whisk to combine. Add flour mixture to wet ingredients; using rubber spatula, fold gently until just combined and even moistened.
  6. Turn batter into prepared pan, smoothing top with rubber spatula. Sprinkle reserved 2 tablespoons sugar-spice mixture evenly over batter. Bake until wooden skewer inserted in center of cake comes out clean, 35 to 40 minutes. Cool on wire rack to room temperature, about 2 hours. Run knife along cake edges without parchment to release. Remove cake pan by lifting parchment overhand and transfer to cutting board. Cut cake and serve.

Wednesday, September 21, 2011

Chocolate Chunk Toffee Granola Bars


I'm not sure if anyone else feels this way, but in the last two years, my life's mission has been to make enough food to fatten feed my husband.  Unlike the average American, he needs MORE food and calories, especially with training for a marathon this fall.  But he doesn't love desserts (like I do) and I don't like to keep processed foods in the house, so I'm always looking for an extra snack or small meal I can make.  Protein shakes, trail mix, homemade Lara bars, homemade crackers, bread....I like to have something that I can throw in his lunch or he can have after a workout.  This week, it's granola bars.

A few of these granola bars found their way into my lunch as well.  For research purposes, obviously.  These granola bars are crunchy with a great taste but aren't overly sweet like some store-bought brands. I found mine were a little crumbly (although I didn't really mind) so I might add an extra tablespoon of melted butter next time to hold them together better.  Next time, I also might double the recipe and bake it in a 9x13 baking dish because we he does go through them quickly.

Chocolate Chunk Toffee Granola Bars
Taken from: Oh She Glows
Makes 8ish bars (depending on the size)
  • 1 1/2 cups oats
  • 1/4 cup whole grain spelt  or white whole wheat flour
  • 2 tbsp chia seeds (I used 2 tbsp flax seed instead)
  • 1 tsp ground cinnamon
  • 1/2 tsp kosher salt
  • 1 cup walnuts, chopped
  • 1/2 cup brown rice syrup (or honey or maple syrup -- I used honey)
  • 2 tbsp butter (add 1 extra tbsp of melted butter if mixture seems dry)
  • 1/4 cup packed brown sugar
  • 1/4 cup all natural peanut butter or any other nut butter
  • 1 tsp vanilla extract
  • 1/2 cup chocolate chunks or chips
  1. Preheat oven to 350F and line an 8-inch pan with a large piece of parchment paper (that covers the sides completely), so the bars do not stick to pan.
  2. In a large bowl, stir together the dry ingredients (oats, flour, chia seeds, cinnamon, salt, walnuts).
  3. In a microwavable bowl, stir together the brown rice syrup, butter, brown sugar, and peanut butter. Microwave on high for 45 seconds. Alternatively you can heat this on the stovetop.
  4. Pour wet mixture onto dry and stir well. The mixture will be very tough to stir (it’s a thick dough!) so don’t be alarmed. Allow the dough to cool a bit before mixing in the chocolate (otherwise, if you add in the chocolate too soon, it will melt, and it’s best chunky).
  5. Scoop into prepared pan and with a wet spoon spread out the mixture. The dough will be very thick and sticky. I dipped a pastry roller into water and rolled it out. Try to get it as even as possible!
  6. Bake for 30-32 minutes at 350F. Allow to cool in the pan, on a cooling rack, for at least 15 minutes. Remove carefully from pan and allow to cool on the rack for another 20-30 minutes. If you cut the bars before completely cooling, they will crack, so it’s a good idea to wait as they will firm up.

Tuesday, August 30, 2011

Pretzel Bites & Week's Menu Plan


When I married my husband, I also became an aunt for the first time.  Of course, my new name Aunt Anne immediately reminded me of the pretzel company Auntie Anne's.  So as a joke, I mentioned it was my new goal to make pretzel to be worthy of my new name and then promptly forgot all about it.

Later, when I came across this recipe for pretzel bites, I was intrigued.  While I haven't made these pretzels for my nieces or nephews yet, they're delicious.  And whenever we decide to have an appetizer dinner, these usually make it onto the menu.  They're delicious and pretty addictive.  This last time, I forgot to halve the recipe like I usually do so we ended up with a lot more pretzel bites!  The leftovers (that didn't last more than a week) were best heated up for a few minutes in the oven (I think we used a 350 degree oven).

There's an option to make a cinnamon-sugar version but I made all of them regular.  We served them with marinara sauce but they were also tasty on their own as well as with a (large) dab of Nutella.  Two Peas and Their Pod also gives instructions on how to make a cheese sauce for them.  Really, the possibilities are endless!

Also, here's this week's menu plan:


Pretzel Bites
Taken from: Two Peas and Their Pod
Makes 150+ pretzel bites (I normally halve this recipe and it still makes a lot!)
  • 1 1/2 cups warm water
  • 2 tablespoons light brown sugar
  • 1 package (2 1/4 tsp.) active dry yeast 
  • 6 Tbsp. unsalted butter, melted
  • 2 1/2 teaspoons kosher salt
  • 4 1/2 to 5 cups all-purpose flour (I did about 2 1/2 cups of all purpose and 2 1/2 cups of white whole wheat flour)
  • Cooking spray
  • 3 quarts water
  • 3/4 cup baking soda
  • 1 whole egg, beaten with 1 tablespoon cold water (for brushing; I omitted)
  • coarse sea salt*
  1. Combine the water, sugar, yeast, and butter in the bowl of a stand mixer and mix with the dough hook until combined. Let sit for 5 minutes.
  2. Add the salt and flour and mix on low speed until combined. Increase the speed to medium and continue kneading until the dough is smooth and begins to pull away from the side of the bowl, about 3 to 4 minutes. If the dough appears too wet, add additional flour, 1 tablespoon at a time. Remove the dough from the bowl, place on a flat surface and knead into a ball with your hands.
  3. Spray a bowl with cooking spray, add the dough and turn to coat with the oil. Cover with a clean towel or plastic wrap and place in a warm spot until the dough doubles in size, about 1 hour.
  4. Preheat the oven to 425 degrees F.
  5. Bring the water to a boil in a small roasting pan over high heat and add the baking soda.
  6. Remove the dough from the bowl and place on a flat surface. Divide the dough into 8 equal pieces, about 4 1/4 to 4 1/2 ounces each. Roll each piece into a long rope measuring 22 inches and shape. Cut the dough into one inch pieces to make the pretzel bites. Boil the pretzel bites in the water solution in batches. We did about 15 bites at a time. Boil for about 30 seconds. Remove with a large slotted spoon. 
  7. Place pretzel bites on a baking sheet that has been sprayed with cooking spray. Make sure they are not touching. Brush the tops with the egg wash (instead, I sprayed with cooking spray) and season liberally with the salt. Place into the oven and bake for 15 to 18 minutes until golden brown.
  8. Remove to a baking rack and let rest 5 minutes before eating.
*If you want to make cinnamon and sugar pretzel bites-instead of adding salt, sprinkle the bites with cinnamon and sugar. For the frosting mix-soft cream cheese-about 3 T, powdered sugar, a teaspoon of vanilla extract, and a little bit of milk. Whisk together. Add more milk if it is too thick, if it is too thin, add more powdered sugar.

Monday, August 22, 2011

Homemade Graham Crackers & Week's Menu Plan


As you might be able to tell, we're moving more and more to making most foods ourselves. It's amazing how many aisles in the grocery store that I now skip on my weekly trip. Top of that list is the cracker and cookie aisle.  Almost all our cookies and crackers come from my kitchen instead.  And now, we have a delicious homemade recipe for one of my favorites: graham crackers.

These graham crackers are more labor intensive and need some time to chill in the refrigerator (twice).  But it worked out well as I could fit in chores and dinner while the dough chills.  And these graham crackers are delicious! The thinner crackers are crispy and have a crunch reminiscent of store bought graham crackers while the thicker ones were a bit chewier.  I liked both kinds and the overall flavor was delicious with a hint of molasses.

To make life easier, I halved the recipe and it still made quite a bit.  I also skipped the step about decorating the cookies to make them look like graham crackers.  It wasn't worth the effort for me.  While the taste is exactly the same, however, including this step would make them look a lot more authentic than mine!

As a side note, I've also included our week's menu plan (and already altered it...we're having roasted eggplant pizza instead of eggplant parmesan)!


Homemade Graham Crackers
Taken from: Smitten Kitchen
Makes 10 4 x 4.5-inch graham crackers or 48 2-inch squares (I halved this recipe)
  • 2 1/2 cups plus 2 tablespoons unbleached all-purpose flour (a swap of 1/2 cup with whole wheat flour or 1 cup while whole wheat flour works well)
  • 1 cup dark brown sugar, lightly packed
  • 1 teaspoon baking soda
  • 3/4 teaspoon kosher or coarse sea salt 
  • 7 tablespoons unsalted butter, cut into 1-inch cubes and frozen
  • 1/3 cup mild-flavored honey, such as clover
  • 5 tablespoons milk, full-fat is best (I used skim with a drop of whipping cream)
  • 2 tablespoons pure vanilla extract
Cinnamon-Sugar Topping (optional, I omitted and we didn't miss it!)
  • 3 tablespoons granulated sugar
  • 1 teaspoon ground cinnamon
  1. Make the dough: Combine the flour, brown sugar, baking soda, and salt in the bowl of a food processor fitted with the steel blade or in the bowl of an electric mixer fitted with the paddle attachment. Pulse or mix on low to incorporate. Add the butter and pulse on and off on and off, or mix on low, until the mixture is the consistency of a coarse meal. (Alternately, if you don't have a food processor or electric mixer, you can cut the ingredients together with a pastry blender, making sure they're very well incorporated.)
  2. In a small bowl, whisk together the honey, milk, and vanilla extract. Add to the flour mixture and pulse on and off a few times or mix on low until the dough barely comes together. It will be very soft and sticky. Lay out a large piece of plastic wrap and dust it lightly with flour, then turn the dough out onto it and pat it into a rectangle about 1-inch thick. Wrap it, then chill it until firm, about 2 hours or overnight.
  3. Meanwhile, prepare the topping, if using, by combining the sugar and cinnamon in a small bowl and setting aside.
  4. Roll out the crackers: Divide the dough in half and return one half to the refrigerator. Sift an even layer of flour onto the work surface and roll the dough into a long rectangle about 1/8 inch thick. The dough will be sticky, so flour as necessary. Trim the edges of the rectangle to 4 inches wide. Working with the shorter side of the rectangle parallel to the work surface, cut the strip every 4 1/2 inches to make 4 crackers. (This makes traditional graham cracker shape.  I cut mine into 2 inch squares instead.)
  5. Place the crackers on one or two parchment-lined baking sheets and sprinkle with the topping. Chill until firm, about 30 to 45 minutes in the fridge or 15 to 20 minutes in the freezer. Repeat with the second batch of dough. Finally, gather any scraps together into a ball, chill until firm, and re-roll.
  6. Adjust the oven rack to the upper and lower positions and preheat the oven to 350°F. 
  7. Decorate the crackers (optional, I omitted): Mark a vertical line down the middle of each cracker, being careful not to cut through the dough (again, this is for the traditional cracker shape). Using a toothpick or skewer, prick the dough to form two dotted rows about 1/2 inch for each side of the dividing line.
  8. Bake for 15 to 25 minutes, until browned and slightly firm to the touch, rotating the sheets halfway through to ensure even baking. After the 10 minute mark, I'd recommend checking every few minutes to ensure they don't burn.