Showing posts with label menu plan. Show all posts

Monday, August 22, 2011

Homemade Graham Crackers & Week's Menu Plan


As you might be able to tell, we're moving more and more to making most foods ourselves. It's amazing how many aisles in the grocery store that I now skip on my weekly trip. Top of that list is the cracker and cookie aisle.  Almost all our cookies and crackers come from my kitchen instead.  And now, we have a delicious homemade recipe for one of my favorites: graham crackers.

These graham crackers are more labor intensive and need some time to chill in the refrigerator (twice).  But it worked out well as I could fit in chores and dinner while the dough chills.  And these graham crackers are delicious! The thinner crackers are crispy and have a crunch reminiscent of store bought graham crackers while the thicker ones were a bit chewier.  I liked both kinds and the overall flavor was delicious with a hint of molasses.

To make life easier, I halved the recipe and it still made quite a bit.  I also skipped the step about decorating the cookies to make them look like graham crackers.  It wasn't worth the effort for me.  While the taste is exactly the same, however, including this step would make them look a lot more authentic than mine!

As a side note, I've also included our week's menu plan (and already altered it...we're having roasted eggplant pizza instead of eggplant parmesan)!


Homemade Graham Crackers
Taken from: Smitten Kitchen
Makes 10 4 x 4.5-inch graham crackers or 48 2-inch squares (I halved this recipe)
  • 2 1/2 cups plus 2 tablespoons unbleached all-purpose flour (a swap of 1/2 cup with whole wheat flour or 1 cup while whole wheat flour works well)
  • 1 cup dark brown sugar, lightly packed
  • 1 teaspoon baking soda
  • 3/4 teaspoon kosher or coarse sea salt 
  • 7 tablespoons unsalted butter, cut into 1-inch cubes and frozen
  • 1/3 cup mild-flavored honey, such as clover
  • 5 tablespoons milk, full-fat is best (I used skim with a drop of whipping cream)
  • 2 tablespoons pure vanilla extract
Cinnamon-Sugar Topping (optional, I omitted and we didn't miss it!)
  • 3 tablespoons granulated sugar
  • 1 teaspoon ground cinnamon
  1. Make the dough: Combine the flour, brown sugar, baking soda, and salt in the bowl of a food processor fitted with the steel blade or in the bowl of an electric mixer fitted with the paddle attachment. Pulse or mix on low to incorporate. Add the butter and pulse on and off on and off, or mix on low, until the mixture is the consistency of a coarse meal. (Alternately, if you don't have a food processor or electric mixer, you can cut the ingredients together with a pastry blender, making sure they're very well incorporated.)
  2. In a small bowl, whisk together the honey, milk, and vanilla extract. Add to the flour mixture and pulse on and off a few times or mix on low until the dough barely comes together. It will be very soft and sticky. Lay out a large piece of plastic wrap and dust it lightly with flour, then turn the dough out onto it and pat it into a rectangle about 1-inch thick. Wrap it, then chill it until firm, about 2 hours or overnight.
  3. Meanwhile, prepare the topping, if using, by combining the sugar and cinnamon in a small bowl and setting aside.
  4. Roll out the crackers: Divide the dough in half and return one half to the refrigerator. Sift an even layer of flour onto the work surface and roll the dough into a long rectangle about 1/8 inch thick. The dough will be sticky, so flour as necessary. Trim the edges of the rectangle to 4 inches wide. Working with the shorter side of the rectangle parallel to the work surface, cut the strip every 4 1/2 inches to make 4 crackers. (This makes traditional graham cracker shape.  I cut mine into 2 inch squares instead.)
  5. Place the crackers on one or two parchment-lined baking sheets and sprinkle with the topping. Chill until firm, about 30 to 45 minutes in the fridge or 15 to 20 minutes in the freezer. Repeat with the second batch of dough. Finally, gather any scraps together into a ball, chill until firm, and re-roll.
  6. Adjust the oven rack to the upper and lower positions and preheat the oven to 350°F. 
  7. Decorate the crackers (optional, I omitted): Mark a vertical line down the middle of each cracker, being careful not to cut through the dough (again, this is for the traditional cracker shape). Using a toothpick or skewer, prick the dough to form two dotted rows about 1/2 inch for each side of the dividing line.
  8. Bake for 15 to 25 minutes, until browned and slightly firm to the touch, rotating the sheets halfway through to ensure even baking. After the 10 minute mark, I'd recommend checking every few minutes to ensure they don't burn.

Monday, July 4, 2011

Cooking Our Way Through California's new home

Since our time in California has come to an end, From Anne's Kitchen is the new home of Cooking Our Way Through California!  Not much else will change besides the new cooking blog name and the new look.  Even if you use the old link of cookingourwaythroughcalifornia.blogspot.com, it should redirect you to this new blog (fromanneskitchen.blogspot.com).  I've also moved over all of the old recipes, so you should be able to find everything on this new blog. Welcome and I hope you enjoy the new blog!

We really enjoyed our year in California - it was an adventure and also became the birthplace of my cooking blog (almost exactly one year ago!).  However, we were excited to come back on the East Coast.  We did the cross-country drive, stopping in Arizona to see friends and family along the way.  We arrived safely although the military has made our move a bit more...eventful...by delaying when we get our household goods delivered to our new apartment.

So for the next week or so, we'll be camping out in our apartment.  Perhaps not surprisingly, I brought the bare essentials for cooking on our cross-country trip so this next week's meals will be part of a  "Bachelor Pad" series, proving what you can possibly cook with the following kitchen gadgets: 1 12" skillet, 1 small stockpot, 1 baking sheet, 1 army utility knife, 1 paring knife, and 1 small cutting board. A can opener will soon be a necessary addition to this set.  But cooking with the basics does not mean boring!  This is partially because of all the fresh summer produce at our fingertips that just makes cooking that much easier.  For example, a caprese salad of farmers market fresh sliced tomatoes topped with mozzarella, basil and a drizzle of balsamic vinegar is going to be part of our lunch today.  And with 2 or 3 meals now, we've had kale chips.  Lots of kale chips (I am not complaining, by the way!).

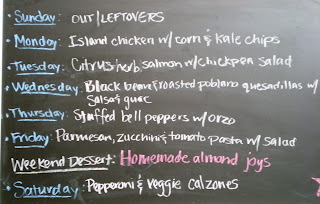
Since my husband made this chalkboard for our weekly meal plan (which I LOVE! He's so clever), here's what we'll be having this week with our bachelor-style kitchen set:

Our internet is a bit limited but I'll be sharing the week's successful recipes in the near future.  In the meantime, however, happy Independence Day!

Sunday, April 17, 2011

Whole Wheat Knots & Week's Menu Plan


I've found it: my favorite rolls.  When my husband was working late one night, I realized I would have more time than usual before we had dinner.  So as soon as I got home from work, I got busy making these rolls.  Normally, these rolls would be near-impossible to make on our typical weeknight because they require a bit more time for steps like cooling the oats mixture and letting the dough rise (twice).  The majority of the time is hands-off, so if happen to have the chance, it is so, so worth it.

I couldn't believe how unbelievably light these knots tasted even though they're chock full of good for you ingredients like whole wheat flour, oats and flaxseed.  I had 2 right out of the oven because they were just that good.  Also, when I toasted one the next morning, it tasted a lot like a bagel! We've had them toasted for breakfast, as a sandwich bun, and served as a side dish for dinner and loved them each way.  I was originally going to brush them in a butter garlic topping which I think would still be wonderful.  I can promise I'll be making these again!


Whole Wheat Knots
Taken from: A Hint of Honey
Makes 16-24 rolls (I believe I made 20
  • 1 cup old-fashioned oats
  • 1/4 cup honey
  • 2 Tbsp. butter
  • 1 1/2 tsp. salt
  • 2 cups boiling water
  • 1 package (2 1/4 tsp.) active dry yeast
  • 1/3 cup warm water (100-110 F)
  • 1/4 cup flaxseed meal
  • 4 cups white whole wheat flour
  • 1 Tbsp. gluten (optional)
  • Approx. 1/2 cup all-purpose flour 
  • 1 large egg, whisked + 1 tsp. water (optional, I omitted)
  • 1 Tbsp. rolled oats (optional, I omitted)
  • 1 Tbsp. poppy seeds (optional, I omitted)
  • 1 Tbsp. sesame seeds  (optional, I omitted)
  1. Combine the first 4 ingredients in a large bowl, and add 2 cups boiling water, stirring until well blended. Cool to room temperature (I stuck mine in the freezer which took about 10-15 minutes to cool).
  2. Dissolve yeast in 1/3 cup warm water in a small bowl; let stand 5 minutes. Add yeast mixture to cooled oats mixture; stir well. Stir in flaxseed meal.
  3. Gradually add 4 cups whole wheat flour to oats mixture; stir until a soft dough forms. Knead about 1 minute and then let dough rest for 20 minutes.  Turn dough out onto a lightly floured surface. Knead until smooth and elastic (about 8 minutes by hand, 5-6 minutes by stand mixer); add enough of all-purpose flour to prevent dough from sticking to hands (dough will feel tacky).
  4. Place dough in a large bowl coated with cooking spray, turning to coat top. Cover and let rise in a warm place, free from drafts, approx. 60 minutes or until doubled in size. (Press two fingers into the dough. If indentation remains, the dough has risen enough.) Punch dough down, and let rest for 5 minutes.
  5. Divide dough in half; cut each half into 8-12 equal portions. Working with one portion at a time (cover remaining dough to prevent from drying), shape each portion into an 8-inch rope. Tie each rope into a single knot; tuck top end of rope under bottom edge of roll. Place each roll on a baking sheet coated with cooking spray. Cover with plastic wrap coated with cooking spray; let rise in a warm place, free from drafts, for 30-60 minutes or until doubled in size.
  6. Preheat oven to 400 F.
  7. Optional step: Combine water and egg in a small bowl; brush egg mixture over rolls. Combine oats, poppy seeds, and sesame seeds; sprinkle evenly over rolls.
  8. Bake in preheated oven for 10-15 minutes or until golden. Cool on wire racks.
Week's Menu Plan

Sunday: Thai Chicken & Noodles
Monday: Cod with Coconut Curry Sauce, quinoa and roasted cauliflower
Tuesday: Southwest Sweet Potato & Black Bean Hash
Wednesday: Sweet & Sticky Chicken Breasts, Mashed Turnips & Potatoes, steamed broccoli
Thursday: Skirt Steak Salad with sauteed asparagus
Friday: out

    Sunday, January 23, 2011

    Homemade Pancakes & Week's Menu Plan

    Pancakes and eggs are an after-church Sunday lunch tradition in my family.  We take our pancakes very seriously...and our maple syrup, too.  My dad is from New York state so we always had real Grade B maple syrup in the house.  (You might think this is a little crazy extreme but we even take our own syrup to restaurants. I say it's just plain smart -- who wants to have gummy, artificially sweetened corn syrup when you can have the real thing?)

    As usual, the blog Smitten Kitchen came through as I was searching for a pancake recipe.  This is a great recipe - it was originally for blueberry pancakes but it's January so we nixed them (and I don't really like blueberry pancakes, anyway). Plus, we wanted to top ours with cinnamon sugar or Nutella or (surprise, surprise) real maple syrup. I love the blog Smitten Kitchen but tweaked a few things: less sugar, less buttermilk and less butter (I have learned I can often cut the butter/oil/fat in half without really missing it).  Bryant declared the best pancakes he had ever had, so we didn't miss these foregone ingredients.


    Homemade Pancakes
    Taken from: Smitten Kitchen
    Makes 20ish pancakes 
    • 2 cups all-purpose flour
    • 2 teaspoons baking powder
    • 1 teaspoon baking soda
    • 1/2 teaspoon salt
    • 2 tablespoons sugar
    • 2 large eggs, lightly beaten*
    • 2 cups buttermilk (a great substitute I use is for each cup of buttermilk, add 1 Tbsp of white vinegar or lemon juice to a 1-cup measurer and then fill up the rest of the way with milk) 
    • 2 tablespoons unsalted butter or Smart Balance, melted, plus 1 tablespoon extra for brushing griddle
    * I used this trick to try to make the pancakes even lighter: separate the eggs, mix the yolks with the buttermilk and butter, but whip the egg whites in a separate bowl until stiff. If you fold the egg whites gently back into the batter–this should be your very last step–your pancakes will be unbelievably light, with an extra-crisp edge.

    -Whisk together the flour, baking powder, baking soda, salt, and sugar in a medium bowl. In a small bowl, whisk the eggs (or just egg yolks), buttermilk, and 2 tablespoons melted butter together.  Add to the dry ingredients and whisk lightly to combine but do not overmix. (Optional step: Gently fold in the egg whites with a spatula.) The batter should have small to medium lumps. Set aside to let the batter rest (this is an essential step).
    -Preheat an electric griddle to 350-375°F, or place a griddle pan or cast-iron skillet over medium heat. Test the griddle by sprinkling a few drops of water on it. If the water bounces and spatters, the griddle is hot enough. Using a pastry brush, brush a bit of the remaining melted butter onto the griddle.
    -Using a 1/4 cup measurer, pour the batter in pools 2 inches apart.  When the pancakes have bubbles on top and are slightly dry around the edges, about 2 1/2 minutes, flip over. Cook until golden on bottom, about 1 minute.
    -Repeat with the remaining batter. You can keep the finished pancakes on a heat-proof plate in the oven at 175°F. Serve warm with any of your favorite toppings - fruit, cinnamon & sugar, Nutella, maple syrup, butter, etc.


    Week's Menu Plan

    Monday: Mujadara and spanakopita

    Tuesday: Grilled scallop ceviche with wild rice pilaf

    Wednesday: Flank Steak with wine mushroom sauce with polenta and roasted Brussels sprouts
     
    Thursday: spaghetti squash with homemade sauce and turkey meatballs

    Friday: homemade pizza

    Sunday, January 16, 2011

    Homemade Ravioli & Week's Menu Plan

    With a long weekend, I definitely plan to put it to good use: making homemade ravioli.  It's incredibly simple to make but you do need some extra time on your hands.  However, once the ravioli is made, you can refrigerate it or freeze it to make a delicious homemade dinner about 5 minutes flat.

    If you're ambitious and have the right tools, you can actually make the ravioli pasta yourself.  But for everyone else, store-bought wonton wrappers are the surprising choice for the pasta. They provide a light and delicate wrap and are just the right size.  You can stuff anything you'd like in the ravioli - cheese, sweet potatoes, mushrooms, etc.  My choice is spinach and ground turkey breast.

    Homemade Ravioli
    Makes 30-40 ravioli
     
    Ravioli filling:
    Taken from: AllRecipes

    • 4 ounces (1/4 pound) ground turkey breast or ground beef
    • 2 cups fresh spinach
    • 1 tablespoon grated Parmesan cheese
    • 1 tablespoon breadcrumbs or panko
    • 1/4 teaspoon dried spices (I use a 1/4 teaspoon of each: oregano, thyme, basil, onion powder and garlic powder)
    • 1 tablespoon olive oil
    • 1 egg white
    • salt and ground pepper
    -Heat a large skillet over medium-high heat and stir in the ground turkey/beef. Season lightly with salt and pepper. Cook and stir until the turkey/beef is crumbly, evenly browned, and no longer pink. Drain and discard any excess grease. Stir in the spinach and cook until wilted, about 1 to 2 minutes. Remove from heat and allow to cool for 10 minutes.
    -Transfer the turkey/beef mixture to a bowl. Add the Parmesan, parsley, bread crumbs, olive oil, egg, garlic salt, and pepper and mix well. Run the filling through a grinder until smooth (or puree in a food processor until smooth).
     
    Ravioli preparation:
    Taken from: Faithful Provisions
    • Wonton wrappers (approximately 40)
    • Small dish of water
    -Lay wonton wrappers out on workspace, have a small dish of water to dip your fingers in to wet wonton so it will seal.
    -Lay out two wrappers, and top one with approximately one tablespoon of filling of choice.
    -Brush the edges of the wrapper with water and lay the second wrapper on top, seal edges (I also press down with edge of a fork to help seal the edges).  Continue until you use all the filling.
    -To freeze the ravioli: Cover a baking sheet with parchment paper. Lay ravioli in a single layer and place in freezer for about 30 minutes.  Once ravioli is frozen, it can be placed in a freezer bag and stored for up to 3 months.  This helps to ensure that the ravioli do not stick to one another.
    -To cook ravioli: This can be cooked from fresh or directly from frozen.  Boil a pot of water and cook ravioli for about 2 to 3 minutes.  Keep it at a low boil.  Drain and serve.

    Week's Menu Plan
     

    Monday: pizza
     
    Tuesday :  crisp ravioli  (homemade) served with steamed artichokes

    Wednesday: Mujadara and spanakopita

    Thursday: Chicken cacciatore with roasted cauliflower

    Friday: appetizers

    Sunday, January 9, 2011

    Breakfast Quinoa & Week's Menu Plan

    Breakfast is by far my favorite meal.  Since I've been cooking much more these last couple years, dinner is rapidly closing in but somehow, I don't think it can surpass breakfast in my book.  I love the elaborate breakfasts - any thing with eggs or some kind of sweet carb - and I even love the simple ones (when Bryant goes out of town, I happily eat cereal for dinner).  With our wonderful Christmas and New Years celebrations, I've had my fair share of those big breakfasts. However, I wanted something special for our lazy Saturday...just without the extra fat and sugar.  Bless you, breakfast quinoa, for gracing our presence.

    Quinoa is incredibly good for you and I love it's nutty flavor.  I've only made it in savory dishes but was really happy to find a sweeter version.  Adding a couple tablespoons of brown sugar, maple syrup or honey gives it a subtly sweet flavor. We topped ours with toasted pecans, sliced almonds, dried cranberries and frozen cherries.  A nice and healthy way to start a weekend!

    Breakfast Quinoa
    Serves 3-4 (makes 2 cups)
    • 2 cups milk or 1 cup milk and 1 cup water (I chose the water/milk option)
    • pinch of salt 
    • 1 cup quinoa, rinsed
    • 3 tablespoons of light-brown sugar, honey or maple syrup (or a combination)
    • 1/2 teaspoon ground cinnamon
    • 1/3 cup toasted pecans or almonds
    • 1/4 - 1/2 cup fresh, dried or frozen fruit (any kind of berries, cherries, cranberries, apples, etc would work really well)
    -Bring milk and water to a boil in a small saucepan. Add small pinch of salt and quinoa, and return to a boil (watch carefully as my pot boiled over when I stopped looking). 
    -Reduce heat to low, and simmer, covered, until three-quarters of the milk has been absorbed, about 15 minutes.
    -While quinoa is cooking, heat medium saute pan to medium.  Add nuts to the dry pan and toast, shaking occasionally, for 3 minutes. 
    -Stir in sugar and cinnamon. Cook, covered, until almost all the milk has been absorbed, about 3-8 minutes. Top with nuts and fruit of your choice.  Serve with additional milk and sweeteners if you choose.


    Week's Menu Plan

    Sunday: Butter Chicken and rice with carrots, celery and peas

    Monday: loaded baked potato (chili, broccoli, cheddar cheese, green onions, bacon)

    Wednesday:  Pecan-crusted cod with couscous and roasted brussels sprouts
     
    Saturday: chicken parmesan burgers
    Sunday: Maely's chicken with sweet potato casserole and salad

    Sunday, January 2, 2011

    Homemade Tortilla Chips & Week's Menu Plan

    After a wonderful Christmas in Seattle and celebrating New Year's in San Diego, it's good to be back (of course, it doesn't hurt that I got lots of gifts for my kitchen!).  It was even nice to take a break from the kitchen and have good food made by other people.

    One wonderful thing about living in California (and I've probably mentioned it before) is (cheap) avocados all year round!  Bryant's specialty is guacamole and to complement that, I found a quick and easy recipe for homemade tortilla chips.  They're also healthier than store bought, not to mention cheaper.

    Even if you don't have avocados this time of year, try these chips with our favorite salsa.

    Homemade Tortilla Chips
    Taken from: AllRecipes 
    • 1-2 corn or flour tortillas
    • 1 teaspoon olive oil
    • 1 tablespoon lime juice
    • 1/4 teaspoon ground cumin
    • 1/4 teaspoon chili powder
    • 1/4 teaspoon salt
    -Preheat oven to 350 degrees F.
    -Cut each tortilla into chip sized wedges and arrange the wedges in a single layer on a cookie sheet.
    -In a small bowl, combine the rest of the ingredients. Mix well and brush on each tortilla wedge.
    -Bake for 3-4 minutes and then rotate the cookie sheet 180 degrees in the oven (this allows the chips to cook more evenly because the back of the oven is hotter than the front). Bake for another 2-3 minutes or until the chips are crisp, but not too brown. Serve with salsas, garnishes or guacamole.

    Week's Meal Plan

    Sunday: Apple Chicken Quesadillas with guacamole and Mexican bean salad

    Monday: skirt steak salad with cornbread muffins

    Tuesday : ground turkey lettuce wraps

    Wednesday:  lentil stew with leftover cornbread muffins

    Thursday: chicken gyros with tzatziki

    Friday: burgers with sweet potato fries
          Weekend dessert (decisions, decisions): Mocha brownies or almond butter snickerdoodles

    Saturday, December 11, 2010

    The Best Blueberry Scones & Week's Menu Plan

    Bryant actually introduced me to scones a couple of years ago and I just love them. I've ordered them at different coffee shops and bakeries. Well, that's not right; I used to order them at different coffee shops and bakeries.  And then I tried making this Cook's Illustrated recipe for scones and these homemade blueberry scones kind of ruined me for all others. They're so, so, so good.  Moist, incredibly flaky, sweet (but not overly sweet) and best when they're fresh out of the oven...now that's my kind of scone.  These are also great because you can freeze the raw scones and when you want one, you take it out of the freezer, pop it in a preheated oven and bake 25-30 minutes.  Not a bad way to start any day.

    The Best Blueberry Scones
    Taken from: Cook's Illustrated
    Serves 8
    I've never tried them with anything other than blueberries (I wash and freeze them when they're in season so I can make these scones any time of year) but I'm sure you could substitute in other fruits or flavors, if you'd like.
    • 1 stick unsalted butter (8 Tbsp), frozen whole*
    • 1 1/2 cups fresh blueberries (about 7 1/2 ounces), picked over
    • 1/2 cup milk (I used skim)
    • 1/2 cup sour cream (I used low-fat)
    • 2 cups unbleached all-purpose flour (10 ounces), plus additional for work surface
    • 1/2 cup sugar*
    • 2 teaspoons baking powder
    • 1/4 teaspoon baking soda
    • 1/2 teaspoon table salt
    • 1 teaspoon grated lemon zest
      *You'll need an additional 1-2 tsp of melted butter and 1/4 tsp. sugar to spread on top of each scone right before baking.
    -Grate stick of butter on large holes of box grater into a bowl. Place grated butter in freezer until needed. Place blueberries in freezer until needed.
    -If you are making some of these scones immediately, turn oven to 425 degrees.
    -Whisk together milk and sour cream in medium bowl; refrigerate until needed. In a large bowl, whisk flour, 1/2 cup sugar, baking powder, baking soda, salt, and lemon zest. Add frozen butter to flour mixture and toss with fingers until thoroughly coated.
    -Add milk mixture to flour mixture; fold with spatula until just combined. With rubber spatula, transfer dough to liberally floured work surface. Dust surface of dough with flour; with floured hands, knead dough 6 to 8 times, until it just holds together in ragged ball, adding flour as needed to prevent sticking.
    -Roll dough into approximate 12-inch square. Fold dough into thirds like a business letter, using bench scraper or metal spatula to release dough if it sticks to countertop. Lift short ends of dough and fold into thirds again to form approximate 4-inch square. Transfer dough to plate lightly dusted with flour and chill in freezer 5 minutes.
    -Transfer dough to floured work surface and roll into approximate 12-inch square again. Sprinkle blueberries evenly over surface of dough, then press down so they are slightly embedded in dough. Using bench scraper or thin metal spatula, loosen dough from work surface. Roll dough, pressing to form tight log. Lay seam-side down and press log into 12 by 4-inch rectangle. Using sharp, floured knife, cut rectangle crosswise into 4 equal rectangles. Cut each rectangle diagonally to form 2 triangles and transfer to parchment-lined baking sheet.
    -At this point, you can wrap the 8 scones in foil, place them in a freezer bag and then put them in the freezer for another day (or cook them immediately).
    -When ready to make, heat oven to 425 degrees. Line a baking sheet with parchment paper (or spray thoroughly with cooking spray).
    -For each scone you're baking, brush top with 1/2 tsp. melted butter and sprinkle with 1/4 tsp. sugar. Bake until tops and bottoms are golden brown: 18 to 25 minutes if at room temperature, 22-30 minutes if frozen. Transfer to wire rack and let cool 10 minutes before serving.


    Week's Menu Plan
    Saturday: barbeque chicken with polenta
    Sunday: Bacon-wrapped pork tenderloin with pistachio & cranberry quinoa

    Monday:  turkey pot pie
    Tuesday: butternut squash risotto

    Wednesday: Manhattan clam chowder 

    Friday: pasta with bacon and peas

    Sunday, December 5, 2010

    Roasted Cauliflower & Week's Meal Plan


    I have to admit, it's probably a good thing that I'm sharing a vegetable dish along with this week's menu plan because this week is full of MEAT.  I've been waiting for quite a few types of meat to go on sale to use a few (highly anticipated) recipes and they finally did...all at the same time.   I actually had a hard time figuring out how to squeeze in one vegetarian meal for the week and I finally had to force myself to freeze some of the meat for another week.

    This roasted cauliflower recipe is good...surprisingly good.  I actually wasn't expecting that much from this dish (I like cauliflower but don't love it) but since we like roasted vegetables, I decided to give it a try.  Let's just say it was so good that Bryant and I were actually snacking on it. (Seriously, how often do you do that?)  Bryant didn't have time to eat lunch the next day at work but somehow, he made time to eat his leftover cauliflower.


    Roasted Cauliflower
    Taken from: Cooking with My Kid
    Serves 3 (this recipe can be easily doubled)
    • 1 large head of cauliflower, cut into florets
    • olive oil
    • kosher salt & fresh ground pepper
    • 1/4 cup toasted pine nuts (optional; I omitted)
    -Preheat the oven to 450 degrees. While chopping the cauliflower, place a baking sheet in the oven to preheat (this cuts down on the baking time if you're a little pressed for time).
    -Place cauliflower in a large bowl, drizzle with olive oil, add salt and pepper, and toss to coat. Remove baking sheet from oven and quickly spread out cauliflower.
    -Roasted for about 10 minutes, and then flip the florets to get them evenly browned and caramelized. Continue roasting about 10-15 more minutes.
    -If desired, add pine nuts and then serve immediately or let cool to serve at room temperature.


    Week's Menu Plan 

    Sunday: Braised onion brisket w/ roasted vegs

    Monday: Arroz con pollo

    Tuesday: Sesame noodles

    Wednesday: Blackened salmon with brussels sprouts

    Thursday: French Dip Sandwiches (leftover from the Braised onion brisket) with salad

    Friday:  Chicago style pizza (with sausage, mushrooms, peppers, onions)

    Saturday:  Breaded chicken stuffed with scallions and blue cheese, served with roasted cauliflower

    Sunday, November 28, 2010

    Mexican Pulled Chicken & Week's Menu Plan

    Since we had Thanksgiving a little late this year so my sister could join us, I was able to use Thursday and Friday for prepping all things Thanksgiving.  However, I had also promised to bring Bryant and his co-workers dinner for Friday.  Since I was busy making cranberry relish, sweet potato casserole, pie dough, gravy, etc, etc, I didn't have much time to make an elaborate or complicated meal.  So I just sauteed some onions and dumped frozen chicken breast (I remove the fat and portion chicken breast before freezing it) and a few other ingredients into the slow cooker and cooked on low for 8 hours.  The result was surprisingly moist chicken that was great for burritos (and we used the leftovers in quesadillas the next day).

    I highly recommend this recipe if you have time to throw the ingredients together in the morning to make an effortless meal that night.  Plus, when you serve it tons of extras - we had lettuce, cheddar cheese, black beans, guacamole, homemade salsa, and tortillas - it not only tastes great but it also looks like you worked a lot harder than you did!

    Mexican Pulled Chicken
    Taken from: Handle the Heat (great in burritos, tacos, quesadillas, etc)
    Serves 4-6
    • 1 1/2 tablespoons olive oil
    • 1 onion, chopped
    • 1 1/2 heaping teaspoons ground cumin
    • 1 teaspoon chili powder
    • salt and pepper
    • 4 boneless, skinless chicken breasts (I used 1 1/2 pounds)
    • 1 cup salsa (homemade is better but jarred is fine for a quick dinner!)
    • 1 1/2 cups chicken stock
    • 1/2 lime, juiced
    -In a nonstick skillet, bring to a medium heat and add olive oil. Add onion, cumin, chili powder and a big pinch of salt and pepper. Cook onion, stirring regularly until it starts to soften (about 5 minutes). Add half a cup of chicken stock.
    -Add skillet mixture to slow cooker.  Add chicken, salsa and the rest of the chicken stock.  Cook on low for 6-8 hours.
    -Shred chicken in slow cooker with two forks (it should be tender enough to easily shred).  Continue cooking for 15 minutes or more or low. Add lime juice to chicken. Taste and adjust seasonings.


    Week's Menu Plan

     Monday: Grilled Mahi Mahi with Roasted Red Pepper Sauce and quinoa

    Tuesday: Thai chicken soup

    Wednesday:  turkey mole

    Thursday: Rice and Bean Casserole

    Friday: Penne with Italian sausage & bell peppers

    Saturday: ground beef wellington

    Monday, November 22, 2010

    Blazin' Buffalo Chicken Calzones & Menu Plan

    As promised, here is the chicken calzones recipe.  These went over very well at the hospital this weekend: spicy, a nice amount of melted cheese and a crispy crust.  The recipe said it served 4 but as I was dividing out the buffalo chicken, I was worried it wouldn't really be enough. However, it worked out perfectly - it was definitely enough to go around. Not only are they really satisfying, they're also really easy to make. If you don't have time to make your own pizza dough, you can always find dough at a grocery store (or use this incredibly quick no-rise dough recipe).

    Before our meal, Bryant had told his co-worker Greg what I was making.  By the time I got to the hospital, Greg had given them a much more colorful name, something to the effect of Blazin' Ragin' Wild Western Buffalo Bill Chicken Calzones. So here you have it: the recipe for Blazin' Ragin' Wild Western Buffalo Bill Chicken Calzones.

    I've also included our week's menu plan.As you can see, we'll be celebrating Thanksgiving two days later than the official day. My sister is coming to visit for our Thanksgiving weekend and we are so excited to celebrate Thanksgiving with her! This will also be my first year cooking the Thanksgiving meal and I am really excited for it.  I can't wait to try this new slow cooker stuffing recipe and attempt to make Carolyn's delicious pecan pie. We loved a brined turkey breast recipe I had made a couple months ago so that will appear again (Who says turkey has to be once a year?).  To round it out, we'll also be having cranberry relish, green beans (both classic Thanksgiving dishes for my side of the family) and sweet potato casserole (courtesy of Bryant's side).  Finally, since I hate pumpkin pie but actually really like all other pumpkin dishes, our nod to this famous dessert will be to have pumpkin bread (with a cinnamon pecan swirl) in the morning.

    Blazin' Ragin' Wild Western Buffalo Bill Chicken Calzones
    Taken from: Healthy Food for Living
    Serves: 4
    • 1 whole wheat pizza dough, at room temperature (I used this recipe made ahead of time but if you're pressed for time, use this one)
    • 1 lb boneless, skinless chicken breasts
    • 1 Tbsp. extra virgin olive oil
    • salt and pepper
    • 1 Tbsp butter
    • 1 1/2 tsp Worcestershire sauce
    • 1 Tbsp hot sauce (add more if desired)
    • 1/4 cup tomato sauce
    • 1 cup sharp cheddar cheese, grated
    • 1/4 cup sliced green onion
    -Preheat oven to 450 degrees.
    -Make pizza dough (this can be made up to a day ahead of time). If made ahead and refrigerated, set on counter to bring to room temperature.
    -Make blue cheese sauce.
    -Heat a drizzle of olive oil in a skillet over medium-high heat.
    -Season chicken with salt and pepper, add to heated pan, and cook until done, about 5 minutes per side. Remove chicken from pan and set aside to cool. Once cool enough to handle, cut chicken into bite-sized pieces. Reduce stove heat to low.
    -Melt butter in the skillet and stir in Worcestershire, hot sauce, and tomato sauce. Stir to combine and remove from heat. Add the cooked chicken to the buffalo sauce, and stir to coat evenly.
    -Divide pizza dough into four equal portions. Roll each out into a circle on a lightly floured surface.
    -Working with one dough circle at a time, spoon 1/4 of the chicken onto one half of the circle. Top with 1/4 cup shredded cheddar and 1 tablespoon sliced green onion. Drape other half of the dough circle up and over the filling, and pinch edges together to seal the dough.
    -Repeat with remaining three dough circles. Transfer calzones to 2 baking sheets or preheated pizza stone (sprinkle the baking sheet/pizza stone with cornmeal). Using the tines of a fork, pierce the top of each calzone a few times to let steam out while cooking.
    -Place calzones into the oven, and cook for 10-12 minutes. Let calzones sit at room temperature for a few minutes. Serve with the blue cheese-yogurt dip and extra hot sauce.

    Week's Menu Plan

    Monday:  grilled cheese & tomato soup and Napa cabbage salad


    Thursday: pumpkin bread for breakfast, Maely's chili for dinner

    Friday: Mexican pulled chicken with nutella blondies

    Saturday (Thanksgiving observed!): brined turkey breast, slow cooker stuffing, Carolyn's sweet potato casserole, green beans, cranberry sauce, Carolyn's pecan pie

    Sunday, November 14, 2010

    Roasted Butternut Squash Pizza & Menu Plan


    This wasn't even supposed to be our main meal of the day. This was the kind of lunch where you scrounge through the refrigerator to see what you can throw together.  And luckily for us, that something that started as the last ingredients in our fridge ended with a delicious roasted butternut squash pizza with caramelized red onions, sauteed spinach and rosemary. 

    We love, love, love pizza but I'm such a marinara fan that I've only made pizza with different toppings on top of tomato sauce. However, I had some leftover pizza dough that needed to be used today (since it wasn't on my menu plan for the week). However, we didn't have any good toppings to be used on tomato sauce and wasn't about to go to the store.  I did, however, have a leftover half of a butternut squash, half a bag of baby spinach and leftover fresh mozzarella.  I vaguely remembered reading that that to use up leftover butternut squash, someone suggested making a pizza of roasted butternut squash, spinach, feta and pine nuts. And this is a very versatile recipe. I added caramelized red onions but nixed the pine nuts. Feel free to do the same - throw in something extra or leave out what you don't have.  Even as a marinara lover, I highly recommend this pizza!

    Roasted Butternut Squash Pizza
    Adapted from: A Hint of Honey
    • 1/2 of no-rise pizza dough recipe or any other pizza dough of your liking
    • 1 Tbsp. extra virgin olive oil
    • fresh chopped rosemary or dried (and any other herbs you want to throw on - I used dried thyme)
    • Parmesan cheese, freshly grated
    • Asiago/mozzarella/fresh mozzarella, grated
    • Feta cheese, crumbled
    • Spinach or baby spinach, washed
    Roasted Butternut Squash:
    • 1/2 butternut squash, peeled, seeded, and diced
    • 2 cloves garlic, minced
    • 1 Tbsp. extra virgin olive oil
    • salt and ground black pepper
    Caramelized Onions:
    • 2 red onions, thinly sliced
    • 1 Tbsp. extra virgin olive oil
    • salt and freshly ground black pepper
    -Prepare no-rise pizza dough.
    -If using caramelized onions, heat the olive oil in a large skillet over medium heat. Add the onions and stir to coat. Season with salt and pepper. Reduce heat to medium-low and cook, stirring frequently, until the onions are soft and caramelized, 30-40 minutes.
    -Meanwhile, preheat oven to 425 F. Spread cubed squash on baking sheet lined with aluminum foil. Toss with minced garlic, olive oil and salt and pepper. Roast in preheated oven for 25 minutes, tossing occasionally, until tender and golden brown. Remove from the oven and set aside to cool.
    -In a skillet over medium to medium-high heat in skillet (could be the same skillet as the onions), add a little olive oil or cooking spray.  Add spinach and season with salt and pepper. Cook for a few minutes until completely wilted.
    -Add pizza stone to oven and cover with cornmeal.  Let heat for 10 minutes.
    -While stone is heating, roll out the dough into a thin crust.  Transfer dough carefully to pizza stone.
    -Bake crust 8-9 minutes (mine actually puffed up and I had to press down with a spatula to let out the air).
    -Brush the crust with the remaining Tbsp. of olive oil and sprinkle with rosemary (I also threw in some dried thyme). Sprinkle with a little cheese. Distribute the roasted squash, caramelized onions, sauteed spinach and feta over the crust. Top with any remaining cheese.
    -Bake in oven for about 8 minutes until cheese has melted.
    -Remove from the oven and let cool several minutes before slicing. 


    Menu Plan

    Sunday: Balsamic roasted chicken with couscous and salad

    Tuesday: Cajun Shrimp Po'Boys with sweet potato fries and Napa cabbage salad

    Wednesday: Mexican seven-layer dip

    Thursday:  Butternut Squash and Coconut Curry with rice and green peas

    Sunday, November 7, 2010

    Curried Lentils & Sweet Potatoes, Week's Menu Plan

    This recipe was pretty impressive.  Not just because Bryant deemed it "blogworthy" but really because it took ingredients like lentils and swiss chard and turned it into a good dish.  Not only a good dish but a healthy dish, too.  Lentils are incredibly good for you (particularly high in folate and fiber), sweet potatoes provide Vitamin A and swiss chard are high in Vitamin A and K.  You can check World's Healthiest Foods for more: http://whfoods.org/.

    This lentils & sweet potato dish needs time (about 45 minutes of cooking time) to soften the lentils so I wouldn't recommend it for a weeknight meal. (I actually had it on for a weeknight last week but then wimped out.)  However, it is nice that not only is it a one-dish meal but it doesn't have to be served immediately - it can just simmer until you're ready to serve.  We had it with some good homemade bread on the side and thoroughly enjoyed this meal!

    Curried Lentils & Sweet Potatoes
     Taken from: Smitten Kitchen
    Serves 6-8
    • 2 tablespoons extra virgin olive oil
    • 1 medium onion, chopped
    • 4 garlic cloves, minced
    • 1 1-inch piece fresh ginger root, peeled and grated
    • 1 1/2 teaspoons garam masala
    • 1 1/2 teaspoons curry powder
    • 1 jalapeño pepper, seeded if desired, then minced
    • 4 to 5 cups vegetable or chicken broth, as needed
    • 2 pounds orange-fleshed sweet potatoes, peeled and cut into 1/2-inch cubes (about 4 cups)
    • 1 1/2 cups dried lentils
    • 1 bay leaf
    • 1 pound Swiss chard, center ribs removed, leaves thinly sliced
    • 1 teaspoon kosher salt, more to taste
    • 1/2 teaspoon ground black pepper
    • 1/3 cup chopped fresh cilantro
    • Finely grated zest of 1 lime
    • Juice of 1/2 lime
    • 1/3 cup finely chopped tamari almonds, for garnish (optional, I omitted)
    • 1/4 cup chopped scallions, for garnish
    -In large saucepan, heat oil over medium heat. Add onion and saute until translucent, 5 to 7 minutes. Add garlic, ginger, garam masala, curry powder and jalapeno. Cook, stirring, for 1 minute.
    -Stir in 4 cups broth, sweet potatoes, lentils and bay leaf. Increase heat to high and bring to a boil; reduce heat to medium, partially cover, and simmer for 25 minutes. (If lentils seem dry, add up to 1 cup stock, as needed.)
    -Stir in chard and salt and pepper, and continue cooking until lentils are tender and chard is cooked, about 30 to 45 minutes total.
    -Just before serving, stir in cilantro, lime zest and juice. Spoon into a large, shallow serving dish. Garnish with almonds if desired and scallions.

    Week's Menu Plan:
    Sunday:  Lentils & Sweet Potatoes 

    Monday:  pasta primavera

    Tuesday: Asian Salmon

    Wednesday: beef bulgogi w/ leftover moo shu veggies

    Friday: out!

    Saturday: ground turkey and spinach ravioli

    Sunday, October 31, 2010

    Baked Doughnuts & Week's Menu Plan

    For my parents' last morning with us, I wanted to make a nicer breakfast. I mentally ran through some of our favorite options: scones...I didn't have enough time, crumb coffee cake...I didn't have enough butter. I found the link to a baked doughnut recipe that I had stored and bribed Bryant go to the store for all-purpose flour in exchange for doughnuts (seriously, who wouldn't take that deal?).  These doughnuts were easy to make in the morning; they don't need to rise so you just mix the ingredients and pop them in the oven for 10 minutes.  I was also surprised by the ingredient list, too - it didn't have the levels of fat and sugar that one expects from a doughnut. Don't get me wrong, doughnuts are still a treat, but at least this recipe turned into a pretty easy and tasty morning treat!

    I did my doughnuts free hand without the doughnut pan (there was no way I was going to shell out for such a pan!).  They definitely didn't come out as pretty but were obviously tasted just as good!

    And so you don't have to worry that we're just eating doughnuts for the rest of the week, here's our menu plan:

    Week's Menu Plan


    Tuesday: Grilled Mahi-Mahi with Avocado Creme and steamed broccoli


    Baked Cinnamon-Sugar Doughnuts
    Taken from: Handle the Heat
    Makes 6 doughnuts
    • 1 cup all-purpose flour
    • 3/4 teaspoon baking powder
    • 3/4 teaspoon baking soda
    • pinch of salt
    • 1 egg (lightly beaten)
    • 1 6 oz container of non fat organic vanilla bean yogurt
    • 1 tablespoon canola oil
    • 2 teaspoons lemon juice
    • 2 1/2 tablespoons real maple syrup
    • 1 1/2 teaspoons cinnamon
    • 1/2 cup sugar
    • 2 tablespoons butter (melted)
    -Preheat the oven to 400 degrees. Grease a baking sheet with cooking spray (or a doughnut pan, if you happen to own one).
    -In a large bowl whisk together all the dry ingredients. In a second bowl stir together oil, lemon juice, maple syrup, egg and yogurt.
    -Make a hole in the center of the dry ingredients and pour the wet ingredients into the hole. Gently fold everything together until combined. The batter will be thick.
    -Scoop batter into a piping bag or ziploc bag, snip a bottom corner with scissors, and squeeze out the batter in 6 doughnut shapes onto the baking sheet (I learned that the doughnuts spread and puff up while in the oven so don't make them too big and leave room between them!).  You could also make doughnut holes (but adjust the time to cook for only 5ish minutes.)
    -Bake for 10-15 minutes or until golden brown. Let cool for a few moments and then flip over onto a cooling rack while still warm.
    -Use a pastry brush the melted butter over your donuts and then dip each donut in the cinnamon sugar mixture to coat. Serve immediately after coating with cinnamon sugar mixture for best texture. 

    Friday, October 15, 2010

    Broiled Tilapia with Thai Coconut-Curry Sauce & Week's Menu Plan

    I had high expectations for this dish.  It was ranked one of the best recipes on cookinglight.com and when I quickly scanned through of a few of the 150 comments, they all sang its praises and offered no changes.

    And they were right - it was delicious.  The sauce was divine.  It's a must to serve it with rice (we had leftover risotto) because it really needs something to soak up the sauce. We kept spooning more sauce onto our plates.  I was even dipping my steamed artichoke leaves into the sauce instead of melted butter! The flavors surprisingly delicate.  There's not much heat to it but I think that adding some crushed red pepper flakes would give it some nice (but not overwhelming) heat.  But I think that's the only change I would make.  Since it's from Cooking Light, it's already a pretty health-conscious meal.  Thank you, Cooking Light!

    Broiled Tilapia with Thai Coconut-Curry Sauce
    Taken from: Cooking Light
    Serves: 4 (which typically means it serves 3 in our house)
    • 1  teaspoon  dark sesame oil, divided
    • 2  teaspoons  minced peeled fresh ginger
    • 2  garlic cloves, minced
    • 1  cup  finely chopped red bell pepper
    • 1  cup  chopped green onions
    • 1  teaspoon  curry powder
    • 2  teaspoons  red curry paste
    • 1/2  teaspoon  ground cumin
    • 4  teaspoons  low-sodium soy sauce
    • 1  tablespoon  brown sugar
    • 1/2  teaspoon  salt, divided
    • 1  (14-ounce) can light coconut milk
    • 2  tablespoons  chopped fresh cilantro
    • 4  (6-ounce) tilapia fillets
    • Cooking spray
    • 3  cups  hot cooked brown rice
    • 4  lime wedges
    -Preheat broiler.
    -Heat 1/2 teaspoon oil in a large nonstick skillet over medium heat. Add ginger and garlic; cook 1 minute. Add pepper and onions; cook 1 minute. Stir in curry powder, curry paste, and cumin; cook 1 minute. Add soy sauce, sugar, 1/4 teaspoon salt, and coconut milk; bring to a simmer (do not boil). Remove from heat; stir in cilantro.
    -Brush fish with 1/2 teaspoon oil; sprinkle with 1/4 teaspoon salt. Place fish on a baking sheet coated with cooking spray. Broil 7 minutes or until fish flakes easily when tested with a fork. Serve fish with sauce, rice, and lime wedges.

    Week's Menu Plan
    Friday: Apple, Cheddar & Ham Panini and Grilled Ham, Pear & Cheese Sandwich

    Saturday:  Chicken Piccata with Summer Vegetables

    Sunday: Mongolian beef with broccoli, mushrooms with edamame

    Monday: pizza margharita

    Tuesday: Rotisserie Chicken, Apple Walnut Salad  with buttercup squash

    Wednesday: feta salmon cakes with roasted sweet potatoes

    Friday: shrimp & grits

    Saturday: sirloin kabobs w/ black eye pea salad, chocolate Guinness cupcakes for dessert 

    Sunday: coffee crumb cake for breakfast, chicken tikka masala with brown rice

    Monday: Spanish Tortilla with salad, apple pandowdy for dessert

    Friday, October 8, 2010

    Stuffed Bell Peppers & Week's Menu Plan

    Stuffed bell peppers was one of the first meals I ever made...actually, it was the first meal I ever remade, straying from the exact recipe and making my own changes to make the dish healthier.  Although most of my changes are now forgotten, I do remember one as switching from a combination of ground pork and ground beef to lean ground turkey (ground beef could work but just try to make it at least 90% lean).  I have no idea where the recipe was originally from but on the index card, I have the title as "Big John's Stuffed Bell Peppers."  Maybe Big John wouldn't be so big if he had made some of these updates! It's delicious as a one-dish meal and is a recipe that I keep coming back to. It's especially good now that bell peppers are in season here.

    As I was making my farmers market grocery list for this coming week's meal plans, I realized that I'm using just about every vegetable that our market offers. While I didn't do it on purpose, I'm happy to fully take advantage of having such a variety of fresh vegetables while I can!

    Stuffed Bell Peppers
    Serves 6
    • 6 bell peppers, tops removed and ribs and seeds removed (any color but our favorite is red)
    • 1 Tbsp. olive oil
    • leftover bell peppers tops, diced 
    • 1/2 onion, diced
    • 3 cloves garlic, minced
    • 3/4 tsp. salt, 1/2 tsp ground pepper
    • 1/2 tsp dried oregano
    • 1/2 tsp. dried thyme 
    • 1/4 cup fresh parsley, chopped 
    • 3/4-1 lb. ground turkey, 93% lean (you could also use lean ground beef)
    • 1 1/2 cups cooked brown rice
    • 1 cup marinara sauce 
    • cheese, if desired (we often grate a bit of mozzarella cheese on top) 
    -Make sure to cook brown rice beforehand. 
    -Preheat oven to 375 degrees.
    -In a large pot of boiling water, boil prepped bell peppers for 5-7 minutes until peppers are fairly soft.  Drain on paper towels and then put peppers in 9 by 13 baking dish.  Add water to the bottom of the baking dish until the bottom of the dish is barely covered.
    -While bell peppers are in boiling water, heat a large skillet over medium heat.  Add olive oil and cook garlic, onions and peppers tops until soft, 5-7 minutes.
    -Add ground turkey, chopped parsley, salt, pepper, oregano and thyme. Cook until brown and all pink is gone, about 5 minutes.   Drain off extra grease.
    -Add brown rice and marinara sauce.  Combine and remove from heat.
    -Spoon mixture into bell peppers.  Cook for approximately 15 minutes.  Add grated cheese, if desired, on top and cook for 2 minutes or until cheese is melted.
    -Serve with additional marinara sauce.


    Week's Menu Plan

    Saturday: Spicy Chicken Avocado Sandwich with steamed artichokes

    Sunday: Ratatouille

    Monday: Chicken Piccata with summer Vegetables

    Tuesday: Italian wedding soup

    Wednesday: Broiled Tilapia with Thai Coconut Curry Sauce (served with steamed broccoli)

    Thursday: Bryant makes dinner!

    Friday: steak fajitas (pear butterscotch pie for dessert)

    Saturday:  Chicken, Apple & Cheese Quesadillas

    Thursday, September 30, 2010

    Week's Menu Plan & Tilapia with Lemon Sauce

    So I'm surviving my first week of work! Actually, not only surviving but also really enjoying it. Well, I did come home after the first day and just stared blankly at the wall for a good 15 minutes.  But now I'm feeling like I'm getting back into the swing of things.  Since I was tired after the first day, it was great that I had this tilapia recipe planned. It was light, very lemony and so easy to make - even I could muster the energy to make this!

    This coming week's menu plan is a combination of using what's already in our fridge/freezer/pantry and using what's still in season and at the farmers market (only 3 weeks left at our local market!).  We're splurging a bit for a meal (read: scallops) but it'll be counter-balanced with some el cheapo dishes (like the black bean tacos).


    Week's Menu Plan

    Friday: homemade burgers with blue cheese

    Saturday: All the necessary game day food - boneless buffalo wings (I make both hot and BBQ; these are great baked in the oven!), celery and carrots with tzatziki or blue cheese sauce, white bean dip with crackers

    Dessert: Nanaimo Bars

    Sunday: Borscht (beet soup)
     
    Monday: stuffed peppers

    Tuesday: Spicy Chicken Avocado Sandwich

    Wednesday: Crispy Black Bean Taco

    Thursday: Seared Sea Scallops with risotto


    Sauteed Tilapia with Lemon Sauce
    Taken from: Cooking Light
    Serves: 3-4

    If you aren't a big fan of the lemon, I would recommend cutting down on the lemon juice from 1/4 cup to 2 Tbsp.
    • 3/4  cup  fat-free, less-sodium chicken broth
    • 1/4  cup  fresh lemon juice
    • 1 1/2  teaspoons  drained brine-packed green peppercorns, lightly crushed (completely optional; you could also substitute capers or like myself, completely leave this out.  Next time, I might try to add some dried thyme which is apparently an adequate substitute.)
    • 1  teaspoon  butter
    • 1  teaspoon  vegetable oil
    • 1 lb. tilapia or sole fillets
    • 1/4  teaspoon  salt
    • 1/4  teaspoon  freshly ground black pepper
    • 1/4  cup  all-purpose flour
    • 2  teaspoons  butter
    • Lemon wedges (optional, for serving)
    -Combine chicken broth, lemon juice and if using, peppercorns (or any substitute).
    -Place 1 teaspoon of butter and 1 teaspoon of oil in a large nonstick skillet over low heat until butter melts.
    While butter melts, sprinkle fish fillets with salt and black pepper. Place the flour in a shallow dish. Dredge fillets in flour; shake off excess flour.
    -Increase heat to medium-high; heat 2 minutes or until butter turns golden brown in pan.
    -Add fillets to pan; sauté 3 minutes on each side or until fish flakes easily when tested with a fork. Remove fillets from pan.
    -Add broth mixture to pan, scraping to loosen browned bits. Bring to a boil; cook until reduced to 1/2 cup (about 3 minutes). Remove from heat. Stir in two teaspoons of butter with a whisk. Serve sauce over fillets. Garnish with lemon wedges, if desired.

    Friday, September 24, 2010

    Week's Menu Plan & Slow Cooker Chicken Broth

    So it's back to the working world for me on Monday - which I'm quite excited about although quick weeknight meals will be a much bigger factor from now on!  I'm assuming that I'll be a bit drained after the first work week so I tried to pick things for this menu plan that are much easier to make or the prep work can be done ahead of time.  And we'll be celebrating on Friday with a little homemade pizza!

    I'm especially looking forward to the skirt steak and blue cheese salad (my husband loves blue cheese although I'll be topping mine with feta instead) because our farmers market just started carrying grass fed beef. And I'll be stocking up, too, as the end of farmers markets is rapidly approaching (it'll be goodbye to the farmers market, hello to CSA [Community Supported Agriculture] boxes!).

    I've been wanted to make my own chicken broth for a while.  I've been shelling out for Trader Joe's chicken broth and while it's good, I figured making my own would be cheaper AND better.  At our local grocery store this week, free range, antibiotic-free whole chickens were only $1 a pound, so I jumped at the chance.  We really only like white meat so I cut off the chicken breast and roasted it along with some vegetables last night.  The rest of the chicken was thrown into the pot for stock and simmered all day yesterday.  For a 5 pound chicken, we got a great meal (or two) AND tons of broth!  I haven't tried the broth yet but I'll be using it in the Vietnamese chicken pho that I'm finally making this week.


    Week's Menu Plan

    Saturday: marinated chicken skewers, tzatiki, Greek salad
    Sunday: Sauteed Tilapia with Lemon Sauce with risotto
    Monday: spaghetti with meatballs with sauteed vegetables
    Tuesday: skirt steak and blue cheese salad
    Wednesday: Spanish Tortilla with biscuits
    Thursday: Vietnamese chicken pho
    Friday:  homemade pizza


    Slow Cooker Chicken Stock
    Taken from: Ina Garten
    Makes approx 4-6 cups of chicken stock (which can then be thinned with water, if desired)
    • 1 (5-pound) roasting chickens (or the parts leftover that you didn't want to eat)
    • 1 large yellow onions, unpeeled and quartered
    • 2 carrots, unpeeled and halved
    • 1 stalks celery with leaves, cut into thirds
    • 7 sprigs fresh parsley (all I had was dried so I just threw in probably about a teaspoon)
    • 5 sprigs fresh thyme (again, only dried)
    • 20 sprigs fresh dill (optional, I omitted)
    • 1/3 head garlic, unpeeled and cut in 1/2 crosswise
    • 1/2 tablespoon kosher salt
    • 1/2 teaspoon whole black peppercorns (don't use ground as it'll be too spicy)
    • 8 cups water
    -Place the chicken/chicken parts, onion, carrots, celery, parsley, thyme, dill, garlic, and seasonings in a large stockpot or slow cooker.
    -Add approximately 8 cups of water and bring to a boil. Simmer, uncovered, for 4 hours over the stove OR place a slow cooker on low and cook 8-10 hours.
    -Strain the entire contents of the pot through a colander and discard the solids.
    -Chill the stock overnight or at least 8 hours. The next day, remove the surface fat.
    -Use immediately or pack in containers and freeze for up to 3 months (my husband laughs but I package mine in 2 Tbsp. ice cubes and then freeze them that way.  This means 8 chicken broth cubes would be one cup. It's a lot easier to get the amount you want and a lot quicker to thaw!)

    Friday, September 17, 2010

    Eggplant Parmesan & Week's Menu Plan

    This non-meat meal of the week was delicious. I had never made (or had!) eggplant parmesan before but it's a favorite meal of one of my uncles. I also know that eggplant is a very meaty type of vegetable so it can take the place of meat pretty well. I really enjoyed it, especially because it had tons of marinara sauce in it (which, in case you haven't figured that out, I would live off if I could). You could also reduce the marinara a bit if you aren't as crazy about it as me. Also, I think we'll play around with this recipe next time - my husband suggested adding ground turkey or beef (either in a meat sauce or as a layer in the dish) which would be excellent. I would probably try to hide in some sauteed zucchini, squash, red bell pepper or chopped spinach to add extra nutrients and vegetables (without altering the flavor too much). You could always up the amount of cheese to make this extra gooey, too.

    The eggplant parmesan recipe would take a while to do start to finish so I cooked the eggplant in advance and refrigerated the slices. That way, when we got home in the evening, I just popped the eggplant back in the oven for about 5 minutes to crisp, made the dish and cook for 15 minutes - a lot easier on our evening!

    This week's menu plan has a birthday celebration (chocolate Guinness cake with Bailey's Irish cream icing, combining my love of chocolate and my husband's love of Guinness), a last burst of summer with tomato gazpacho, leftover vegetables for stir fry and finally, a bit more Latin food in our life, thanks to my cousin Dan for sending some recipes! I'm really excited to try these recipes. Also, I really hope we get around to making the shrimp and grits finally because I've been wanting to try them for weeks!

    Also, this is my last week before I start my new job! We are really excited about it and feel so blessed by the Lord's provision. I've loved being at home but really excited to start working again! This, of course, means that meals might have to be shorter and quicker during the week (more people can relate to that idea, anyway!) and save the more elaborate dishes for the weekend.

    Eggplant Parmesan
    Taken from: Martha Stewart
    Serves 4 (I halved the recipe as it originally served 8. It would be really easy to make it for 8 and freeze for future meals!)
    • 1 large egg 
    • 1/4 cup + 2 Tbsp. whole wheat breadcrumbs
    • 1/4 cup + 2 Tbsp. finely grated Parmesan (additional 2 tablespoons for topping, optional)
    • 1/2 teaspoon dried oregano
    • 1/4 teaspoon dried basil
    • 1/4 teaspoon dried thyme
    • 1/4 teaspoon dried parsley
    • Coarse salt and ground pepper
    • 1 large eggplant or 2 small (1 1/4 pounds total), peeled and sliced into 1/2-inch rounds
    • 6 cups marinara sauce (store bought or homemade; you can use this recipe for Martha's Chunky Tomato Sauce if you'd like) 
    • 1/2 cups shredded mozzarella

    -Preheat oven to 375 degrees. Line 2 baking sheets with aluminum foil (to reduce cleanup) and spray with cooking spray; set aside. In a wide, shallow bowl, whisk together eggs and 2 tablespoons water. In another bowl, combine breadcrumbs, 3/4 cup Parmesan, oregano, and basil; season with salt and pepper.
    -Dip eggplant slices in egg mixture, letting excess drip off, then dredge in breadcrumb mixture, coating well; place on baking sheets. Bake until golden brown on bottom, 20 to 25 minutes. Turn slices; continue baking until browned on other side, 20 to 25 minutes more. (At this point, you can refrigerate the eggplant until ready to use and then bake it at 400 for about 5 minutes to make the eggplant crispy)
    -Increase oven heat to 400 degrees. Spread 1 cup sauce in a 8-inch square baking dish. Arrange half the eggplant in dish; cover with 1 cup sauce, then 1/4 cup mozzarella. Repeat with remaining eggplant, sauce, and mozzarella. Bake until sauce is bubbling and cheese is melted, 15 to 20 minutes.
    -Sprinkle with remaining 2 tablespoons Parmesan, if desired. Let stand 5 minutes before serving.


    Week's Menu Plan

    Friday: butter chickpea curry, beef samosas, coffee cake for dessert (and breakfast IF there's any leftover!)

    Saturday: fish tacos with avocado relish, black bean and corn salad
    chocolate stout cupcakes with irish cream frosting for dessert

    Sunday: gazpacho with tomato chickpea crostini

    Monday: chicken stir fry

    Tuesday: shrimp and grits with homemade polenta

    Wednesday: pasta with spicy sausage and spinach (Everyday Italian cookbook)

    Thursday: Spanish Tortilla

    Friday: Greek meal: chicken skewers, tzatiki, Greek salad

    Saturday: rice and beans (thanks to my cousin Dan!)

    Saturday, September 11, 2010

    Weekly Menu Plan & Pulled Pork

    With my husband working long hours this month, I've been trying to do things to make his life easier and of course, taking pity on him and making his favorite meals. This is especially true when he works on the weekends so that's when I really try to make something special. And that something special this weekend is definitely pulled pork sandwiches. This recipe is so good! The spices give the pork a great flavor. And it's not just meant for BBQ pulled pork (although I didn't realize that fact last time). Once this recipe is cooked, it can be used in lots of other dishes - Chinese, Mexican, salads, etc. Of course, we'll be having BBQ pulled pork sandwiches tonight but I'll freeze the leftovers to use in other dishes.

    Pulled pork is traditionally made with a cheaper cut of pork called pork shoulder or Boston butt. However, once you remove the tons of extra fat, a 4-lb shoulder is suddenly much closer to 3 pounds. I've started buying a slightly more costly, leaner cut of pork but since it's leaner, I can buy a small quantity (since you don't have to remove as much fat). While I still haven't found a perfect cut of pork for pulled pork, I've tried pork loin chops before which worked well.

    Week's Menu Plan

    Saturday: slow cooker pulled pork, salad, my husband's award-winning cookies

    Sunday: Jamaican Jerk Chicken with corn on the cob

    Monday: pad see ew (thanks to lots of leftovers from a lovely lunch I had with my grandma on Friday) with baby bok choy and red peppers

    Tuesday: beef enchiladas from last week (I've actually already made the meat and frozen it so all I have to do is bake the enchiladas) with restaurant style salsa

    Wednesday: Baked Eggplant Parmesan

    Thursday: shrimp and grits

    Friday: Vietnamese chicken pho (it never was made last week)


    Slow Cooker Pulled Pork
    Taken from: Life's Ambrosia
    • 1 1/2 teaspoon kosher salt
    • 1 teaspoon chili powder
    • 1 teaspoon cumin
    • 1 teaspoon granulated garlic
    • 1/2 teaspoon fresh cracked black pepper
    • 1/2 teaspoon dried oregano
    • 1 (5 pound) bone-in pork shoulder OR 3 pounds of pork loin chops or whatever cut you've chosen (again, if you go with a leaner cut of meat, you won't need as much)
    • 1 medium onion
    • 3 cups beef broth
    • 2 cups water
    -Remove as much fat as possible from the pork.
    -Combine salt, chili powder, cumin, granulated garlic, pepper and oregano in a small bowl.
    -Rub spice mixture all over the pork. Cover and refrigerate over night or for several hours.
    -Slice the onion and lay it on the bottom of a 5 quart slow cooker. Place the pork on top of the onions. Pour beef broth and water over the top. Cover and cook for 8 hours on low (or 4 hours on high).
    -Remove from slow cooker. Allow to cool slightly. Discard bone and pan juices. Using a fork and spoon shred meat (removing any visible fat).
    -If making BBQ pulled pork sandwiches, return shredded pork to slow cooker and add good bottled BBQ sauce or homemade sauce. Cook on low for 1-2 hours.