Showing posts with label Mexican. Show all posts

Tuesday, June 24, 2014

Grilled Fish Tacos with Chipotle-Lime Dressing


Over Memorial Day weekend, we bought a grill.  Of course, this is the perfect time of year to have a grill and we're just starting to find recipes for it.  Besides the traditional hamburgers, we've tried grilling pizza (very delicious) and fish for these tacos.

After topping the fish with some cabbage that's been tossed in the dressing and adding some homemade guacamole, this is one of my favorite ways to serve fish.  The dressing wasn't very spicy -- just smoky from the chipotle and adobo -- although you could certainly increase the heat in the dressing or even top with some hot pepper sauce.  The guac is cool and creamy which is a nice contrast to the crunch from the cabbage.  Altogether, it was a great combination of flavors and textures!

I served this with refried beans and a salad.  Even if the picture might not look like much, it made a delicious summer meal.

Grilled Fish Tacos with Chipotle-Lime Dressing
Taken from: AllRecipes
Serves about 4
  • 1/4 cup extra virgin olive oil
  •  2 tablespoons distilled white vinegar
  • 1 chipotle pepper in adobo sauce, plus 2 teaspoons adobo sauce (I scraped out the seeds for less heat)
  •  2 tablespoons fresh lime juice
  •  2 teaspoons lime zest
  •  1 1/2 teaspoons honey
  •  2 cloves garlic, minced
  •  1/2 teaspoon cumin
  •  1/2 teaspoon chili powder
  •  1 teaspoon seafood seasoning, such as Old Bay
  •  1/2 teaspoon ground black pepper
  •  1 pound tilapia, cod or mahi mahi, cut into large chunks
  •  6-10 flour tortillas (you could used corn tortillas instead)
  •  1/4 cup cilantro, chopped
  •  1 small head cabbage, cored and shredded
  • guacamole (I recommend homemade)
  • Optional: hot pepper sauce (I omitted)

  1. To make the marinade, whisk together the olive oil, chipotle, adobo, vinegar, lime juice, lime zest, honey, garlic, cumin, chili powder, seafood seasoning, black pepper in a bowl until blended. Place the tilapia in a shallow dish, and pour half of the marinade over the fish. Cover, and refrigerate 6 to 8 hours.
  2. Combine cabbage and cilantro in a bowl and then dress with remaining marinade. You can do this several hours before you serve the meal.
  3. Preheat an outdoor grill for high heat and lightly oil grate. Set grate 4 inches from the heat.
  4. Remove fish from marinade, drain off any excess and discard marinade. Grill fish pieces until easily flaked with a fork, turning once, about 9 minutes. (You could also bake in a 350 degree oven for 9-12 minutes instead.)
  5. Assemble tacos by placing fish pieces in the center of a tortilla, then top with cabbage slaw and guacamole. Top with hot sauce, if using.

Sunday, May 4, 2014

Refried Beans (Slow Cooker)


I've finally found a great recipe for slow cooker refried beans (and obviously, I had to share it).  I've tried several recipes but for something simple, it seemed like the other recipes just weren't quite right. But this recipe works.   I think the secret here is that you boil the pinto beans for about 15 minutes before hand (which I think helps the pinto beans cook faster and more evenly).  This recipe also has a small (but delicious) ingredient list - a few spices, salt, beans, onions, garlic, jalapeno and vinegar.  I even forgot the vinegar the last time I made this and honestly didn't notice!

So in case you couldn't tell, we love this recipe. It's easy, healthy and delicious.  This is probably the fourth time I've made this in the past few months (which is saying a lot for me).  I love it as a side dish for all kinds of meals - Mexican (obviously) but we last had it alongside some fish, corn and a salad, which was delicious.  Then my one year old recently finished off the leftovers with scrambled eggs, sauteed bell peppers and guacamole.  I was pretty jealous, I must admit.  I'm going to have to make that for the whole family soon!

PS - Have you noticed that my pictures are no longer safe from a certain toddler? She's quite the help these days!

Slow Cooker Refried Beans
Taken from: Mel's Kitchen Cafe
Makes about 8 cups
  • 1 pound dry pinto beans, rinsed, remove any stones or shriveled beans
  • 1 teaspoon salt plus more to taste
  • 2 teaspoons cumin
  • 1 teaspoon coriander
  • 1 medium white or yellow onion, peeled and cut into large chunks
  • 4 cloves garlic, peeled and smashed
  • 1 jalapeno, seeded and membranes removed, chopped
  • 1 tablespoon white vinegar or same amount of liquid from a jar of jalapenos or banana peppers

  1. Rinse beans and place in a medium or large saucepan and cover with water by at least an inch. Bring the beans and water to a boil and cover, cooking for 15 minutes (be aware that the beans will expand as they absorb water and cook so make sure your pan isn't overly full to begin with).
  2. Remove from the heat and drain and rinse the beans. Place the beans in the slow cooker insert and cover them with about 2 inches of water. Add the salt, onion, garlic, and jalapeno. Cover and cook on high for 4-6 hours or on low for 8-10 hours.
  3. When the beans are tender, ladle out about 1 to 1 1/2 cups of the cooking liquid and reserve in a bowl or liquid measuring cup. Drain the beans and veggies in a colander until most of the liquid is gone but there are still a few drips (you don't want the beans bone dry).
  4. Place the beans and veggies and 1 tablespoon white vinegar in a food processor or blender (you may need to do this in batches).  Or if you have an immersion hand blender, you can put the beans and veggies back into the slow cooker, add the vinegar and blend in there.  
  5. Add about 1/4 cup of the leftover liquid (more if needed).  Blend to your desired consistency (we like ours a little on the chunkier side).  Taste the beans and add additional salt or spices, if needed.
  6. Serve and enjoy! If you want to freeze any leftovers, let the refried beans cool and then spoon them in 1-2 cup amounts into freezer ziploc bags, press them flat, remove as much air as possible and seal.


Monday, September 2, 2013

Chicken Fajitas


I first made this recipe for my husband's birthday.  While we technically have a grill (and I would love to try to make grilled chicken fajitas someday!), it doesn't have any grill grates so it's not exactly usable at this point.  So I needed to find a recipe that could be done on the stove or in the oven.  And, of course, Cook's Illustrated delivered.

While this does take some time to make, this recipe wasn't too hard and I love that much of it can be prepped ahead of time.  You cook the chicken on the stove, and the vegetables, surprisingly, get broiled in the oven (the onions are especially good).  And the end result is amazing!  Probably one of my favorite dishes that we've had all year.  We loved it so much that we served it to his parents when they came to visit a few weeks later.

I never could get the tortillas warmed by their recommended method so I always ended up putting them in the microwave for about 30 seconds right before serving.  But I've still included the instructions, in case you have more success than I did!

We served this with homemade tortillas, homemade salsa, homemade guac, homemade Greek yogurt, and black beans on the side.  And, of course, my husband's amazing margaritas!

Chicken Fajitas
Taken from: Cook's Illustrated
Serves 4-6
  • 1/3 cup lime juice (from 2 to 3 limes)
  • 4 tablespoons vegetable oil
  • 3 medium cloves garlic, minced or pressed through garlic press (about 1 tablespoon)
  • 1 tablespoon Worcestershire sauce
  • 1 1/2 teaspoons brown sugar
  • 1 jalapeño chile, seeds and ribs removed, chile minced
  • 1 1/2 tablespoons minced fresh cilantro leaves
  • Salt and ground black pepper
  • 3 boneless, skinless chicken breasts (about 1 1/2 pounds), trimmed of fat, tenderloins removed, breasts pounded to 1/2-inch thickness
  • 1 large red onion (about 14 ounces), peeled and cut into 1/2-inch-thick rounds (do not separate rings) -- we liked this so much I might have to double the onions next time
  • 1 large red bell pepper (about 10 ounces), quartered, stemmed, and seeded
  • 1 large green bell pepper (about 10 ounces), quartered, stemmed, and seeded
  • 8 - 12 plain flour tortillas (6-inch) - I recommend homemade!
  • Toppings: salsa (I recommend homemade), guacamole (I recommend homemade), sour cream/plain Greek yogurt
  1. In medium bowl, whisk together lime juice, 2 tablespoons oil, garlic, Worcestershire, brown sugar, jalapeño, cilantro, 1 teaspoon salt, and 3/4 teaspoon pepper. Reserve 1/4 cup marinade in small bowl; set aside. Add another teaspoon salt to remaining marinade. Place chicken in marinade; cover with plastic wrap and refrigerate 15 minutes (I often refrigerate mine for several hours if it's more convenient).
  2. Adjust one oven rack to upper-middle position (about 8 inches from heating element) and second rack to lower-middle position; heat broiler.
  3. Brush both sides of onion rounds and peppers with 2 tablespoons oil and season with salt and pepper. Arrange onion rounds and peppers (skin sides up) in single layer on rimmed baking sheet. Wrap tortillas securely in foil in two packets, each containing half of tortillas.
  4. Remove chicken from marinade and pat dry with paper towels; discard marinade. Heat remaining 2 teaspoons oil in 12-inch nonstick or cast-iron skillet over medium-high heat until just beginning to smoke. Swirl oil to coat skillet, then arrange chicken smooth side down in skillet in single layer; cook without moving chicken, until well browned, about 3 minutes. Using tongs, flip chicken; continue to cook until second sides are well browned, about 2 minutes. Reduce heat to medium and continue to cook, turning chicken once or twice, until chicken is no longer pink when cut into with paring knife or instant-read thermometer inserted in thickest part registers 160 degrees, 3 to 5 minutes longer. Transfer chicken to large plate and let rest 5 minutes.
  5. While chicken is cooking, place baking sheet with vegetables in oven on upper rack; place tortilla packets on lower rack. Broil vegetables until spottily charred and peppers are crisp-tender, 6 to 8 minutes. Using tongs, transfer peppers to cutting board. Flip onion rounds and continue to broil until charred and tender, 2 to 4 minutes longer. Turn off broiler and remove vegetables, leaving tortillas in oven until needed.
  6. Separate onions into rings and place in medium bowl; slice bell peppers lengthwise into 1/4-inch strips and place in bowl with onions. Add 2 tablespoons reserved unused marinade to vegetables and toss well to combine. Slice chicken into 1/4-inch strips and toss with remaining 2 tablespoons reserved marinade in separate bowl; arrange chicken and vegetables on large platter and serve with warmed tortillas and any additional toppings.

Monday, August 19, 2013

Black Bean & Quinoa Casserole


While I don't like eating at Mexican restaurants too much, we really like Mexican food at home (it just seems so much tastier and better for you that way!). And since I needed an idea for dinner, had some salsa in the fridge to use up, and we happened to have the rest of the ingredients on hand, a black bean-quinoa casserole was born.  A delicious black bean-quinoa casserole, I might add.

I actually wasn't planning on blogging about this (hence the picture taken after we had had dinner) but we enjoyed it so much that I had to document it! It was healthy, easy and tasty -- what more do you want in a recipe?  Of course, feel free to use different proportions (or whatever you happen to have on hand!).

Black Bean & Quinoa Casserole
Quinoa cooking instructions taken from The Kitchn

  • 3/4 cup quinoa, rinsed (rinsing helps remove the bitterness, so I highly recommend it  -- just use a fine mesh strainer)
  • 1 cup water
  • 1/2 cup chicken or vegetable broth (could also use water instead)
  • 2 cups black beans, cooked (about 1 can, rinsed and drained)
  • 1/2 tsp. ground cumin
  • 1/4 tsp. chili powder
  • 1/4 tsp. dried oregano
  • 1/2 - 1 jalapeno, minced (seeds and ribs removed)
  • 3 cups fresh spinach, chopped
  • 1 bell pepper, chopped
  • 1 garlic clove, chopped
  • 1/4 red onion, chopped
  • 1/2 cup shredded cheese (I used a combination of shredded mozzarella and shredded cheddar; also, feel free to use more or less cheese to taste)
  • 2 Tbsp cilantro, chopped
  • Toppings (optional): salsa (could be homemade), guacamole (could be homemade), plain yogurt (could be homemade); even tortilla chips would be great!


  1. Quinoa cooks very well in a rice cooker -- just toss in the rinsed quinoa with the water, broth and a pinch of salt and you're good to go! If you don't have a rice cooker, add quinoa, broth, water and a pinch of salt in  a saucepan, cover, and bring to a boil.  Once boiling, turn heat down to the lowest setting. Cook for 15 minutes.  After 15 minutes, turn off the heat and remove the pot from the burner. Let stand for 5 minutes, covered.  (Feel free to chop vegetables and preheat oven while quinoa is cooking.)
  2. Preheat oven to 375.
  3. Once quinoa is cooked, in an 8x8 baking dish (you could also use a 9x13 dish), combine all ingredients except cheese and cilantro.  Let bake for 15 minutes, then top with cheese and bake an additional 5 minutes until cheese is melted.  Top with cilantro.
  4. Serve with salsa, guacamole and/or plain yogurt, as desired.

Friday, August 10, 2012

Easy Guacamole Recipe


I've always been rather picky about my guacamole.  I find it is usually sub-par in restaurants (does it just taste off to you, too?) and I can't say I've ever used a pack of the green goo they sell in stores.  But for years, my husband and I used a guacamole spice packet -- you just drop the packet into a bowl, mash it with an avocado, add a few more ingredients (like cilantro) and voila, semi-homemade guacamole.  While we really enjoyed that, I finally decided to try a homemade guac recipe.  I had seen quite a few fancier guacamole recipes (pineapple guac, anyone?) but I was on the lookout for a great, basic guacamole.

Truth be told, this recipe is just about as simple as adding a packet.  There is a little more chopping involved but not surprisingly, this recipe tastes so much fresher than our packaged counterpart.  It's cheaper than buying a packet each time and I love that I now know exactly what goes into our guac! 

Considering that guacamole is pretty much mandatory whenever we have Mexican, I've made this about half a dozen times so far and loved it each time. Maybe we'll use a packet in a pinch but this is definitely our go-to recipe. 

Easy Guacamole Recipe
Taken from: Alton Brown
  • 1 Haas avocado, halved, seeded and peeled
  • 1/2 lime, juiced
  • 1/4 teaspoon kosher salt
  • 1/4 teaspoon ground cumin
  • 1/8 teaspoon crushed red pepper
  • 1/4 medium onion, diced
  • 1 Roma tomatoes, seeded and diced
  • 1-2 tablespoons chopped cilantro
  • 1 clove garlic, minced
  1. In a large bowl place the scooped avocado pulp and lime juice, toss to coat. Using a potato masher, add the salt, cumin, and crushed red pepper and mash to the consistency you like (we like a bit chunkier guac).  Then, fold in the onions, tomatoes, cilantro, and garlic. Add more spices or salt to taste. Cover and let sit until ready to serve -- I let it sit in the fridge although Alton Brown recommends at room temperature; also, most people say to let sit for at least 30 minutes before serving but I'm sure it'll still taste delicious if you serve it right away!

Friday, June 1, 2012

Tacos with Tangy Cilantro Chicken


So this is the first time that I've opened my blog in about a week.  A little disgraceful, especially considering we've been around for the most part.  But I'm back with a taco recipe!

I think this was only my second time using tomatillos in a recipe (I don't know what took me so long considering I really liked these enchiladas verde!).  There was a nice smokiness to the dish and I really liked that since you cooked the chicken in the sauce, the chicken comes out nice and juicy.  There was a little bit of heat from the jalapeno - if you want more, increase the amount of jalapeno (or serrano chile) and if you want a milder dish, let the chile out altogether. 

Finally, while this wasn't quite a 30-minute meal, it still was pretty quick and easy (I had the timer on for a different reason so it took almost exactly 40 minutes).  There's not a lot of chopping to do and about half of that time is hands-off as the chicken simmers on the stove. 
Tangy Cilantro Chicken Tacos
Taken from: Everyday Food Magazine, June 2012
Serves 4-5
  • 1 - 1 1/2 pounds boneless, skinless chicken thighs, quartered (I used chicken breasts instead)
  • 2 tablespoons canola oil
  • 1 medium white onion, diced small
  • 1 1/4 teaspoons ground cumin
  • Optional: 1 serrano chile, diced small (I used 1/2 of a jalapeno instead, seeds and ribs removed)
  • 1/2 pound tomatillos, diced large
  • 1 - 1 1/2 cups water
  • 3/4 cup roughly chopped fresh cilantro
  • 12 tortillas (they suggest hard tacos but we prefer soft homemade flour tortillas)
  • 1/2 - 1 1/2 cups shredded Monterey Jack cheese (we used a combination of sharp cheddar and mozzarella)
  • 2 cups shredded romaine lettuce
  • Additional add-ins: chopped bell peppers, salsa, plain Greek yogurt, etc
  1. Pat chicken dry with paper towels and season with salt and pepper.  In a large heavy pot, heat oil over medium-high heat.  
  2. Add chicken to pot and cook, stirring occasionally, for about 5 minutes.  Add onions, cumin and chile, and cook 3 minutes.
  3. Add tomatillos and 1 cup water, scraping up any browned bits with a wooden spoon.
  4. Bring to a rapid simmer and cook, stirring occasionally, until mixture is thick and meat can be shredded with a fork, about 20-25 minutes (add up to 1/2 cup more water, if necessary).  (While the chicken simmers, you can use the time to chop the cilantro, shred lettuce, shred cheese and prepare any add-ins.)
  5. Shred chicken, add cilantro and season to taste.  Serve inside tacos with cheese, lettuce and any additional add-ins.

Thursday, March 8, 2012

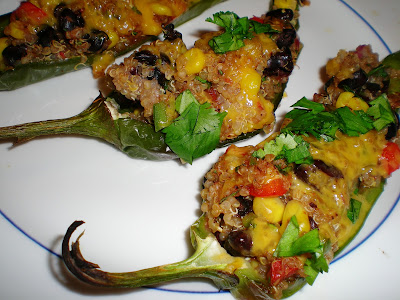
Stuffed Poblano Peppers


 I had high expectations for this dish.  Mexican is definitely a favorite in our house and I'm a fan of our stuffed bell peppers. So it seemed like a logical idea to make Mexican stuffed peppers.  And I think I ended up liking these even more than our Italian stuffed pepper recipe! The flavors melded so well together.  The melted cheddar cheese really helped to make the dish; I think the sharpness and creaminess just helped to put this over the top.

I also like that these ingredients and the amounts can be adjusted to your liking.  I'm using quinoa a LOT in our house recently and it goes perfectly in this dish.  However, you could use brown rice or some other grain you might have.  I used fire-roasted diced tomatoes but diced tomatoes with chiles or salsa would also work well.  I also didn't really measure many of the ingredients so feel free to play with the suggested amounts below!

We served this with a simple side salad.  I'm already looking forward to the leftovers!


Stuffed Poblano Peppers
Taken from: A Couple Cooks via A Hint of Honey 
Makes 12-16 stuffed pepper halves
  • 6-8 poblano peppers, halved lengthwise, seeds and ribs removed (I used anaheim peppers instead)
  • 1 cup uncooked quinoa (you could use brown rice instead)
  • 1 1/2 cups of cooked black beans (1 15-oz. can black beans, drained and rinsed)
  • 1 15-oz. can diced tomatoes with green chiles or fire-roasted diced tomatoes
  • 1 cup fresh or frozen corn kernels (optional)
  • 3 green onions, sliced (I used 1/4 cup of diced red onion instead)
  • 1 jalapeno, minced (optional)
  • 1 tsp. cumin
  • 1 tsp. chili powder
  • dash cayenne pepper
  • salt and freshly ground black pepper, to taste
  • 1/3 cup fresh cilantro, chopped + extra for garnish
  • Cheddar or any Mexican blend of cheese, shredded for topping
  • Extra add-ins: I threw in some diced green and red peppers as well
  1. Cook quinoa (or rice) according to package directions.  For quinoa, I rinse it, add 1 cup to a rice cooker and then add 2 cups of water. 
  2. While the quinoa cooks, prepare the peppers: slice them in half and remove the seeds and ribs (be careful when handling the seeds and ribs -- wear gloves if necessary).
  3. Broil Method: Place the peppers in a baking dish skin side up. Broil about 5-7 minutes, then flip the peppers and broil 4-7 minutes more. (There are also an oven cooking method and a grilling method below.)
  4. In a large bowl, toss to combine cooked rice, beans, tomatoes, corn (optional), onion, jalapeno (optional), cumin, chili powder, cayenne and cilantro. Season to taste with salt and freshly ground black pepper. 
  5. Heat the filling a few minutes in the microwave (or on the stove) until warm, depending on the heat of the rice.  Stuff peppers with the filling.
  6. Place the pepper halves skin side down in a baking dish, and spoon the filing into each half. Top with shredded cheese and broil until the cheese is melted, for about 1 1/2 to 2 minutes.  (Can keep warm in a 350 degree oven for a few minutes until serving.)
  7. If desired, garnish with chopped cilantro and serve with sour cream or nonfat yogurt.
Alternative Oven Method: Preheat oven to 400 F.  Prepare the peppers (slice in half and remove seeds and ribs).  Follow Step 4 by mixing all other ingredients together.  Fill peppers and bake until peppers are tender and browned, about 25-30 minutes.  During last 5 minutes of cooking, top with cheese and finish cooking.
Grilling method: Preheat grill to medium-high heat. Grill peppers until tender and charred on the bottom. Top with cheese several minutes before they are done grilling to allow the cheese to melt. Garnish with fresh cilantro and serve.

Friday, December 16, 2011

Chickpea Tacos


I like tacos.  I'm not really exclusive - black bean, chicken, barbecoa, carnitas (have you tried these pork tinga tacos?).  We even tried lentil tacos recently.  So when I saw a recipe for chickpea tacos, I was intrigued.  And, to be honest, I might have been a little excited to find yet another vehicle for guacamole and pico de gallo.

But regardless of how tasty the guacamole, pico de gallo and nonfat yogurt were on top of the tacos, these chickpeas had a surprising amount of flavor! They're marinated in a chili powder/cumin/lime concoction and then cooked in the oven.  They ended up having a ton of flavor (I loved the marinade) and I really liked the texture - soft but still have a bit of chew to them. They are incredibly simple to throw together, although they do need about 30 minutes to marinate and 20-30 minutes to cook. 

We served these tacos with all the fixings (including homemade tortillas) and my husband's famous margaritas.They're a wonderful addition to our taco repertoire!

Chickpea Tacos
Taken from: Peas and Thank You
Makes 6-8 tacos
  • 2 teaspoons chili powder
  • 1 1/2 teaspoons ground cumin
  • 1/4 teaspoon garlic powder
  • 1/4 teaspoon onion powder
  • 1/4 teaspoon dried oregano
  • 1 teaspoon sea salt
  • 1 tablespoon lime juice
  • 2 tablespoons water
  • One 14 oz. can of chickpeas, drained and rinsed (or approx. 1 1/2 cups of cooked chickpeas)
  • 6-8 flour or corn tortillas
  • Taco trimmings: shredded cabbage or lettuce, tomato, guacamole, salsa or pico de gallo, plain yogurt or sour cream, cheese, etc.
  1. Preheat oven to 375 degrees. In a large bowl, combine chili powder, garlic powder, onion powder, oregano, cumin, salt, lime juice and water.
  2. Add chickpeas and marinate for at least 30 minutes.
  3. Place chickpeas on a baking sheet that has been sprayed with cooking spray.
  4. Bake for 20-30 minutes, stirring once during cooking, until chickpeas are slightly crispy.
  5. Prepare taco shells according to package directions. Fill with chickpeas and desired toppings.

Thursday, December 8, 2011

Chicken Enchiladas


There are quite a few Mexican posts on this blog.  In fact, this is my third enchilada post (actually, fourth if you count this deconstructed enchilada dish)! While we love the other enchilada recipes, this one is such a classic recipe of chicken enchiladas in red sauce that I had to include it.  Several months ago, I bought red enchilada sauce but it was so spicy and odd tasting that I ended up throwing it out (even though I hate wasting food). The homemade sauce in this recipe is nothing like that that -- it's delicious and easy to tailor the amount of heat to your liking.  The chicken is cooked in the sauce and then shredded which makes it moist and flavorful (I also threw in frozen chicken since I forgot to thaw it beforehand and it worked perfectly!). 

All together, there are a few steps to making this so it isn't a quick weeknight meal (although I suspect that you could split up the tasks).  However, it's worth it if you have a little time on your hands!  We served this with some slow cooker black beans and a salad.

Chicken Enchiladas
Taken from: Annie's Eats
Serves 4-6
  • 1 medium onion, chopped fine
  • 1-2 jalapenos, seeded and chopped fine (I only used one and it was mild)
  • 1 tsp. canola oil
  • 3 cloves garlic, minced
  • 3 tbsp. chili powder
  • 2 tsp. cumin
  • 1 tbsp. sugar
  • 1 (15 oz.) can tomato sauce (I used a 15 oz can of whole peeled tomatoes instead of the tomato sauce and chopped tomato)
  • 1 tomato, seeded and chopped (I omitted)
  • 1 cup water
  • Salt and pepper
  • 1 lb. boneless, skinless chicken breasts
  • 1 cup shredded sharp cheddar cheese, divided
  • 1 cup shredded monterey jack cheese, divided (I used part-skim mozzarella instead)
  • ½ cup minced fresh cilantro
  • 12 (6-inch) soft corn tortillas (I used homemade flour tortillas instead)
  • Cooking spray
  1. Combine the onion, jalapeno and oil in a large saucepan over medium heat.  Cook, stirring often, until the onions and peppers have softened, 8-10 minutes.  Stir in the garlic, chili powder, cumin and sugar, and cook just until fragrant, less than 30 seconds.  Mix in the tomato sauce, water, and chopped tomato.  Bring the sauce to a simmer, lower the heat and cook until slightly thickened, about 5 minutes.
  2. Nestle the chicken into the sauce.  Reduce the heat to low, cover and cook until the chicken is completely cooked through (160˚ F on an instant-read thermometer), about 12-20 minutes (I stuck my chicken in frozen so it took a few more minutes to cook all the way through).  Transfer the chicken to a plate and set aside to cool.
  3. Strain the sauce through a large mesh strainer into a medium bowl, pressing down on the onions and tomatoes to extract as much liquid as possible.  Transfer the reserved solids to a large bowl and set aside.  Season the sauce with additional salt and pepper to taste.
  4. Shred the chicken into bite size pieces and add to the bowl with the onion mixture.  Add in ¼ cup of the enchilada sauce, ½ cup of each of the shredded cheeses, and the cilantro.  Stir to combine.
  5. Preheat the oven to 425˚ F.  Oil a 9 x 13″ baking dish with cooking spray.  Stack the tortillas on a plate, cover with plastic wrap, and microwave for 40-60 seconds, until warm and pliable.  Spoon 1/3 cup of the chicken mixture evenly down the center of a tortilla.  Roll up the tortilla around the filling tightly, and place in the prepared baking dish, seam-side down.  Repeat with the remaining filling and tortillas.
  6. Lightly spray the tops of the enchiladas with cooking spray.  Place in the oven, uncovered, for 7 minutes or until the tortillas start to brown slightly.
  7. Reduce the oven temperature to 400˚ F.  Remove the enchiladas from the oven and pour the sauce oven the top.  Sprinkle with the remaining shredded cheese.  Cover the dish with foil and bake for 20 minutes.
  8. Remove the foil and bake for 5 more minutes, until the cheese is browned.  Remove from the oven and let stand 10 minutes before serving.

Wednesday, June 22, 2011

Portobello & Caramelized Onion Quesadillas

I dislike disliking foods.  And by that, I mean real foods, of course.  I'm not talking about my goal of never having a Twinkie pass my lips because Twinkies are simply not "real" food in my book.  I'm talking about my dislike for mushrooms and fresh tomatoes (although perhaps that's just a rule for grocery store tomatoes because farm or garden fresh tomatoes are so much better!).  But I'm trying to break out of that rut -- I've been able to sneak mushrooms into dishes and I recently made grilled portobello mushroom paninis (with mozzarella, basil pesto and roasted red peppers.  Highly recommended!). This week, we continued to break my dislike by having portobello and caramelized onion quesadillas.

These quesadillas originally called for brie cheese, and while that would have been delicious, I didn't have any on hand (I have a fridge that needs to be eaten down before our move).  So I opted to make these quesadillas more Mexican-infused by substituting cheddar cheese and serving it with refried black beans, homemade salsa, homemade guacamole and nonfat yogurt.  This was a great, easy meatless meal for us.  I cooked the caramelized onions the night before so I loved being able to throw everything in a skillet and have a quick dinner at the end of a long week.

Portobello & Caramelized Onion Quesadillas
Taken from: A Hint of Honey
Serves 3-4
  • 1 large onion, thinly sliced
  • 2 Tbsp. extra virgin olive oil, divided
  • salt and freshly ground black pepper, to taste
  • 2 large cloves of garlic, minced
  • 6 oz. portobello mushrooms (about 2 large), stems and gills removed and sliced
  • 1 Tbsp. balsamic vinegar (I substituted 1 Tbsp. lime juice to keep with Mexican flavors for this dish)
  • handful or two fresh spinach, chopped
  • 2 large whole wheat tortillas
  • brie, thinly sliced (I substituted shredded cheddar cheese)
  1. Can be done up to 2 days before: To caramelize onions, heat 1 Tbsp. olive oil in a large skillet over medium heat. Add onion and season with salt and pepper. Cook, stirring frequently, until soft and caramelized, 25-35 minutes. (Reduce heat as necessary to prevent onions from browning too quickly.)
  2. Meanwhile, heat 1 Tbsp. olive oil in a second large skillet over medium heat. Add garlic and cook 1 minute. Add mushrooms and season with salt and pepper. Stir in the balsamic vinegar or lime juice. Cover and cook, stirring occasionally, until mushrooms are tender. Stir in the spinach and cook until wilted. Season to taste with salt and pepper.
  3. Wipe out skillet with a wad of paper towels and then heat again over medium heat. Place the tortillas on the skillet and top half of each of the tortillas with thinly sliced brie or shredded cheddar, half of the caramelized onions, and half of the mushroom-spinach mixture. Fold over the second half of the tortillas. Cook, flipping halfway through, until the cheese is melted and the tortillas are golden brown. Slice and serve.

Saturday, May 7, 2011

Cilantro Lime Rice

I have to admit, Cinco de Mayo is a favorite of mine.  It's not really celebrated by anyone in Mexico (their independence day is actually September 16) so I don't feel bad about making this day completely revolve around Mexican foods and drinks.

Well this year, I got a little carried away.  For dinner, we had slow-cooked barbacoa beef, cilantro lime rice, pinto beans, homemade mango salsa, homemade restaurant-style salsa, guacamole, tortillas, and chopped vegetables.  When there's only two of us, that makes for enough leftovers to feed a small army.  However, of all the different dishes we had on Thursday night, I believe the cilantro lime rice was my favorite (although with my husband's guac, it was a close call).

I almost always buy brown rice because of the higher nutrition content but this time, it was so, so worth it to have white rice.   The recipe is very simple, too.  A little chopping of cilantro, a squeeze of lime and a few teaspoons of canola oil really sets it apart from plain ol' white rice.  Bryant gave it the highest of compliments when he said that it tastes like Chipotle's rice (indeed, the recipe was branded as a knock-off of their rice!).  Although we had this as a filling for our burritos, it was also delicious on its own as a side dish.

Cilantro Lime Rice
Taken from: Gina's Skinny Kitchen
Serves 4
  • 1 cup extra long grain white rice or basmati rice
  • juice of 1/2 lime
  • 2 cups water
  • 1 tsp salt
  • 3 tbsp fresh chopped cilantro
  • 3 tsp vegetable oil
  1. In a small heavy pot, add rice, water, 1 tsp oil and salt. Boil on high until most of the water evaporates. When the water just skims the top of the rice, reduce to low and cover about 15 minutes. Shut off flame and keep covered an additional 5 minutes.
  2. Add chopped cilantro, lime juice, and remaining oil to the pot and toss until completely mixed. Serve as a side dish or as a filling for burritos.

Saturday, April 2, 2011

Slow Cooker Pork Tinga Tacos

I happen to love my slow cooker.  It was such a great wedding gift -- I just love the idea of throwing things in a pot, going to work and then coming home to a complete meal.  Who wouldn't want that? So when I found this slow-cooker taco recipe, I couldn't wait to try it!  

This was a huge success, too! I only had pork tenderloin in our freezer instead of pork shoulder so I just cut down on the cooking time dramatically and it ended up being perfect - not too dry, which is usually the problem with using a lean cut of meat. The meat was so easy to shred with two forks.  I think one of my favorite things was that usually after work, my mind goes straight to cooking.  But for this meal, I threw it in the slow cooker at lunch time and forgot about it, had a great coffee date with Bryant after work and was still able to have dinner on the table within minutes of coming home.

We thought these tacos did have quite a bit of heat (even after removing most of the seeds in the chile); the avocado helps cool it down but I cooled it a bit further with some nonfat yogurt.  We served it with some homemade refried beans on the side to round out an easy weeknight meal.

Smoky Pork Tinga Tacos
Taken from: Elly Says Opa via Mexican Everyday by Rick Bayless
  • 1 lb. redskin or Yukon Gold potatoes, cut into 1/2″ cubes
  • 2 lbs. boneless pork shoulder, cut into 1″ pieces OR 1 1/2 lbs pork tenderloin, fat removed
  • 1 (28 oz.) can diced tomatoes (preferably fire-roasted), including juice
  • 3-4 chipotles in adobo, sliced (remove seeds for a milder dish)
  • 1 Tbsp. adobo sauce
  • 1 Tbsp. Worcestershire sauce
  • 2 tsp. dried oregano
  • 4 garlic cloves, minced
  • 1 medium white onion, sliced 1/4″ thick
For serving:
  • 4 oz. fresh Mexican chorizo sausage (optional)
  • 24 warm corn or whole wheat tortillas
  • 1 cup crumbled Mexican queso fresco or other fresh cheese, such as feta or goat cheese
  • 2 large avocados, diced
  • nonfat yogurt (optional)
  1. Spread the potatoes over the bottom of a slow cooker and top with the pork.
  2. In a large bowl, mix the (undrained) tomatoes with the chipotles, adobo sauce, Worcestershire, oregano, garlic, onion, and about 1 1/2 tsp. salt.  Pour the mixture evenly over the meat and potatoes.
  3. Cover and slow cook on high for 6 hours or low for 10 (if using pork tenderloin, cook on low for 5-6 hours - I had halved this recipe and the pork was perfect at 4 hours on low).
  4. When you’re ready to eat, fry the optional chorizo and then stir everything together, breaking the pork into smaller pieces (with pork tenderloin, shred with two forks).  Taste and season with additional salt if necessary.
  5. Serve with warm tortillas, cheese, avocados and optional yogurt for making soft tacos.

    Wednesday, February 23, 2011

    Enchiladas Verde

    Somehow, time has escaped me.  There was plenty of material to blog about in these past two weeks but for the lack of time (and let's face it, laziness on my part, too), I haven't written a word.

    But finally, we're back into the swing of things, enjoying the routine-ness in life. And this enchilada verde recipe is a great one to share.  I had never cooked with tomatillos before but it will definitely not be the last time. This tomatillo sauce really makes the dish but I love how distinct all the flavors are - you can really taste all the ingredients (chicken, tortillas, tomatillo salsa and cheese...how could you go wrong?) without any one ingredient overpowering the rest.

    While the preparation is pretty easy, it does take some time - 20 minutes to boil the chicken and then 20 more to bake the enchiladas.  It wasn't a quick weeknight meal but was definitely worth it.

    Enchiladas Verde
    Taken from: A Hint of Honey
    Serves: 4
    • 2 bone-in chicken breast halves (skin removed)
    • 2 cups chicken broth
    • 1/4 white onion
    • 1 clove garlic
    • 2 tsp. salt
    • 1 lb. fresh tomatillos, husks removed
    • 1 serrano pepper (substitute a jalapeno for a milder flavor)
    • 1/4 white onion
    • 1 clove garlic
    • 1 pinch salt
    • 12 corn tortillas (or use whole wheat or flour tortillas)
    • 1 cup crumbled queso fresco (I substituted a combination of shredded cheddar and mozzarella)
    • 1/2 white onion, chopped
    • small bunch of fresh cilantro, chopped
    1. Preheat oven to 400 degrees.
    2. In a saucepan, combine chicken breast with chicken broth, one quarter onion, a clove of garlic, and 2 teaspoons salt. Boil for 20 minutes. Reserve broth, set chicken aside to cool, and discard onion and garlic. When cool enough to handle, shred chicken with your hands.
    3. While chicken is cooking, place tomatillos and serrano chiles in a pot with enough water to cover them. Boil until tomatillos turn a different shade of green (from bright green to a dull, army green). Strain tomatillos and chilis, and place in a blender with another quarter piece of onion, 1 clove garlic, and a pinch of salt. Pour in reserved chicken broth, so that liquid just covers the veggies in the blender by about an inch. Blend all ingredients until they are completely pureed. Pour salsa in a medium saucepan, and bring to a low boil.
    4. Heat tortillas until soft. In a baking dish, fill each tortilla with shredded chicken and green sauce. Roll tortilla tightly and place seam-side down. Top enchiladas with cheese and chopped onion. 
    5. Bake in oven for 15-20 minutes until cheese is melted and bubbly. Garnish with fresh chopped cilantro.

    Monday, February 7, 2011

    Spicy Bean Burritos

    I just don't get tired of Mexican.  We make it all the time here.  These spicy bean burritos were delicious, quick and great for our meatless meal of the week.  Beans have tons of protein and fiber which really makes this a satisfying meal. I will be adding this dish to our repetoire of Mexican meals!

    Of course, what we love just as much (or possibly more) than the burritos are all the toppings for it -- don't skimp on the guacamole, nonfat yogurt, homemade restaurant-style salsa, lettuce, peppers, jalapeno, cheddar cheese...whatever you love!

    Spicy Bean Burritos
    Taken from: Annie's Eats
    Serves:4
    • 2 tsp. canola or vegetable oil
    • 2 cloves garlic, minced or pressed
    • 1 tsp. chili powder
    • 1 tsp. minced chipotle in adobo sauce
    • 1 tsp. ground cumin
    • ¼ tsp. kosher salt
    • Dash cayenne pepper
    • 1/3 cup water, vegetable broth or chicken broth
    • 1 15 oz. can black beans, drained and rinsed (or 1 1/2 cups of cooked dried black beans)
    • 1 15 oz. can pinto beans, drained and rinsed (or 1 1/2 cups of cooked dried pinto beans)
    • 6 tbsp. fresh salsa

    Some suggestions for burrito fillings:
    • 6 (9- or 10-inch) flour, corn or whole wheat tortillas, warmed
    • Shredded cheese
    • guacamole
    • restaurant-style salsa
    • green, yellow and/or red bell peppers
    • diced tomatoes
    • shredded romaine lettuce
    • chopped green onions
    • nonfat yogurt
    • sliced jalapenos (for even more of a kick!)
    1. To make the bean filling, heat the oil in a skillet over medium-high heat.  Add the garlic, chili powder, chipotle, cumin, salt and cayenne; stir, cooking just until fragrant, 30-60 seconds.  Add the beans and the water or broth to the pan.  Bring the mixture to a boil.  Reduce the heat to medium-low and allow the mixture to simmer for 10 minutes.  Remove the skillet from the heat, stir in the salsa and mash the mixture with a spoon or fork.
    2. Spoon about a third of a cup of the bean mixture down the center of each tortilla.  Top each bean serving with toppings of your choice.  Roll the tortilla up tightly, burrito style, and serve immediately.

      Sunday, November 28, 2010

      Mexican Pulled Chicken & Week's Menu Plan

      Since we had Thanksgiving a little late this year so my sister could join us, I was able to use Thursday and Friday for prepping all things Thanksgiving.  However, I had also promised to bring Bryant and his co-workers dinner for Friday.  Since I was busy making cranberry relish, sweet potato casserole, pie dough, gravy, etc, etc, I didn't have much time to make an elaborate or complicated meal.  So I just sauteed some onions and dumped frozen chicken breast (I remove the fat and portion chicken breast before freezing it) and a few other ingredients into the slow cooker and cooked on low for 8 hours.  The result was surprisingly moist chicken that was great for burritos (and we used the leftovers in quesadillas the next day).

      I highly recommend this recipe if you have time to throw the ingredients together in the morning to make an effortless meal that night.  Plus, when you serve it tons of extras - we had lettuce, cheddar cheese, black beans, guacamole, homemade salsa, and tortillas - it not only tastes great but it also looks like you worked a lot harder than you did!

      Mexican Pulled Chicken
      Taken from: Handle the Heat (great in burritos, tacos, quesadillas, etc)
      Serves 4-6
      • 1 1/2 tablespoons olive oil
      • 1 onion, chopped
      • 1 1/2 heaping teaspoons ground cumin
      • 1 teaspoon chili powder
      • salt and pepper
      • 4 boneless, skinless chicken breasts (I used 1 1/2 pounds)
      • 1 cup salsa (homemade is better but jarred is fine for a quick dinner!)
      • 1 1/2 cups chicken stock
      • 1/2 lime, juiced
      -In a nonstick skillet, bring to a medium heat and add olive oil. Add onion, cumin, chili powder and a big pinch of salt and pepper. Cook onion, stirring regularly until it starts to soften (about 5 minutes). Add half a cup of chicken stock.
      -Add skillet mixture to slow cooker.  Add chicken, salsa and the rest of the chicken stock.  Cook on low for 6-8 hours.
      -Shred chicken in slow cooker with two forks (it should be tender enough to easily shred).  Continue cooking for 15 minutes or more or low. Add lime juice to chicken. Taste and adjust seasonings.


      Week's Menu Plan

       Monday: Grilled Mahi Mahi with Roasted Red Pepper Sauce and quinoa

      Tuesday: Thai chicken soup

      Wednesday:  turkey mole

      Thursday: Rice and Bean Casserole

      Friday: Penne with Italian sausage & bell peppers

      Saturday: ground beef wellington

      Wednesday, September 15, 2010

      Beef & Black Bean Enchiladas with Restaurant Style Salsa

      Well, I was supposed to make this enchilada recipe several weeks ago but somehow, we never got around to it. I did half of the work and then stuck it in the freezer. This made dinner last night really easy to assemble - thaw out the enchilada sauce and meat, combine with cheese, cilantro and jalapeno, then assemble. Not a bad weeknight meal plan! The meat and beans were also great in tacos so if you have the meat already cooked and simmered, it makes for an even quicker meal.

      Using ground beef and black beans instead of steak really helped to make this an economical meal. I had also stocked up on 100% vegetarian, non-antibiotic ground sirloin when it went on a big sale (and then froze it in 1/2 pound increments), making it even cheaper to make.

      This salsa recipe tastes like it came straight from a Mexican restaurant...delicious! I had halved the recipe but it still made a TON. Which is fine with me - we'll be having this salsa again and again. I still haven't quite figured out how to make "medium" salsa - taking out the seeds of the jalapeno is too mild but when I keep them in (as I did in this case), it was too hot for us! But even though I'm still figuring out the right amount of heat for us, this recipe tastes pretty auténtico to me! It's also quite easy to make -- just throw in all the ingredients to a blender.

      Beef and Black Bean Enchiladas
      Taken from: Cook's Country TV


      • 3 garlic cloves , minced
      • 3 tablespoons chili powder
      • 2 teaspoons ground coriander
      • 2 teaspoons ground cumin
      • 1 teaspoon sugar
      • ½ - 3/4 pound ground beef (preferably 85% lean or leaner)
      • 2-3 cups black beans
      • 1 tablespoon vegetable oil
      • 2 medium onions , chopped
      • 1 (15-ounce) can tomato sauce (I used fresh tomatoes pureed in the food processor)
      • ½ cup water
      • 2 cups shredded cheese (you can use part-skim mozzarella, Monterey Jack cheese, cheddar cheese or a combination)
      • 1/3 cup chopped fresh cilantro leaves
      • 1/2 jalapeno, finely chopped (remove seeds to make it milder)
      • Corn or whole wheat tortillas
      -Combine garlic, chili powder, coriander, cumin, sugar, and 1 teaspoon salt in small bowl. Heat oil in Dutch oven over medium-high heat until shimmering. Cook meat until browned (about 6 min), then drain off fat. Transfer meat to plate.
      -Add onions to pot and cook over medium heat until golden, about 5 minutes. Stir in garlic mixture and cook until fragrant, about 1 minute. Add tomato sauce and water and bring to boil. Return meat, beans and juices to pot, cover, reduce heat to low, and gently simmer, about 1 to 1 1/2 hours.
      -Strain beef mixture over medium bowl, pressing on mixture to break meat into small pieces and extract as much sauce as possible; reserve sauce. At this point, you could refrigerate the meat and sauce for up to 2 days or freeze each for up to a month.
      -Adjust oven rack to middle position and heat oven to 400 degrees.
      -Transfer meat to medium bowl and mix with 1 cup cheese, cilantro, and jalapeños.
      -Spread 3/4 cup sauce in bottom of 13 by 9-inch baking dish. Microwave 6 tortillas on plate on high power until soft, about 1 minute (if necessary). Spread 1/3 cup beef mixture down center of each tortilla, roll tortillas tightly, and set in baking pan seam side down. Repeat with remaining tortillas and beef mixture.
      -Pour remaining sauce over enchiladas and spread to coat evenly. Sprinkle remaining 1 cup cheese evenly over enchiladas, wrap with aluminum foil, and bake until heated through, 15 to 20 minutes. Remove foil and continue baking until cheese browns slightly, 5 to 10 minutes. Serve.

      Restaurant-Style Salsa
      Taken from: Good Life Eats

      • 1 - 14 ounce can Whole Tomatoes With Juice (I used 2 fresh tomatoes instead)
      • 1 - 10 ounce can Rotel Original (diced Tomatoes And Green Chilies) or Rotel Mexican (diced Tomatoes with Lime and Cilantro)
      • 1/4 medium onion, roughly chopped
      • 1 clove garlic, roughly chopped
      • 1/2 jalapeno, roughly chopped(seeds removed for milder salsa)
      • 1/8 teaspoon sugar or honey
      • 1/4 teaspoon salt
      • 1/4 teaspoon ground cumin
      • 1/4 cup cilantro
      • 1/2 lime, juiced
      -Combine tomatoes, onion, jalapeno, garlic, sugar, salt, cumin, lime juice, and cilantro in a blender or food processor. Pulse until you get the salsa to the consistency you’d like—about 5 to 15 pulses. Test seasonings and adjust as needed.
      -Refrigerate salsa for at least an hour before serving.

      Wednesday, August 25, 2010

      Portland Visit & BBQ Chicken Quesadillas

      Well, I'm back. Back from a WONDERFUL 3 days of visiting my sister in Portland and back to cooking (and writing about it!). First of all, the trip was absolutely wonderful. We had a great mix of doing things and doing nothing. Laura did tons of research on things to do in Portland so after she picked me up at the airport Saturday morning, we picked from her long list of what the area has to offer. We spent Saturday wandering Portland. This included going to brunch at a small place with made-from-scratch breakfast and a violinist who wanders in and plays during brunch hours, trying on bridesmaids dresses, buying groceries and going back to make dinner (and dessert, of course).

      After church on Sunday, we headed to Cannon Beach, a beautiful 2-hour drive from Portland. At Cannon Beach, we walked along the ocean, looked at the tidal pools and (I) slightly froze from getting ankle deep in the Pacific Ocean (needless to say, there were no swimmers in the water). Cannon Beach has these amazing 10 or 20-story high rocks jutting out of the water which have become nesting grounds for thousands of sea gulls (and apparently, feeding grounds for bald eagles). Since I'm used to East Coast beaches, I couldn't get over how the evergreens just drop off right at the beach. The Ecola State Park was a quick 5-mile drive from Cannon Beach and was beautiful - full of views and these trails that appear out of nowhere and led us down to the water. It was so beautiful that we went back to Cannon Beach for some seafood and brought it back for a picnic dinner. Monday was also tons of fun with walking the 4T trail in Portland, which takes you along the outskirts of the whole city by trail, tram, trolley and train. It was a beautiful, cloudless day and we had tons of great views of the city and Mount Hood.

      But now I'm back - happy to be back with my husband and back to my kitchen. We had BBQ chicken quesadillas for dinner last night with some (attempted) homemade whole wheat tortillas. I'm still working on the tortilla recipe but the quesadilla recipe is ready to share! It's such an easy and filling meal - the BBQ sauce makes all the difference so make sure to get a good one (we use TJ's Kansas City style but family members have given good reviews of both Stubb's and Sweet Baby Ray's sauces). Also, the chicken can be done ahead of time - I had already cooked and frozen the chicken so it was all ready to go to make this meal even quicker!

      BBQ Chicken Quesadillas
      Taken from: A Hint of Honey

      • 4 whole wheat flour tortillas (if large tortillas, only 2 are necessary)
      • 1 cup pineapple, cut into small cubes
      • 1-2 boneless, skinless chicken breast half
      • Cajun seasoning
      • 1 1/2 cups of grated cheese (mozzarella, cheddar or monteray jack are good choices)
      • 1/2 jalapeno, sliced into rounds
      • fresh cilantro, chopped
      • barbecue sauce
      -Preheat indoor grill pan to medium-high heat OR oven to 400.
      -(NOTE: This step can be done ahead of time and refrigerator or frozen until needed.) Sprinkle the chicken with Cajun seasoning, salt, and pepper and grill until the juices run clear. You can also bring water to a boil and let chicken breasts boil for approximately 10 minutes until registers at 165. Toss the chicken with Cajun seasoning and salt and pepper.
      -Let chicken rest several minutes before slicing.
      -Sprinkle half of the cheese over two tortillas. Top each with half of the grilled chicken, half of the pineapple, and half of the jalapeno rounds. Sprinkle with cilantro and top with the remaining cheese. Place the second tortillas on top (or fold over if have large tortillas).
      -Grill on preheated grill pan or panini press until the outside is crisp and the cheese has melted. You can also set your tortillas on a baking sheet and bake for several minutes in the oven. Turn on the broiler and finish off with 1-2 minutes per side until brown spots start to appear.
      -Slice and serve with BBQ sauce and, if desired, sour cream and pico de gallo.

      Thursday, July 15, 2010

      California BLT and Mexican Bean Salad

      As I sit here writing this blog, I'm currently finishing off the rest of the Mexican bean salad (well, that's only partly true...it made so much that I froze half of it! So I'm only finishing off the non-frozen portion.). We had BLTs with avocado and Mexican bean salad for dinner Tuesday night. First, I was excited to find this BLT recipe because we both LOVE avocado. Our first week in California, we consumed 4 avocados...4! Once I realized that, I tried to cut back on our intake a bit but they are so creamy and such a good source of monounsaturated fat and potassium.

      Another reason why I was excited about the BLT is that we have great homemade bread (recipe courtesy of my dad). Since we've been in California, my husband has started to get into bread baking (I obviously do not complain). He's made two batches (one whole wheat loaf bread and one whole wheat cinnamon boule), both of which have been extremely successful! He's planning to bake more this Sunday because we've already devoured all of his bread.

      So if you're going to have a recipe with only a few ingredients, they really should be high quality. With homemade bread, farmers market tomatoes and ripe avocados, it was the perfect time for this sandwich. Of course, I nixed the mayo and threw on a few Heinz Genuine dill pickles because that's just what my family does. They were great (even though I finished off half of a sandwich, I don't think one sandwich was quite enough for my husband so just a heads up).

      California BLT
      Taken from: Ina Garten
      • 4 slices of bacon
      • 4 slices of whole-wheat bread
      • 2 lettuce leaves (we like Romaine for the crunch)
      • 1 tomato, cut into 4 whole slices
      • 1 avocado, cut into 1/2 in. thick slices
      • Lemon juice
      • Salt & pepper
      • Extra toppings: mayo, dijon mustard, pickles, etc.
      -Prep all ingredients and toss avocado slices in lemon juice to prevent browning.
      -Cook bacon in frying pan over medium high heat until browned. Let drain on a plate covered with a paper towel.
      -On a baking sheet, place the 4 slices of bread and broil for 1-2 minutes until browned, checking every 20-30 seconds. Flip slices over and broil for 1 more minute.
      -On one of the slices, pile lettuce, bacon, tomato, avocado, salt and pepper and any extra toppings. Place second slice on top and serve.

      __
      I really like bean salads. They're typically fresh and it's a great way to get protein and fiber. This bean salad was no exception but a word of caution - it makes a lot of salad! I put this in a medium sized bowl and it was filled to the brim. I ended up freezing half of the bean salad (I'm not sure how well they freeze but we'll find out!) because I didn't want us to be eating beans for days (maybe weeks). At first, I thought the spices were a bit overpowering but the longer the salad sat, the better the spices melded with the dish. So if you don't like spices, go easy on the cumin and chili powder.

      Mexican Bean Salad
      Taken from: A Hint of Honey blog
      • 1 can black beans, drained and rinsed
      • 1 can kidney beans, drained and rinsed
      • 1 can canellini beans, drained and rinsed
      • 1 red bell pepper, diced
      • 1 green bell pepper, diced
      • 1/2 red onion, diced
      • 1 jalapeno, ribs and seeds removed and minced
      • 2 cloves garlic, minced
      • 1/4 cup fresh cilantro, chopped
      • 1/4 cup extra virgin olive oil
      • 1/4 cup red wine vinegar
      • 1 tsp. sugar
      • 1 Tbsp. freshly squeezed lemon juice
      • 2 Tbsp. freshly squeezed lime juice
      • 1/2 tsp. salt (adjust to taste)
      • 1/2 tsp. freshly ground black pepper (adjust to taste)
      • 1 1/2 tsp. cumin
      • 1/2 tsp. chili powder
        **You could also add avocado, corn or tomatoes.
      -In a large bowl, combine beans, bell peppers, onion, jalapeno, garlic and cilantro. In a small bowl, whisk olive oil, vinegar, sugar, lemon juice, lime juice, salt, pepper, cumin and chili powder. Add oil mixture to large bowl and toss to combine. Allow the salad to sit for a few hours to let the flavors meld together.